
Today’s DSLR cameras are amazing pieces of technology. The features and capabilities of even entry-level cameras can enable beginners to capture beautiful, professional images. Hidden inside each and every DSLR are countless features that you may not know about. Once you learn to use these features, they will become a fundamental part of your photography technique.
From help in composing and reducing post-processing time to ensuring you achieve the depth of field you want, here are some excellent features you never knew your camera was capable of.

Internal level
In landscape photography, one of the most obvious mistakes you can make is not having your horizon perfectly level. With images such as a seascape or any situation where there is a long and obvious horizon, even the slightest tilt to the horizon is very noticeable. This is the case in the photo above.
It used to require a bubble level mounted in the hot shoe on top of the camera to ensure your camera was perfectly level. But now, more and more cameras are equipped with an internal level that will make your life easier and your horizons straighter. Plus, since you no longer need a bubble level, you’ll have fewer small items to possibly lose.
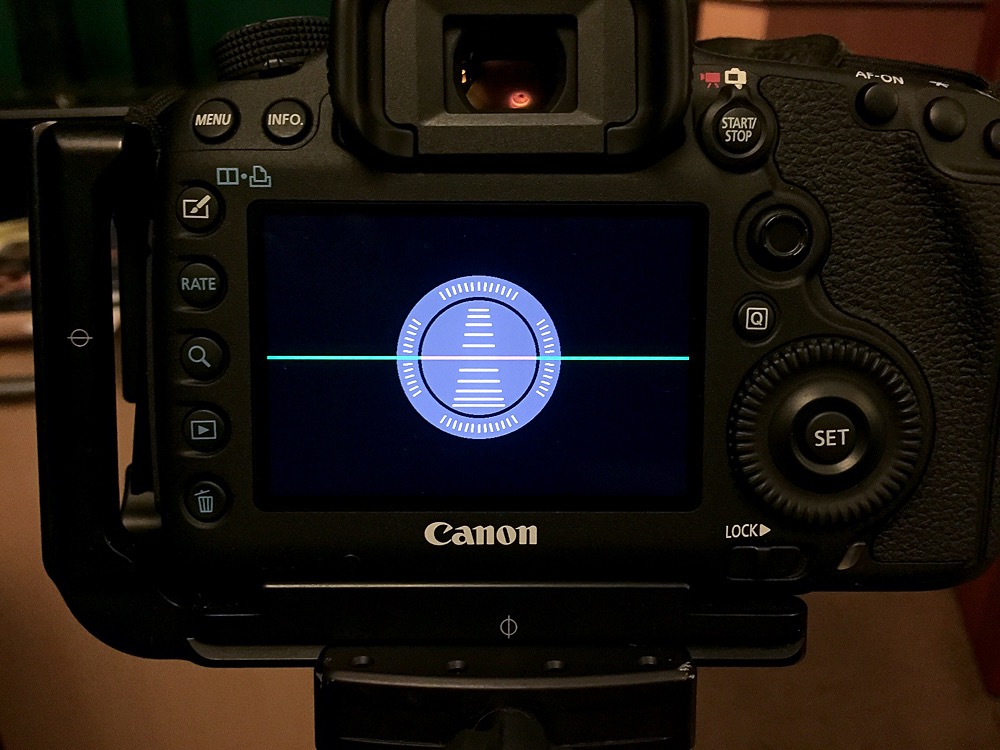
In the Canon cameras that have the internal level, you can also overlay the level on the LCD while using live view. Having the level right there on the screen while using live view to compose a photo is very handy.
Auto Exposure Bracketing combined with high-speed drive


For capturing multiple exposures to be used in exposure blending or HDR, you can manually alter the exposure between shots or you can use Auto Exposure Bracketing (AEB). When using AEB, you can capture a series of shots from three to nine exposures, depending on camera model, where each exposure is set to capture the scene from darkest to lightest.
These shots can be blended using Photoshop or a dedicated HDR program like Nik’s HDR Efex Pro to create an image with more dynamic range than the camera can capture in a single exposure. While many photographers know about Auto Exposure Bracketing, did you know that you can speed things up by using AEB in conjunction with high-speed drive?
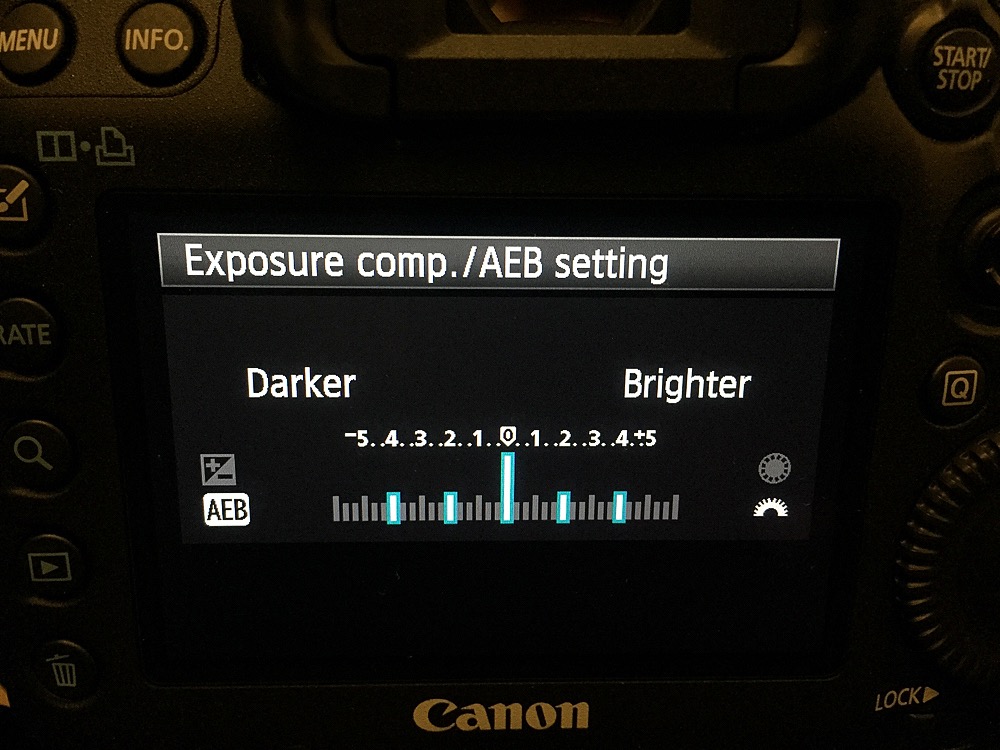
Normally, when you set your camera for Auto Exposure Bracketing, you also have to press the shutter button for each exposure in the bracketed sequence. If you set your camera to high-speed drive or burst mode, you can press and hold the shutter button and the camera will rapidly fire off the entire sequence of photos.
I’ve found this to be extremely helpful in when photographing movement such as wind-blown clouds in the scene. This was the case in the above series of photos captured one stop apart from two stops underexposed to two stops over exposed. I also use this function on the rare occasion I shoot hand-held HDR. It helps to minimize camera movement in the event you don’t have a remote shutter release.

This is the result of blending the five bracketed images above, processed in Lightroom using the new Merge To HDR feature.
Depth of field preview
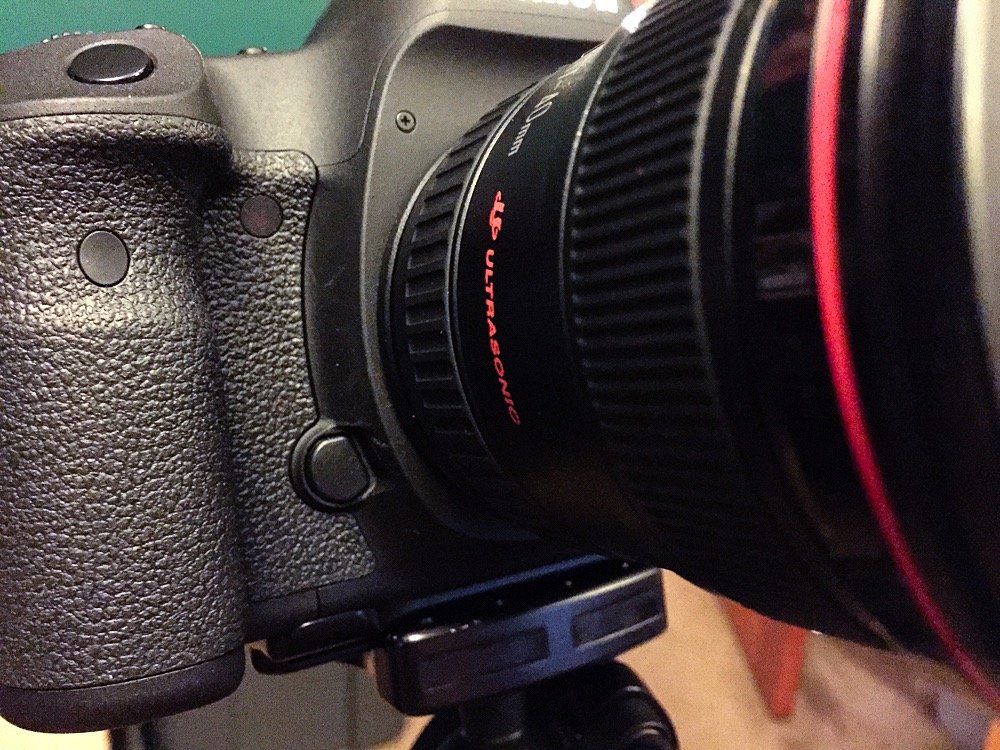
Each and every DSLR — at least all of the ones I’ve ever seen — have a small button on the front of the camera, usually down below the lens mount. It seems most new photographers haven’t got a clue as to what it does. That little mystery button is the depth of field, or DOF, preview button. But what does it do?
In short, it helps ensure that when shooting photos like the one of the garden above, you have sufficient depth of field to capture the entire image in focus from background. In this case, that’s from the brick pathway in the foreground to the white picket fence on the far side of the garden.
When you look through your viewfinder, you’re seeing the scene through the widest aperture your lens is capable of. Therefore, you really can’t judge whether you’ve focused in the correct spot to maximize your depth of field. The DOF preview button does stops the lens at the shooting aperture you set in the camera, allowing you to judge DOF better.
But there’s a catch: Because it stops the lens down to the shooting aperture, the view through the viewfinder gets dark, making it hard to judge sharpness. This is why I highly recommend using the DOF preview in conjunction with live view. Assuming you have live view set to show exposure simulation (some cameras may have this feature as a default), the image on the LCD will automatically brighten so you can see the effect of the lens stopping down more easily.
When using the DOF preview, if you find an area in the foreground that isn’t quite as in focus as you’d like, you can then readjust your focus point or use a smaller aperture to give you more depth of field.
Share tips, start a discussion or ask one of our experts or other students a question.
No Responses to “My Camera Can Do What?! 3 Camera Functions Every Photographer Should Use”