
Clasped weft weaving is a weaving technique that I can’t get enough of. You can do it on a simple loom and its design potential keeps everyone happy. This post will give you some tips for maximum delight in creating high impact designs with clasped weft weaving.

Why weave with this technique?
Clasped weft is really interlocking two threads in an open shed to produce two colors or textures in the one row of weaving. That’s two colors in one rhythmical motion. The special point is where the threads hold to each other. This is the point where you can direct the design, placing the changing color line wherever you like. Every row builds your pattern on this placement, leading to easy-to-weave, high-impact designs.
Prepare your yarns
For this simplest rendition of the clasped weft weaving technique you need two yarns. For a first, try to use two smooth, un-hairy yarns in two colors. One yarn will be wound onto your shuttle/bobbin. The other needs to be in a free running, non-tangly yarn package. This is important, especially with finer yarns. No balls of yarn running around the room getting stuck on everything. Use a cone of yarn, center pull yarn ball that works or a wound bobbin placed in a boat shuttle on the ground. It helps to place your second yarn on the ground as the yarn runs freely upwards to the loom. If you can’t do this, just make sure plenty of yarn is freely available when you grab the yarn each row.
This technique also doubles the yarn in each row. Good for using up that finer yarn in your stash that you couldn’t find a project for.
First setup row
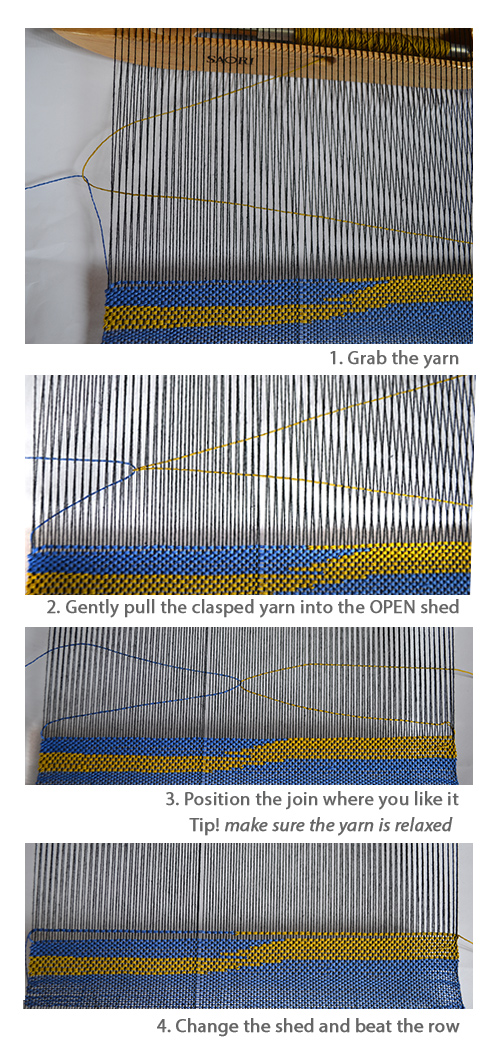
Begin weaving your first row with your shuttle. When you get to the opposite side, “grab” the second yarn that you placed on the floor by going under and over it and drag it back into the same open shed, returning to the side you started the row with. Keep dragging the clasp point where the two yarns lock together so it is positioned just where you want it. When you’re happy with the placement change your shed and beat.
Tips to make wonderful cloth
You may find this technique tends to pull edges in. Don’t stress — this is an easy fix. When you are positioning the yarns make sure they are relaxed — no tension at all! Similar to the placement in Step 3. Think of clouds ( I mean real ones) when you’re weaving!
Building woven designs
Keep changing the position of where the yarns meet on every row. You can easily build pattern with a free in-situ approach. However simple pattern ideas are everywhere once you get into the clasped weft weaving technique. Just changing the second color to the other side of the weaving every so often will get you started. Then try some of the ideas here or below. The beauty of this technique is not only the range of designs but the way you can interpret them with different textures or colors.
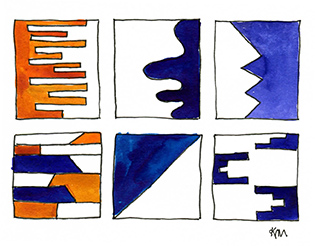
Design ideas for clasped weft weaving
Just got a saori loom so will definitely be doing lots of this!
Love & would love more on Saori loom & weaving & tapestry .
Thank you for making this simple to understand.