Embroidering on crochet is a wonderful way to add interest to a project, and there are countless creative options for crochet embroidery.
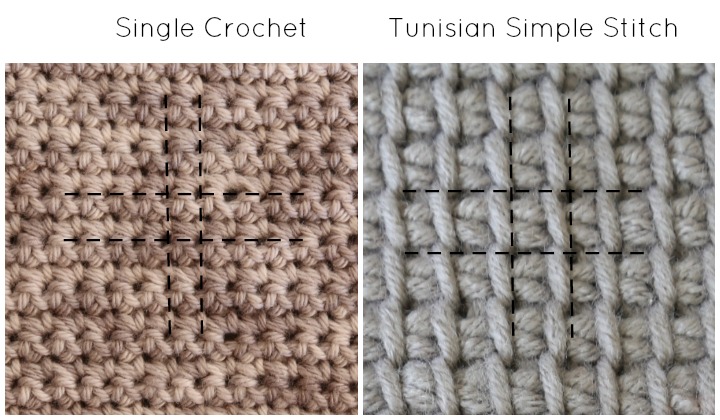
Although you can embroider on any crochet fabric, single crochet and Tunisian simple stitch make for the best canvas. These stitches create a “grid” with squares that are simple to embroider on.
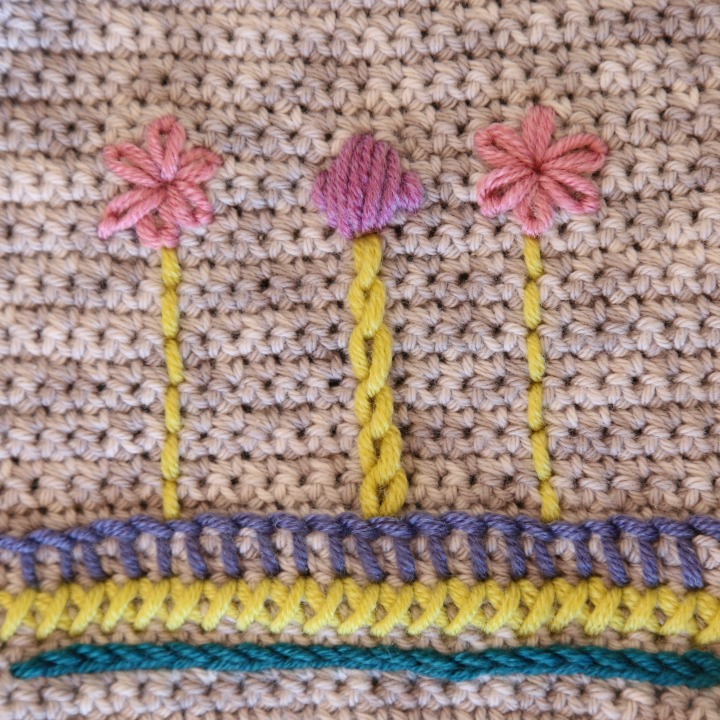
Today, we’ll look at 7 common embroidery stitches.
If you’d like to learn about more embroidery stitches, check out this popular tutorial on the Craftsy Embroidery Blog.
Before we dive into the tutorials, there are a few tips you should keep in mind:
- When using Tunisian simple stitches, work into every row and stitch. When working into single crochet stitches (as in this tutorial), work into every stitch and every second row.
- Work into the holes formed between stitches — not into the strands of yarn. Splitting the yarn will result in untidy stitches.
- Be aware of the back of the fabric if it will be visible. If the back of the work will be hidden, the tidiness doesn’t matter much. Either way, pay attention to how you weave in your yarn ends. It’s neater to work them into the crochet stitches, not just the embroidery stitches.
- I find it more comfortable to hold my fabric sideways rather than the right way up, because it is easier to insert your needle from right to left instead of from the top to the bottom. For that reason, I am demonstrating the majority of the stitches below with the fabric shown sideways.
Let’s get started on the crochet embroidery stitch tutorials!
I’m using a single crochet canvas made with Scheepjes Sunkissed and I’m embroidering with Scheepjes Merino Soft. All instructions are provided from a right-handed point of view, so you will need to swap “left” and “right” if you are left-handed.
1. Surface slip stitch
This stitch is the easiest of the embroidery stitches, because it can be made with a crochet hook. If you can make a slip stitch, you already have the skills needed to make it.
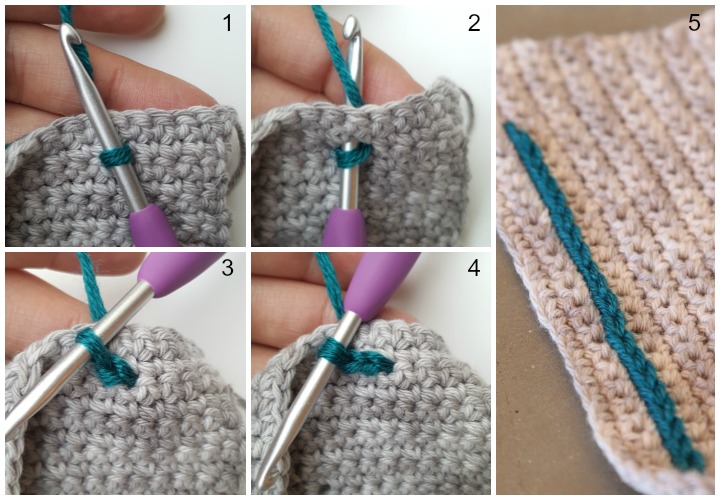
- With your embroidery yarn behind your work, insert your hook into the stitch where you wish to start. Pull up a loop.
- Insert your hook into the next stitch. Yarn over and pull the working yarn through the stitch and through the loop on your hook. That’s your first surface crochet stitch.
- Repeat Step 2 until you have made all the required surface slip stitches.
2. Cross stitch
The cross stitch is easy and visually effective! To make the cross stitch, you need to work into a grid. You’ll first create a row of “back slashes” and then you’ll double back and make “forward slashes” over the “back slashes” to make an X.
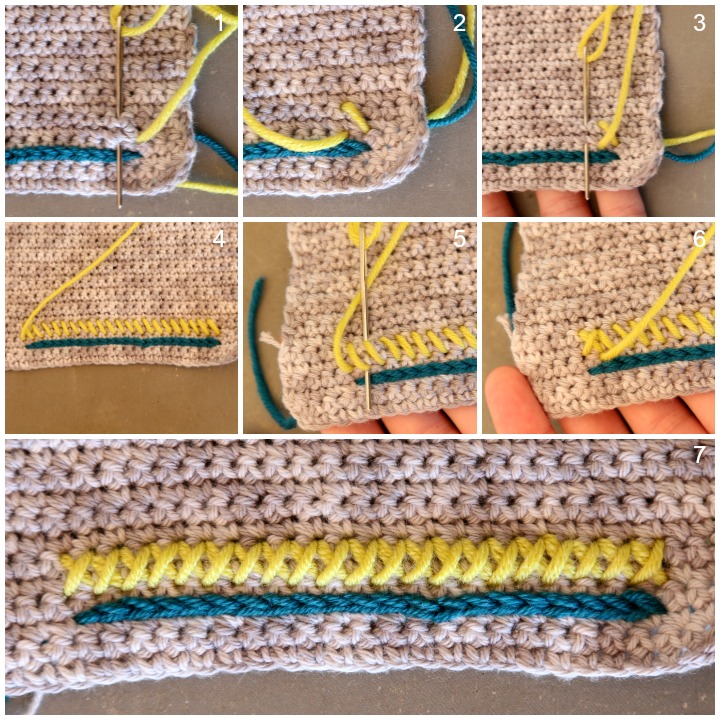
- Join your yarn by inserting your needle from back to front into the bottom right corner of the design you wish to embroider. Leave a 3” tail.
- Then, insert your needle from front to back into the stitch 2 rows up and 1 stitch to the left of where you joined your yarn. Next, insert your needle from back to front into the stitch 2 rows below where you just inserted it.
- Pull the yarn through to form your first “back slash.”
- Insert your needle from front to back into the next stitch to the left of the top of your previous “back slash,” and from back to front into the stitch 2 rows below where you just inserted it.
- Pull the yarn through to form the next “back slash.”
- Repeat steps 4 and 5 until you have made all the backslashes for that particular row.
- To complete the crosses, insert your hook from front to back into the stitch that contains the top of the second-to-last “back slash,” and from back to front into the stitch that contains the bottom of the last “back slash.”
- Pull the yarn through to form a “forward slash” over the “back slash,” completing your X.
- Repeat this step until you have completed all your cross stitches for the row.
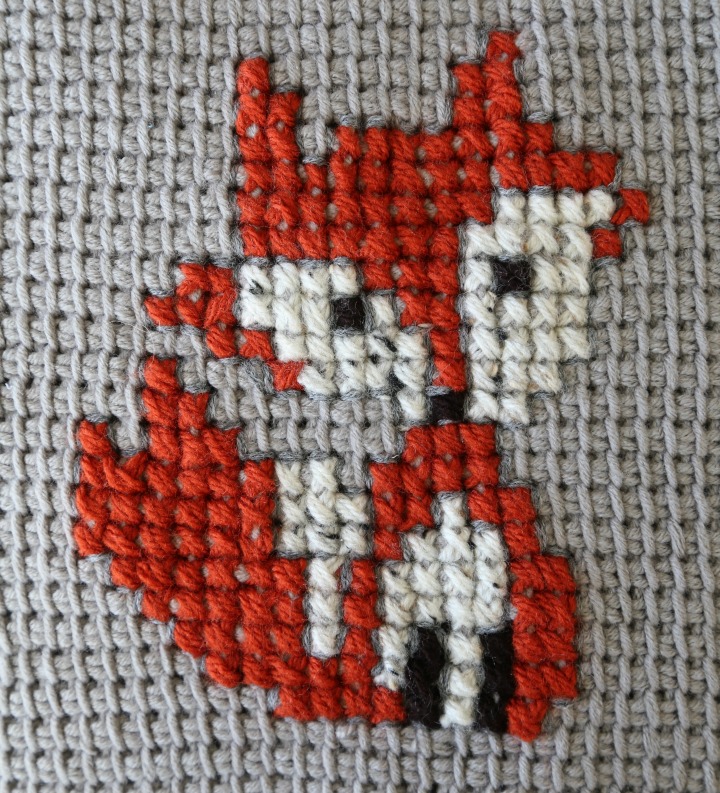
Here is an example of a cross stitch fox my mom made:
3. Blanket stitch
The blanket stitch is most often used to edge blankets, but I think it looks great as part of a design or picture.
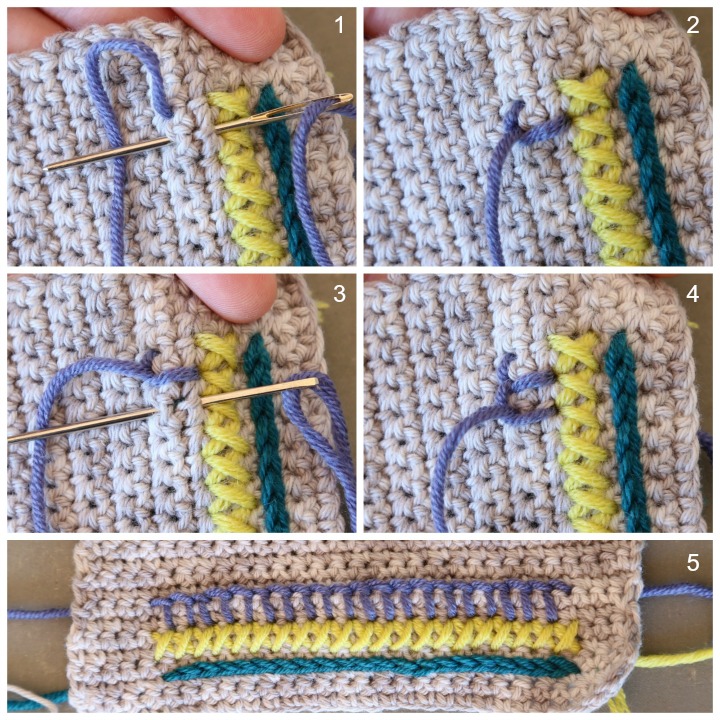
- Join your yarn by inserting your needle from back to front into the top right corner of the grid square you wish to start in. Leave a 3” tail. Turn your work so that you are working toward yourself. Working like this, the top of the blanket stitches will be on your left.
- Insert your needle from front to back into the stitch 2 rows down and 1 stitch to the left of where you joined your yarn. Insert your needle from back to front into the stitch 2 rows above where you just inserted it, making sure that your needle is on top of your working yarn. This will create the loop that forms the top of the blanket stitch.
- Pull your yarn through so that it catches the working yarn to create your first blanket stitch.
- Insert your needle from front to back into the stitch to the left of the bottom of the “leg” you just made. Insert your needle from back to front into the stitch 2 rows above where you just inserted it, making sure that your needle is on top of your working yarn again.
- Pull your yarn through so that it catches the working yarn to create your next blanket stitch.
- Repeat steps 4 and 5 until you have made as many blanket stitches as you want.
4. Backstitch
You know the saying “two steps forward, one step back”? That’s the idea behind the he backstitch — but it goes one step back and then two steps forward. This creates a clean dotted line.
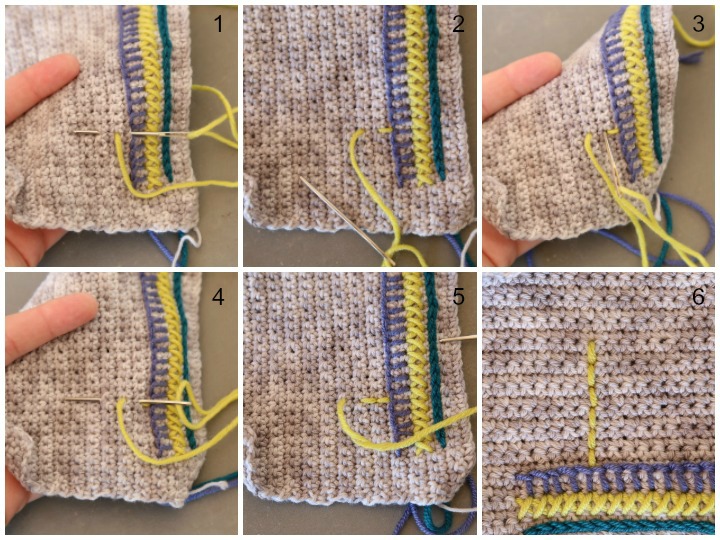
- Join your yarn by inserting your needle from back to front into the row one row up from where you wish to start. Leave a a 3” tail. Turn your work so that you are working from right to left.
- Insert your needle from front to back into the row below where you joined your yarn, and from back to front into the row above where you joined your yarn (one step back, 2 steps forward).
- Pull your yarn through to create your first stitch.
- Insert your needle from front to back into the row below the stitch you just worked into (which will be the top of the stitch you just created).
- Insert your needle from back to front into the row 2 rows above where you just inserted your needle.
- Pull your yarn through to create your next stitch.
- Repeat steps 4 to 6 until you have made all but the last stitch. To create the last stitch, insert your needle from front to back into the row below the stitch you just worked into (which will be the top of the stitch you just created). Pull your yarn through to the back of your work.
5. Chain stitch
The chain stitch is similar to the surface slip stitch, but it is created by using a needle.
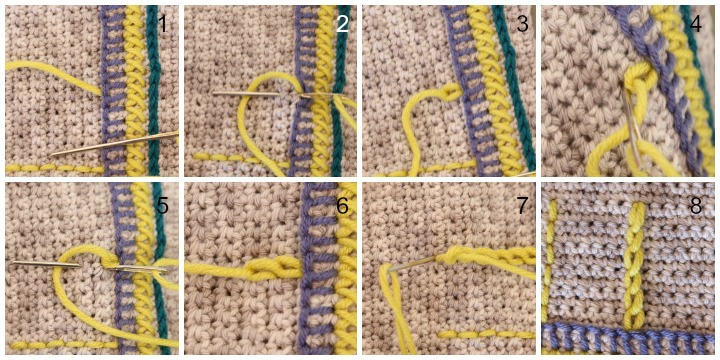
- Join your yarn by inserting your needle from back to front into the row where you wish to start. Leave a 3″ tail.
- Insert your needle from front to back into the same stitch, and from back to front into the stitch 2 rows up, making sure that your needle is on top of your working yarn as this will create the loop that forms the chain stitch.
- Pull your yarn through, being careful to catch the working yarn. Don’t pull too hard or you’ll lose the shape of your chain stitch.
- Insert your needle from front to back into the same stitch as the last stitch, but above the loop formed by the chain. This is a personal preference — you are welcome to insert it below the loop of the chain if you like the look more.
- Insert your needle from back to front into the stitch 2 rows above where you just inserted your needle, making sure to ‘catch’ the working yarn.
- Pull your yarn through to create your next chain stitch.
- Repeat steps 4 to 6 until you have made all the required chain stitches. To finish off, repeat step 4 and pull your yarn through to the back of your work to anchor the last chain.
6. Satin stitch
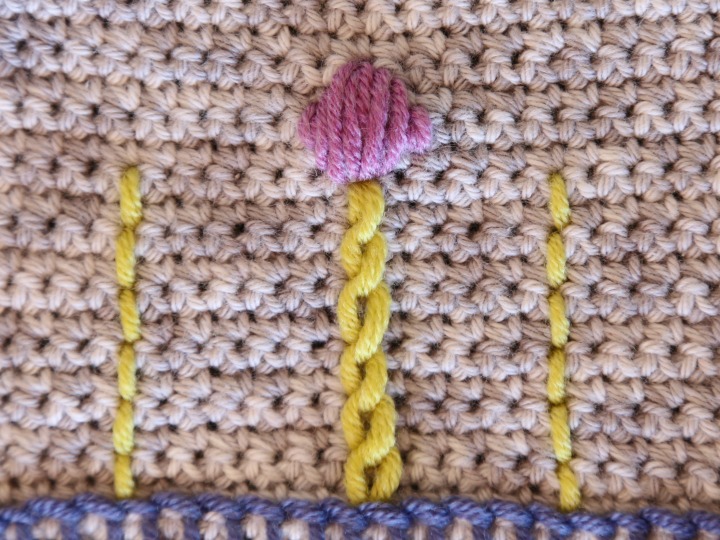
The satin stitch is brilliant for filling work. Just like coloring inside the lines, this stitch is used to add color in in embroidery. It is the only stitch where you might have to work into the strands of your yarn, not just into the holes.
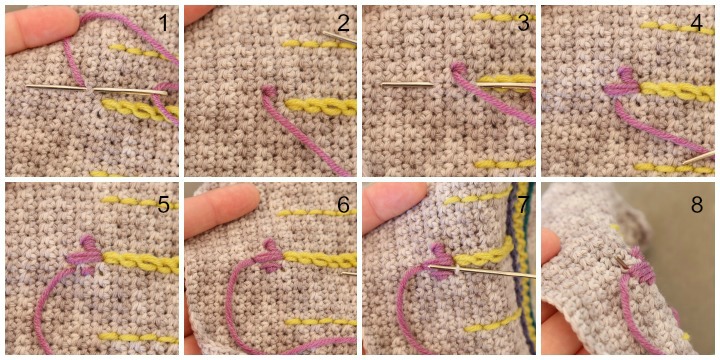
- Join your yarn by inserting your needle from back to front into the row where you wish to start. Leave a 3″ tail. Insert your needle from front to back in the row 2 rows below where you just joined your yarn, and from back to front into the same stitch as where you joined your yarn.
- Pull your yarn through and insert your hook exactly as in Step 1. Pull your yarn through again so that you end up with two stitches in tight proximity. This will plump your work out.
- Insert your needle from front to back, and then from back to front, into the next set of stitches you want to fill.
- Pull your yarn through and repeat the whole process to get a double strand again.
- Repeat Steps 3 and 4 until you reach the other side of your design.
- Double back to fill the holes in the design. Sometimes you only need to catch one loop of a stitch to create a fuller effect. Sometimes it is necessary to insert your needle between the strands of the actual yarn.
7. Laisy daisy
The Laisy Daisy is a flower created by using chain stitches. It starts from the center of the flower and each petal is created by starting in the center and creating a chain stitch outward.
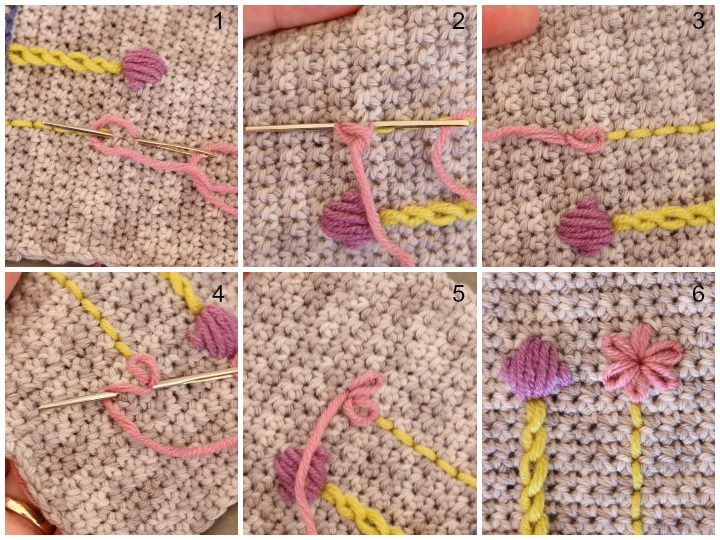
- Join your yarn by inserting your needle from back to front into the center of your flower. Leave a 3” tail. Insert your needle from front to back into the same stitch, and from back to front into any stitch/row roughly one grid space away from the center, making sure that your needle is on top of the working yarn to create a chain stitch.
- Pull your yarn through and insert your needle from front to back into the same stitch as the last stitch, but above the loop formed by the chain. Then insert it from back to front into the stitch at the base of the chain (the center of the flower).
- Pull your yarn through to complete the first petal.
- Insert your needle from front to back into the same stitch, and from back to front into any stitch/row roughly one grid space away from the centre and adjacent to the previous petal. Leave enough space so that the petals won’t be squashed. Remember that your needle should be on top of the working yarn to create a chain stitch.
- Pull your yarn through and insert your needle from front to back into the same stitch as the last stitch, but above the loop formed by the chain. Then insert it from back to front into the stitch at the base of the chain (the center of the flower). Pull your yarn through again.
- Repeat Steps 4 and 5 until you have made each petal.

Share tips, start a discussion or ask one of our experts or other students a question.
Already a member? Sign in
No Responses to “7 Decorative Stitches to Spruce Up Crochet Projects”