
There are many ways to set about designing for weaving, but one of my favorite tools is the humble yarn wrapping. It is a simple but very effective way of trying out different combinations of colors and textures.
The ingredients are very modest: a selection of yarns and a strip of stiff card, about one inch wide. It’s an excellent use for the card you often find in the packaging of shirts or bed linen. Use a craft knife to cut it into strips, which you can keep handy for whenever a weaving inspiration strikes!
The wrapping process is also straightforward. You simply take a yarn and wrap it around the card, so that it is snug enough to cover the card. You can wind a single strand or several strands together. When you want to finish using a particular yarn, cut the end and tape it down on the back of the card.
I use wrappings in several different ways and will describe three approaches here.
Narrowing down color choices
There is no substitute for sampling! But if you want to narrow down your choice of warp and weft yarns before you start, then wrapping is a great way to test color combinations.
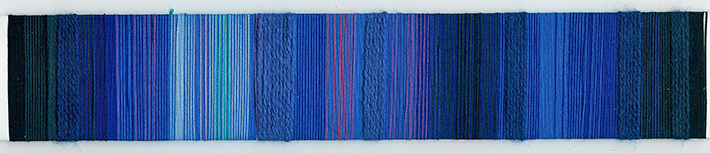
In the wrapping below, I was trying out different shades of blue, green and grey for a design which needed three colors in total. Each trio of yarns is wrapped in two ways: one has a small block of each color, and one has the colors are all wrapped together.
Wrapping two or three colors together is a good way of seeing the effect of optical blending which you will get when you use them as warp and weft.
Choosing proportions
Suppose you are planning a striped warp: how wide should the stripes be? You can use a wrapping to try out relative amounts of different colors.
In the wrapping below I wanted to try out stripes of brick, white and gold, inspired by this image of Horsey Windmill which appeared on a calendar I was given.
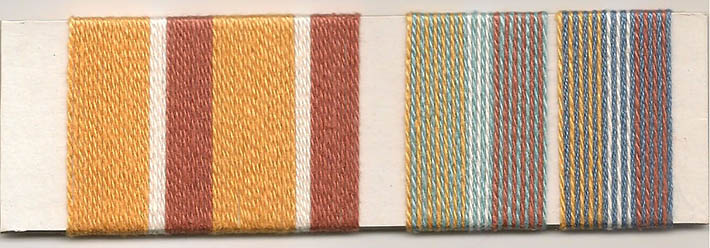
Note that the stripes do not need to be full size – what matters here are the relative quantities of the three colors.
Once I have made a wrapping which pleases me, I can measure the widths of the stripes and scale them to any size I want. In this case they turned out to be in the proportions 6 gold : 1 white : 3 brick.
Suppose that I want my narrowest (white) stripe to be half an inch wide. To get the widths of the other stripes I just need to multiply each number by ½. If I want my narrowest stripe to be two inches wide, I need to multiply each number by two, and so on. Then I will use an appropriate sett for my yarn to determine how many ends it will take to achieve a stripe of that width.
The additional wrappings at the right serve to test two different shades of blue as possible wefts by wrapping the colors together.
Creating a complete warp design
You can use a wrapping to create a complete warp design. An easy way to start is to use an image as inspiration – it could be a photo, a collage, or your own sketch. In this example I made a pastel sketch of a seashell and then based my wrapping on the color transition from purple to creamy yellow.
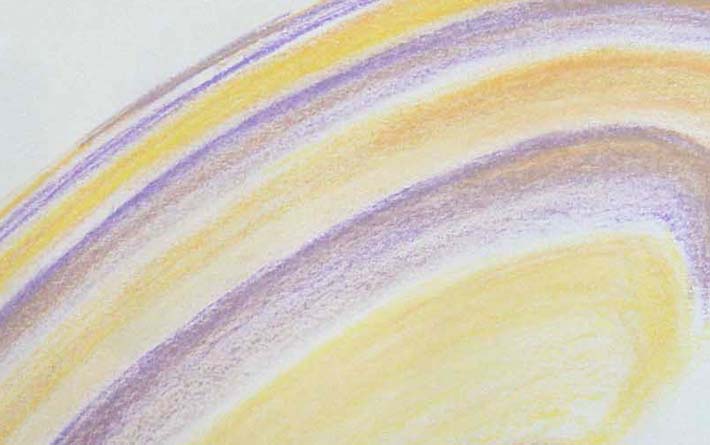
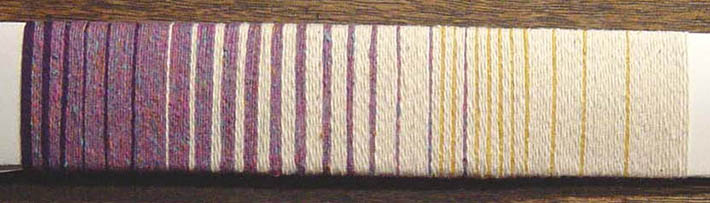
Although this wrapping is only seven inches wide, by scaling it up as before I can turn it into a plan for a warp of any width.
These are just some of the ways in which using wrappings can help you to design a beautiful warp.
Share tips, start a discussion or ask one of our experts or other students a question.
No Responses to “Designing Warps: How to Use Yarn Wrappings”