
What do weavers and rabbit breeders have in common?
Many things, I am sure, but in particular they both have reason to be interested in the work of Leonardo of Pisa, a 12th century mathematician nicknamed Fibonacci. In 1202 he published a book of arithmetic and algebra in which he posed the following problem:
A certain man put a pair of rabbits in a place surrounded on all sides by a wall. How many pairs of rabbits can be produced from that pair in a year if it is supposed that every month each pair begets a new pair which from the second month on becomes productive?
The answer is given by the sequence now known as the Fibonacci sequence, where each number is the sum of the preceding two numbers:
1 1 2 3 5 8 13 21 34 55 …
The numbers of the Fibonacci sequence are widely found in nature and the relationship between them produces proportions that our human brains find especially attractive. It is no surprise, then, that they are also much used by designers in many fields. Weaving is no exception.
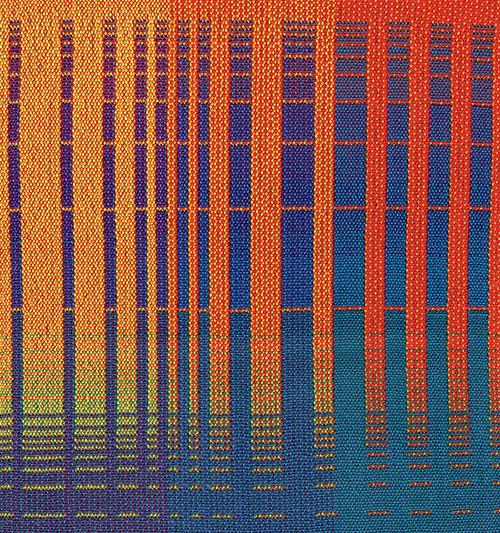
There are all sorts of ways you can introduce the Fibonacci numbers into a weave design. The most accesible way to start is to use them as the basis for stripes or for shading between two colours.
Fibonacci-inspired stripes
Step 1:
In this example I am going to start with a portion of the Fibonacci sequence and use it to build up a design of warp stripes. Note that I don’t need to use the numbers in their given order to benefit from the pleasing relationship between them.
The first five numbers
1 1 2 3 5
can be rearranged to give the sequence
3 1 2 1 5
which looks quite attractive drawn in outline:
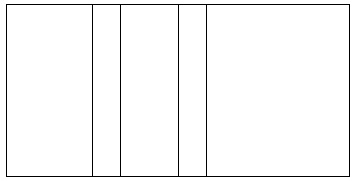
You can use squared paper or a spreadsheet program to try out different configurations until you find one you like.
Step 2:
Next I need to think about scale. This little block consists of 1 + 1 + 2 + 3 + 5 = 12 “Fibonacci units” and I am free to interpret a unit as anything I want! I could make each unit an inch wide, which would give me a block of 12 inches; or half an inch for a block of 6 inches.
Alternatively, I could think about my yarn. Suppose my yarn calls for a sett of 20 epi and I choose to interpret each unit as 6 ends. That means that the narrowest stripe (one unit wide) will be a smidgeon more than a quarter of an inch in the reed. My block of 12 units will consist of 6 x 12 = 72 ends, or just over 3.5 inches.
I like the sound of that last option, so I’ll carry on designing with a 72-end block of stripes.
Step 3:
I can now put blocks side by side to build up to the total width I want. Four blocks would give me 288 ends, or 14.4 inches in the reed. I can repeat the block in the same order across the warp…

…or I can introduce some reflection to vary the layout of the stripes.

Step 4:
You’ll notice that I haven’t included anything about color or pattern yet. The stripes in this design could be two, three or more different colors, or they might correspond to threading blocks or to both color and threading. All these things are interconnected and it may take several iterations before you have the perfect design for your project.
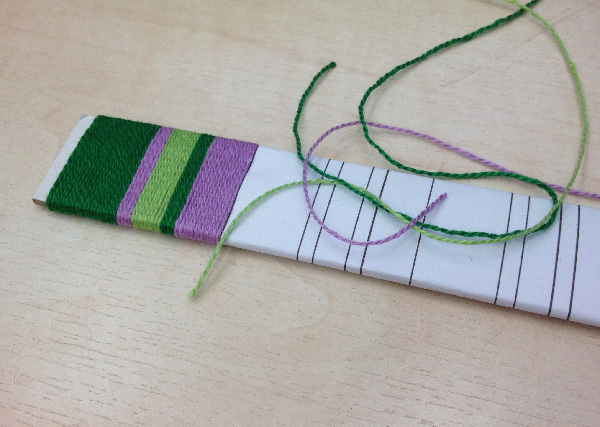
When I am planning colored stripes in this fashion, I like to print out the design outline, tape it around a piece of card and use it as the template for a yarn wrapping.
Although this plan has only covered warp stripes, the same stripes could be applied in the weft for Fibonacci-inspired blocks.
Fibonacci shading
Another popular use for the Fibonacci sequence is in shading gradually from one color to another, either in the warp or the weft. Again in this example I will focus on warp shading.
The trick is to think about the width of the transition area, much as we considered the scale of our stripe design above. Suppose I want a warp with two colors and a 9-inch width in total: this could be broken down into 3 inches of solid color at each side and a 3-inch transition area in the middle.
Step 1:
I first need to translate this requirement into yarn ends using the sett for my yarn. 20 epi will give me a transition area of 3 x 20 = 60 ends, 24 epi will give me 3 x 24 = 72 ends and so on. As I have two colors, I need half of this number for each color.
Step 2:
Let’s take the example of 60 ends and see what we can do with 30 ends per color. The next step is to add up the numbers of the Fibonacci sequence, starting with 1 and ending when we reach or exceed our target of 30 ends.
1 + 1 = 2
1 + 1 + 2 = 4
…and so on until…
1 + 1 + 2 + 3 + 5 + 8 = 20
1 + 1 + 2 + 3 + 5 + 8 + 13 = 33
We haven’t hit our target precisely, but 33 is quite close. If we used this sequence for our transition, then we would have 66 ends in total (3.3 inches), or we could opt for the previous (shorter) sequence and have 40 ends (2 inches). I’m going to use the longer sequence – but how?
Step 3:
It’s very simple. I make the transition by introducing one end of the new color and then returning to my old color with as many ends as the largest number in the sequence, in this case 13. Then I add another end of the new color and go back to my old color for the second largest number in the sequence, i.e. 8. I continue by following the Fibonacci sequence in increasing order for the new color and decreasing order for the old color. When I reach 13 ends of the new color I will finish off with one last end in the old color and then drop it completely.

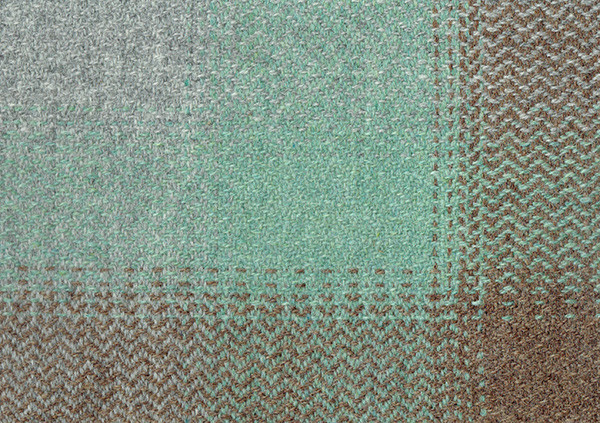
Reading this diagram from left to right shows green being introduced as the new color
Using this method you can find a Fibonacci transition for any yarn and any width. You can proceed across the warp exchanging colors as slowly or as quickly as you please. In the sample piece below I have used a short transition of 1 + 1 + 2 + 3 between colors. Where the yarns are very similar in hue and value (green and gray at top left), the transition is almost invisible, but even where they are contrasting (green and brown at bottom right), the shading is effective at softening the color change.
You can vary it further by working with pairs of ends rather than single ends, or with threading units if that is appropriate to your design. Once you start, you will never run out of options.
Any advice on a conversion from thread weaving to wire wrapping? Say, crystal pendants? Peace -Ty
Hi Cally. Just want to sound off please? I got a mark of two out of 10 for my definitions of Fibonacci, Golden Mean and Proportion. Fibonacci because I did not start with 0 and the others because I did not quote my definition source. Any chance of a comment please? I will be changing my entries in my website next time I apply for Level I as I failed miserably both technically and practically. I need to play by the rules if I want to earn my certificate. Cheers Robin Fuller. New Zealand.