
If you are lucky enough to have a loom with eight or more shafts, then double weave blocks are yours to master – but beware their addictive powers! In this post, we’ll talk through the logic of working with blocks and suggest some possibilities to get you hooked…I mean started.
Why 8 shafts?
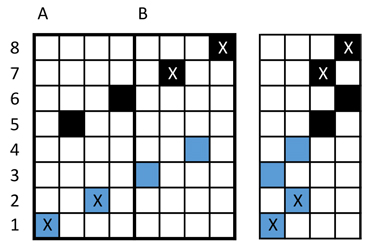
We have already seen in our post on double cloth weave how a loom with four shafts can be used to weave two layers of plain weave. When you have eight shafts to play with, you can assign four to each layer: that makes it possible to divide your threading into two groups of two shafts each. A typical block threading looks something like this:
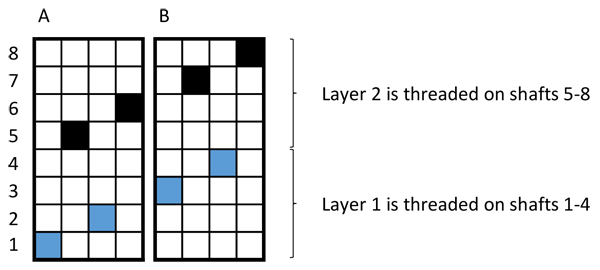
The blue squares indicate one warp layer, which is threaded on shafts 1-4. The black squares show the other layer, threaded on shafts 5-8. The threading has been divided into blocks A and B. In block A, the blue warp layer is threaded on shafts 1 & 2, the black warp layer on shafts 5 & 6. In block B, shafts 3 & 4 are used for the blue layer, shafts 7 & 8 for the black layer.
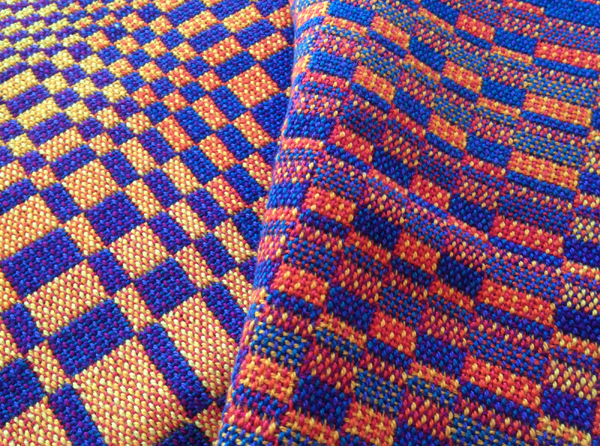
Each block consists of 4 ends but can be repeated as many times as you like: wide blocks, narrow blocks, any-size-you-please blocks. My 8-shaft sampler is threaded so that one half consists of equal width blocks, while the blocks in the other half are based on the Fibonacci sequence.
To weave two layers
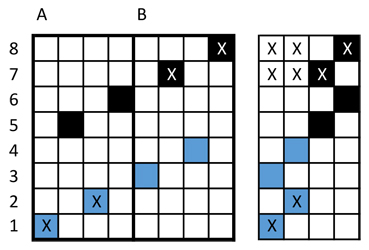
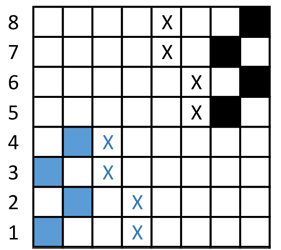
Just because you have blocks, doesn’t mean you’ll want to use them all the time! You can still weave two solid plain weave layers. In the diagram below, I have indicated that the blue layer is going to be the layer on top by marking it with crosses on the threading plan – as you get involved in devising your own double weave drafts, this is quite a useful way to plan what you want to achieve and design a liftplan to bring it to life.
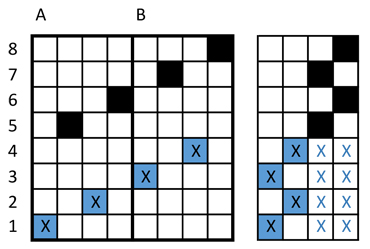
In the adjacent grid we can see the four lifts that we will need: two lifts to make plain weave in the top layer, and two more lifts to make plain weave in the bottom layer while lifting the top layer out of the way. I’ve used my threading notation of colored squares to show which shafts are being used to make plain weave in the two layers, and simple crosses to show which shafts are simply being lifted out of the way. I have found that it helps my understanding of double weave drafting to distinguish between these two reasons for lifting shafts.
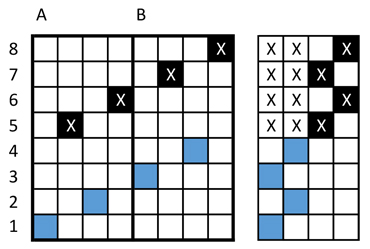
Using the same notation, I can write out the following set of lifts to give me plain weave in two layers with black on the top:
Note: Tie-ups, liftplans and all
The diagrams above show two sets of lift combinations, which are necessary to make plain weave in two layers. At this stage they are neither liftplans nor tie-ups – we’ll come back to those later. If you can, it is well worth using a table loom when you explore double weave blocks. When you have the freedom to move each shaft independently then all the possibilities are open to you and you can develop your own lift combinations by thinking through the process.
To weave blocks
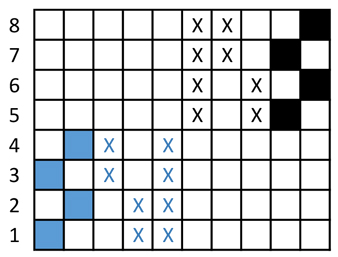
Let’s turn, then, to thinking about blocks. First of all, we are still going to need to make plain weave in both layers of our cloth. This gives us the starting point shown below:
I have indicated with crosses my intention to have the blue layer on top in block A and the black layer on top in block B.
Notice that I want the black warp on shafts 7 & 8 to form part of the top layer. This tells me that when I am weaving the blue layer I will need to lift those two shafts up, so that their warp ends remain visible on the surface of the cloth.
Similarly, when I am weaving the black layer I will need to raise shafts 1 & 2 to keep those warp ends on the surface.
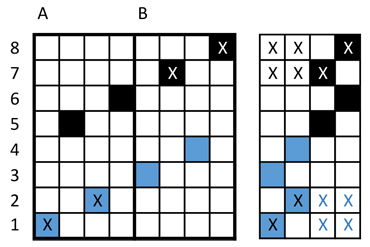
And there we have it: a combination of lifts which will give us blue on the face of the cloth wherever block A is threaded and black wherever block B is threaded.
To switch the colors over to the opposite blocks, we need to lift the opposite pairs of shafts.

Note that we are continuing to make plain weave in exactly the same way as before – the only thing we have changed is our choice of which shafts carry the top layer. Of course, we have the option to go further and mix up the layers in our plain weave too, but that is a challenge for another day!
Liftplans and tie-ups
You can easily turn any of the examples shown here into a liftplan. The important thing to remember is that you need to alternate your weaving of the two layers pick by pick. To make a tie-up is a little more complex and is most easily done by splitting the treadles into two groups, one to operate shafts 1-4 and the other to operate shafts 5-8.
On a jack loom you will need at least eight treadles: four for each group. Two of these treadles weave plain weave, one lifts block A and one lifts block B. If you want to lift the whole layer, then you need to use both of these treadles together, or – if you have 10 treadles – you can tie up another treadle to do this job. I’ve used the same notation as above to show what each treadle is doing – of course, you may prefer to order them differently.
On a countermarche loom, if you want to have access to all these combinations, then you will need a full dozen treadles: six for each group. As you cannot use the block A and block B treadles together, you will need one treadle to raise the whole layer and another treadle to lower it.

It can be quite a challenge at first to make the treadle combinations do what you want, but it is also quite exciting to mix and match! Just make sure that your treadling maintains the pick by pick alternating of layers.
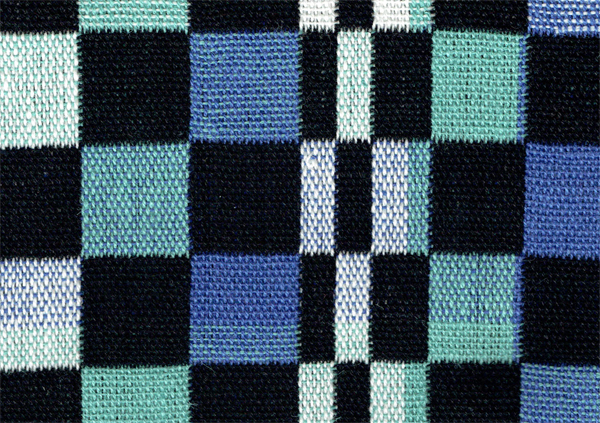
Some double weave design possibilities
The popular “windows” design is achieved by arranging your threading so that you begin and end with block A.
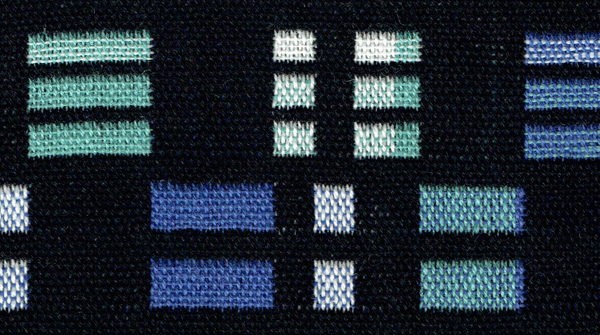
You then weave a sequence which has:
- all of one layer on top
- the same layer on top in block A only
- all of the layer on top again
Staggered blocks are visually very exciting, especially if your threading blocks are of different widths.
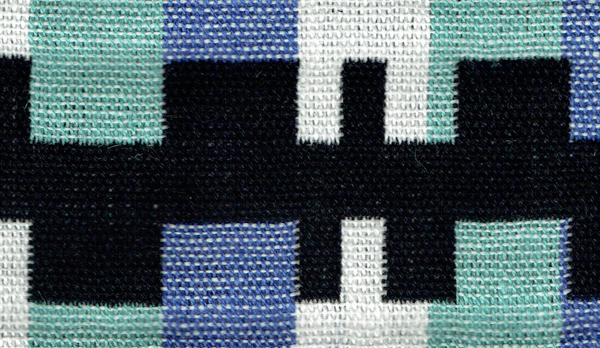
You need to weave a sequence with:
- layer 1 on top in both blocks
- layer 2 on top in block A only
- layer 2 on top in both blocks
- layer 2 on top in block B only
- layer 1 on top in both blocks
Share tips, start a discussion or ask one of our experts or other students a question.
No Responses to “Understanding Double Weave Blocks”