
 To me, creating a painting or drawing instead of snapping a quick photo with my camera is also a way to spend even more time in the scenery that I love, whether I am on location painting en plein air, back in my studio using a photo I took as a reference or simply painting from a lovely memory of a place I found beautiful.
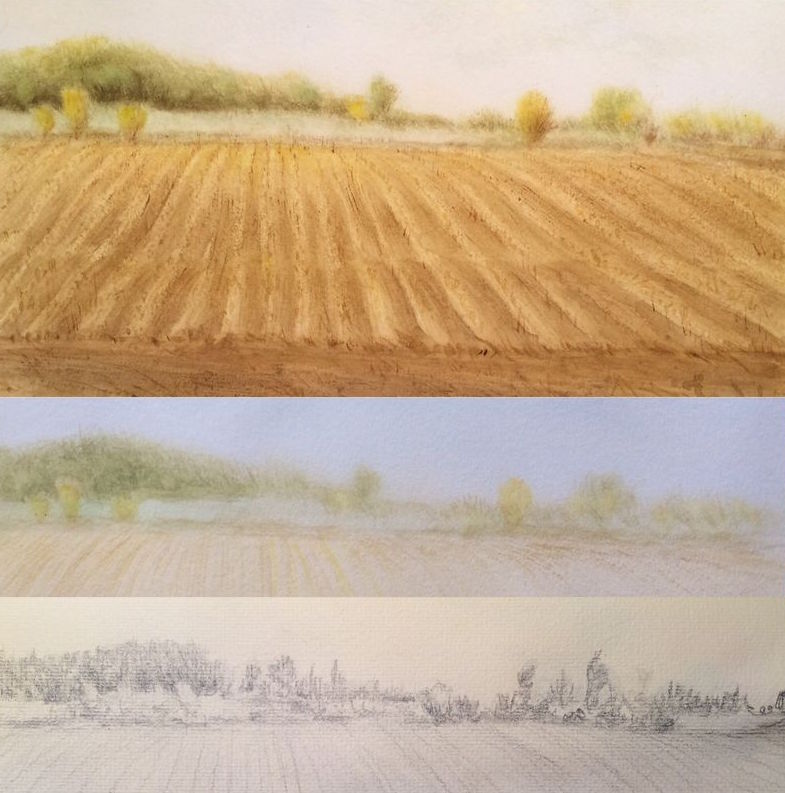
Wherever I paint, there are some basic stages for my landscapes.
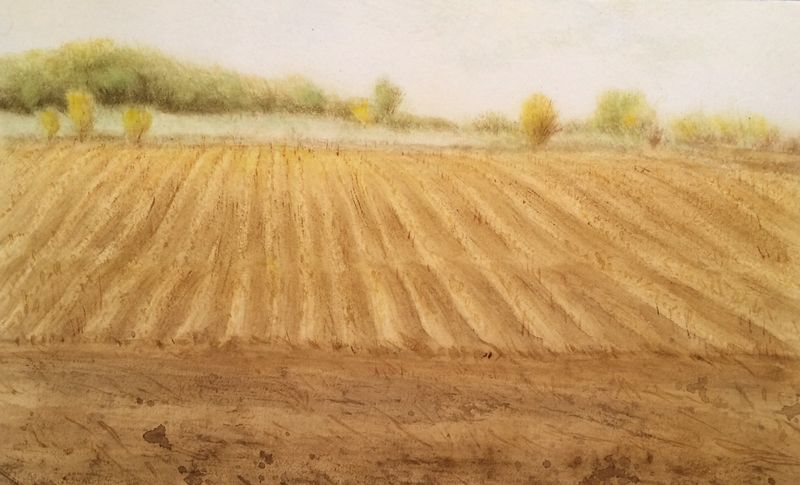
The subject of the painting in this tutorial is a favorite section of a country road I travel on frequently. It is a quiet view of bare cornfields with a distant row of trees. Instead of a sweeping wash of rich, wet-in-wet color, I decided to use a dry brush technique so that I could slowly weave together all of the soft, intricate textures and shades of gold, earthen browns, pale greens and blues that were in my memory.The materials used in this painting are:
- An HB pencil to make a sketch
- 140# hot pressed Fabriano Artistico watercolor paper block, sized 9″ x 12″
- Sizes 8 and 10 sable pointed round watercolor brushes
- Winsor & Newton Professional Watercolor paints in: Winsor lemon, raw sienna, yellow ochre, raw umber, burnt umber, cerulean blue and viridian
- Metal dip pen or stylus to create texture in the foreground
I almost always begin with a pencil sketch of my subjects.
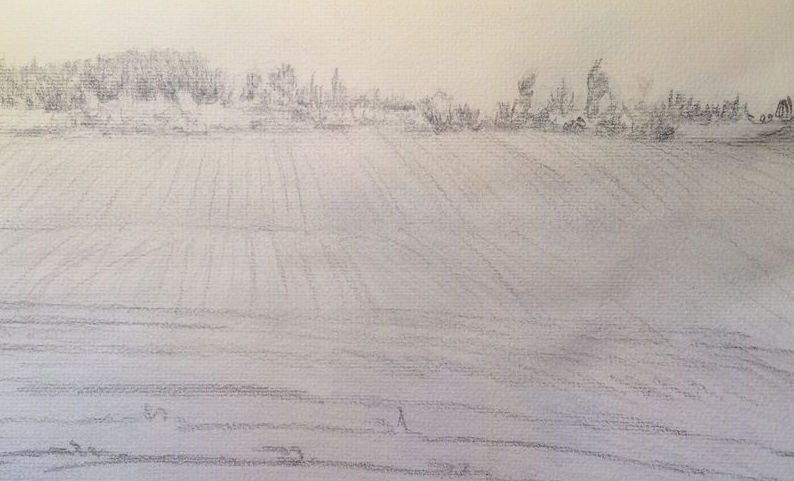 For me, it’s important to find the composition that feels right, and to work out the areas of contrast in the scene — the darks and lights — right away. Our paintings are always more successful if we establish a strong contrast between the lights and darks, and doing this in our first sketch gets us off to a great start.
My initial sketch is simple, but it gives me all of the information I need to begin.
For this painting I chose a hot press watercolor paper that is 100 percent cotton and is a 140 lb weight. I tend to prefer the smooth finish of a hot press paper over the more textured cold press because it allows me to achieve finer details in my work. Dry brush is a more delicate technique than wet-in-wet washes, and hot press paper is the best choice. It’s a very personal choice though, and cold press paper would work just fine if that is what you have available.
I tend to work on a watercolor block, a pad of watercolor paper that is glued down on all sides, so that my paper has less of a chance to buckle or curl up at the edges.
For me, it’s important to find the composition that feels right, and to work out the areas of contrast in the scene — the darks and lights — right away. Our paintings are always more successful if we establish a strong contrast between the lights and darks, and doing this in our first sketch gets us off to a great start.
My initial sketch is simple, but it gives me all of the information I need to begin.
For this painting I chose a hot press watercolor paper that is 100 percent cotton and is a 140 lb weight. I tend to prefer the smooth finish of a hot press paper over the more textured cold press because it allows me to achieve finer details in my work. Dry brush is a more delicate technique than wet-in-wet washes, and hot press paper is the best choice. It’s a very personal choice though, and cold press paper would work just fine if that is what you have available.
I tend to work on a watercolor block, a pad of watercolor paper that is glued down on all sides, so that my paper has less of a chance to buckle or curl up at the edges.
Once the sketch is set, it’s time to add washes of color.
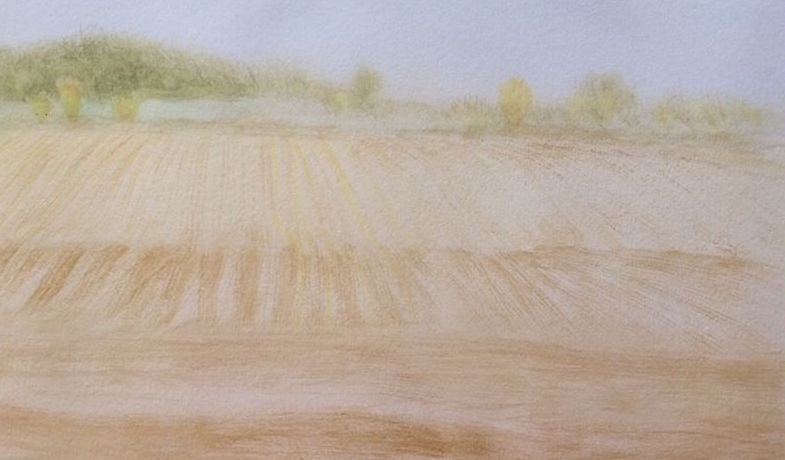 For this painting I chose a rather muted and limited palette of earth pigments such as raw sienna, raw umber, burnt umber and yellow ochre. I also chose Winsor lemon, viridian, and cerulean blue to keep the soft, early morning atmosphere of the scene that was in my memory, and to be able to mix soft and luminous greens.
I used a No. 10 pointed round brush and began by applying a pale wash of color to define the sky (Cerulean blue) and a very pale wash of raw sienna for the middle ground and foreground. I also made a pale wash of viridian, a very light aqua color, to highlight the area of land on the left of the painting, right below the line of trees. This pale beginning was the only bit of “wet” and washy painting that I did. I was only trying to establish the sky, middle ground and foreground, the main sections of my scene.
For this painting I chose a rather muted and limited palette of earth pigments such as raw sienna, raw umber, burnt umber and yellow ochre. I also chose Winsor lemon, viridian, and cerulean blue to keep the soft, early morning atmosphere of the scene that was in my memory, and to be able to mix soft and luminous greens.
I used a No. 10 pointed round brush and began by applying a pale wash of color to define the sky (Cerulean blue) and a very pale wash of raw sienna for the middle ground and foreground. I also made a pale wash of viridian, a very light aqua color, to highlight the area of land on the left of the painting, right below the line of trees. This pale beginning was the only bit of “wet” and washy painting that I did. I was only trying to establish the sky, middle ground and foreground, the main sections of my scene.
Then, I painted in the details.
As soon as this was established, I picked up a damp, number 8 pointed round sable brush and splayed out into a fan shape with my fingers. I used the splayed-out bristles to feather in the line of trees and shrubs in the distance using varying mixes of cerulean blue, Winsor lemon and yellow ochre to get soft greens and golden hues. I then used yellow ochre, raw umber and burnt umber to feather in the directional lines that created the suggestion of the rows of corn stubble, always following the direction that the landscape was taking. Then, using a darker yellow ochre and raw umber mix, I made tiny lines suggesting the texture of the corn stubble and some directional lines suggesting dried grasses in the foreground. Throughout all of this, I used a brush that I dipped in my paint mixtures, then dried off on a cotton rag until it was a bit dry, and again splayed out with my fingers into a fan shape. I like to say that this technique is more like using your paint brush as a pencil — drawing with the drier pigment — rather than using a wet brush with a juicy wash of paint. It is helpful to think about feathery, directional strokes that are always suggesting the textures you notice in the landscape you’re trying depict.Once this initial layer was completely dry, I began building up some contrast and defining the different elements.
 I did this step still using a sable brush, a number 8 pointed round. Again, to form the brush I wet it with water, then squeezed it between my fingers to wring the water out and splay the bristles into a fan shape. Then, I began lightly dragging this dry brush over the pigments and started feathering on soft strokes of color.
At this point, I did not blend the color on my palette, but used them pure to create the illusion of mixed color. I find the color is more luminous this way: each tiny stroke of color singing on its own, but visually mixing with all the others to create a myriad of hues.
I also used a sharp metal dip pen to etch into the fields where I wanted the impressions of bare corn stubble. As I worked, these impressions in the paper caught pigment and became progressively darker over the course of painting.
I did this step still using a sable brush, a number 8 pointed round. Again, to form the brush I wet it with water, then squeezed it between my fingers to wring the water out and splay the bristles into a fan shape. Then, I began lightly dragging this dry brush over the pigments and started feathering on soft strokes of color.
At this point, I did not blend the color on my palette, but used them pure to create the illusion of mixed color. I find the color is more luminous this way: each tiny stroke of color singing on its own, but visually mixing with all the others to create a myriad of hues.
I also used a sharp metal dip pen to etch into the fields where I wanted the impressions of bare corn stubble. As I worked, these impressions in the paper caught pigment and became progressively darker over the course of painting.
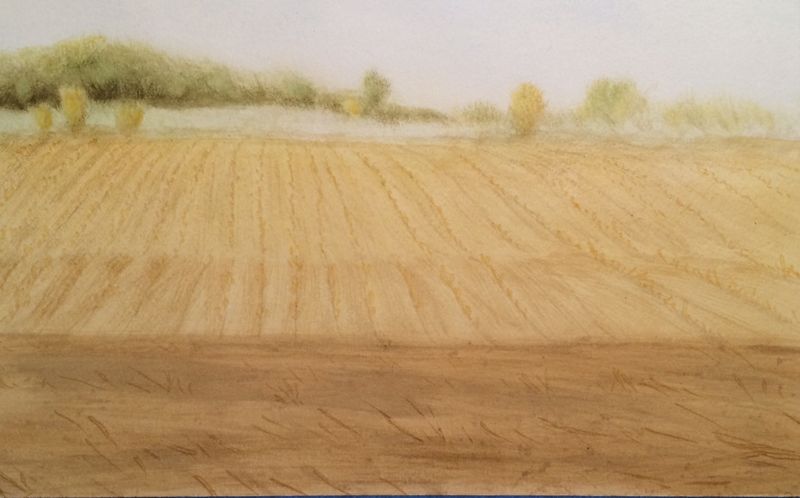
Then I continued with the slow building of color with my dry brush technique.
 Progress is slow with dry brushing. It is a gentle and slow building or weaving of color. The forms slowly begin to take shape. I move around to different areas of the painting as they occur to me. It is meditative and satisfying work.
As I paint, I always seek out areas that need more depth and contrast, focusing on the darker areas to create texture and also to contour. I try to keep my brush strokes moving in the direction of contour or form.
After I felt the field had taken shape nicely in my painting, I began adding contrast to the line of trees, using a raw umber over the green and golden mixes that I used earlier. I really paid attention to where the trees were darker and more in shade. The dry brush technique was perfect for lending a wispy texture to the trees, suggesting the illusion of branches and leaves.
Progress is slow with dry brushing. It is a gentle and slow building or weaving of color. The forms slowly begin to take shape. I move around to different areas of the painting as they occur to me. It is meditative and satisfying work.
As I paint, I always seek out areas that need more depth and contrast, focusing on the darker areas to create texture and also to contour. I try to keep my brush strokes moving in the direction of contour or form.
After I felt the field had taken shape nicely in my painting, I began adding contrast to the line of trees, using a raw umber over the green and golden mixes that I used earlier. I really paid attention to where the trees were darker and more in shade. The dry brush technique was perfect for lending a wispy texture to the trees, suggesting the illusion of branches and leaves.
Once I was satisfied with the overall contrast and texture I had built up, I used my brush loaded with a pale mix of raw umber to spatter the foreground with speckles of paint.
This gave a random, natural-looking texture that suggests the scraggy look of the edge of a rough, winter cornfield.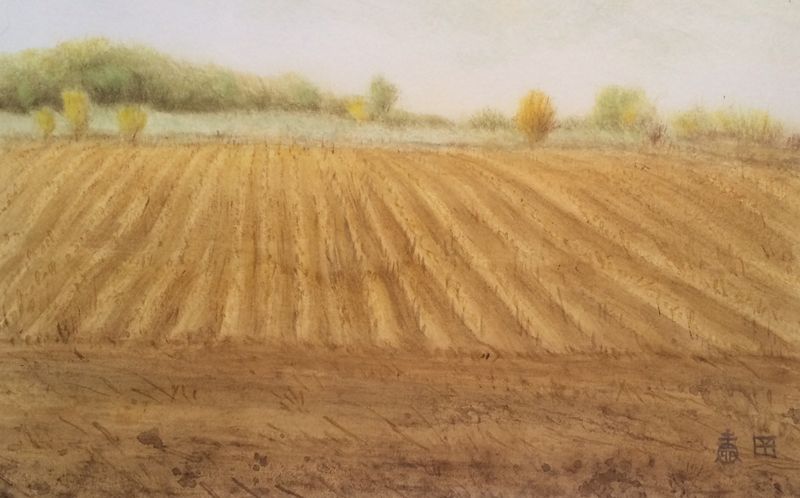
Share tips, start a discussion or ask one of our experts or other students a question.
No Responses to “Weaving a Landscape With Dry Brush Watercolor”