
A friend of mine recently asked me to help her sharpen up the points on her shawl. I thought that was a great opportunity to document the process and show you how I use blocking wires to block a lace shawl. If you’re a long-time blocking wire user, you may do the following steps in a different order, but this works for me. Be sure to share your methods in the comments!
How to use blocking wires for knitting
Step 1:

First you’re going to want to thoroughly wet the piece and blot out the excess water. Be careful not to wring it or squish it too much — if you’re using wool yarn, it might felt! Although when you block some knitting projects you can just spritz the project with a plant mister or use a steamer, for this type of blocking the yarn must be really wet so you can stretch it as much as possible into the shape you want it to take.
Step 2:

Once the shawl has been soaked and the extra water gently squeezed out, lay it flat on the floor. Begin stringing each point through your blocking wire.
Blocking wires can be used to block any project that has linear edges, like sweater pieces, scarves, shawls, etc. They also bend for blocking projects that have curves.

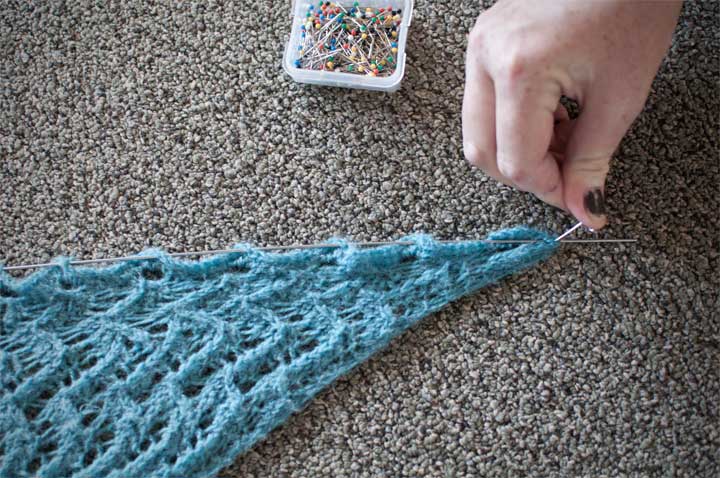
When putting the shawl points onto the wire, you want to get the wire as close to that last bind-off row as possible. Use the center stitch of each point as a guide so the point will be centered on the wire. Depending on how large the piece is, you may need two to three wires to go down the entire side.
Step 3:
Once all the points along that edge have been strung onto the wire, pin the center corner down. Use as many pins as you need to secure it. Bigger pins are better for this, as they’re much sturdier than the small sewing pins that I had on hand.
Start distributing these stitches along the wire to see what the length of the edge is. If the points fall off the wire on either end, you need to use another wire for length. You may have to pin and re-pin several times throughout the process to adjust the shape. Remember that however you pull the shawl out, that’s the shape it’s going to be when it’s dry.

Step 4:
At the point of the shawl, cross another wire over the first and begin blocking down the opposite side. How tightly you block or pull just depends on your own style, so pull it as tightly as you want!
Step 5:

Now you want to check the length of each side. Make sure that the lengths of both sides of the top and the lengths of both angled edges match up. Move the pins until opposite edges are the same length and the shawl is symmetrical down the spine.
Step 6:
Next we’re going to run blocking wires through the top edge of the shawl. The smaller increments you use when running this wire through, the straighter this top edge will be. If you use long increments, you might block points into the top edge of the shawl.
Step 7:

Pull out the edge wires to accommodate whatever shape the pattern calls for, or whatever shape you personally desire. The more you pull the edges out, the pointier those points will become. You can pin the edges to create straight lines or curves, it’s up to you and to the “give” in your yarn.
Step 8:
Now you want to pin along every edge to hold those points in place while the shawl dries. Be especially conscious of the center point to make sure it’s as spread out and defined as possible because that will be the focal point of the shawl.
Step 9:
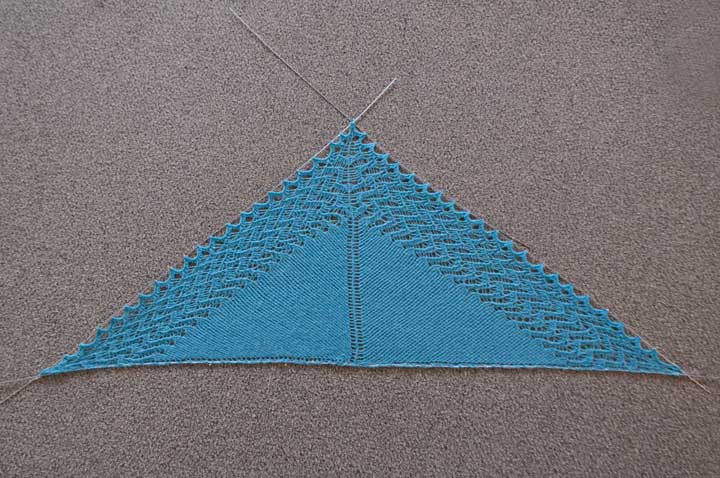 Spot check the piece from above to make sure it’s symmetrical. Add more pins and adjust each corner pin as necessary to make everything match up (and measure up) correctly.
Step 10:

Next we wait! Drying time depends on the yarn you used, the weight of the yarn, and humidity of your location. Here in Denver, it doesn’t take too long, but you want to make sure your piece is completely dry before taking the wires and pins out.
Share tips, start a discussion or ask one of our experts or other students a question.
No Responses to “How to Use Blocking Wires for Perfectly Pointy Shawls”