
Does free-motion quilting intimidate you? Between quilting stippling and meandering stitches, you may feel like you have to be an expert at drawing freehand designs.
If swirls and flowery designs aren’t right for your next quilting project, why not try a more geometric approach and connect the dots?
To get an idea of how this works, imagine that you are drawing on a grid marked with an erasable quilting marker. In this Orange Peel quilting tutorial from Elizabeth Hartman of Oh, Fransson, you can clearly see how the quilting lines go from corner to corner within the grid.
Elizabeth’s other free-motion quilting tips include dividing a large project into sections, finishing each smaller area before moving on to the next. See how she quilted her Tokyo Subway Map quilt, which offers a natural patchwork grid on which to connect the dots.
By using the natural suggestions of your patchwork, you can accent the design through quilting from point to point. In this Civil War Sampler from Craftsy member Darns, you can see how the center star lends to a quilting pattern of an on-point diamond. The diamond connects each of the north, south, east and west points on the star, and adds dynamic visual interest. As the design moves outward, you can see how the quilting on each of the blue star points also echoes the natural patchwork design.
When free-motion quilting between points, you can either try to visualize the geometric quilting lines or draw them on with a quilting marker to eliminate the guesswork.

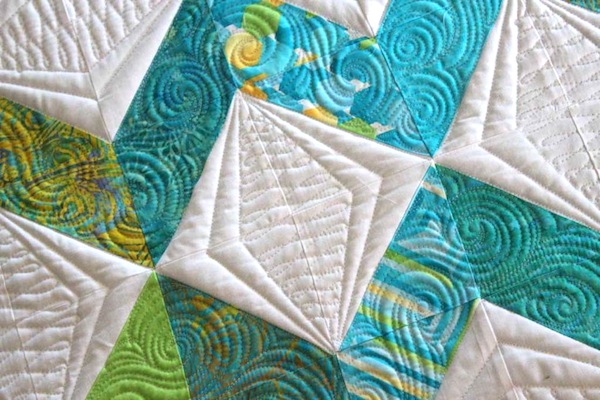
You can see another example of dot-to-dot quilting in this stunning quilting job finished by Judi Madsen of Green Fairy Quilts. Within the blue star, you can see how she quilted from point to point to echo the natural design of the patchwork. Moving outward into negative space, she quilted a square box around the star, and used these newly defined areas to once again connect the dots, quilting a horizontal diamond.
Again, you can see how useful it is to focus on one area at a time, beginning with a geometric outline and filling in later with diamonds, circles or another fitting pattern.
Can you see the dot-to-dot method in use in this Dot-to Dot-Combination of Designs quilt by Craftsy instructor Angela Walters? By drawing a pair of vertical diamonds in the white negative space, Angela has defined a totally new area in which she can quilt a figure-eight pattern. You can use this free-motion quilting tip on a longarm machine or a domestic sewing machine — the concept is the same.
In her new Craftsy class, Dot-to-Dot Quilting, Angela Walters dives into this technique covering not only diamonds, but also stunning starbursts and lattice designs. Her free motion quilting tips include ways to rotate, resize, invert and replicate each design for endless possibilities. As a student, you’ll also have access to downloadable diagrams and patterns to help with your next free-motion quilting project.
Share tips, start a discussion or ask one of our experts or other students a question.
No Responses to “Free-Motion Quilting Tips: Connect the Dots”