
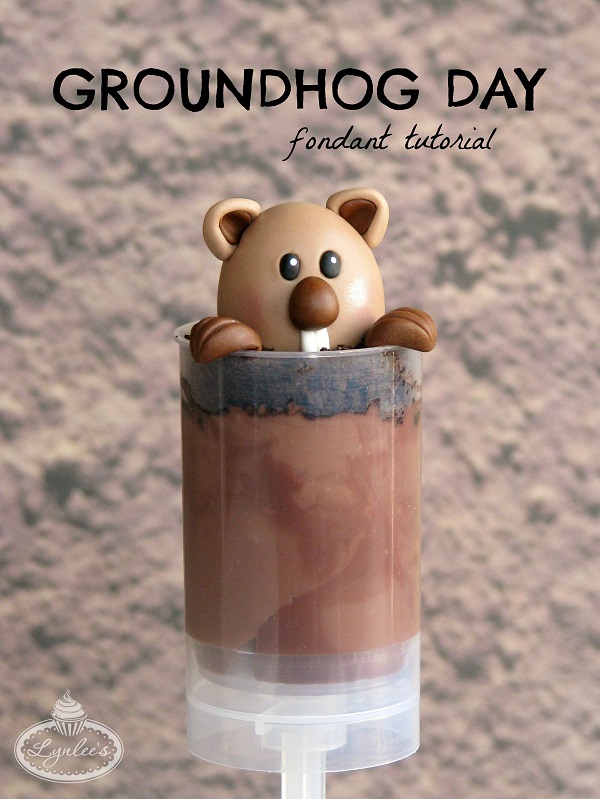
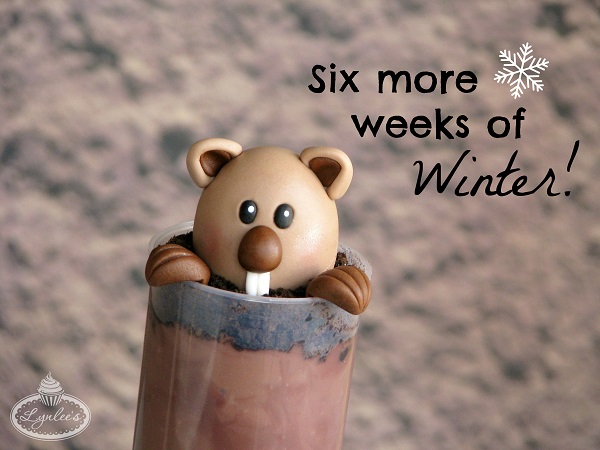
According to folkloric tradition, every February 2nd we anxiously await the groundhog to emerge from its burrow to witness whether the creature will see its shadow, consequently indicating another six weeks of Winter!
Make adorable Groundhog Day treats by following this simple tutorial.
Materials needed:
- Light brown, dark brown, black and white fondant
- Fondant rolling pin with 1/8″ and 1/16″ guide rings
- Two wooden dowels (1/4″)
- Water/edible glue and brush
- Vegetable shortening
- Fondant modeling tool
- Knife tool
- Miniature circle cutter
- Round decorating tips #7 and #12
- White soft gel paste and toothpick
- Pink shimmer dust/brush
- Push pop container
- Crushed Oreo cookies
Step 1:
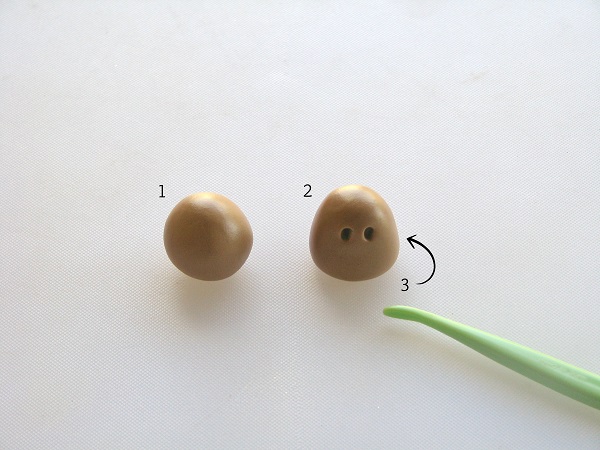
Roll light brown fondant into a ball (approximately 1 1/2″). Make sure the entire surface of the fondant ball is smooth. If not, keep rolling the fondant until there are no seams or lines.
Step 2:
Dip your fingers in vegetable shortening and begin to shape the ball by flattening out the bottom and narrowing the top to form the groundhog’s head.
Step 3:
Once satisfied with the shape of the groundhog’s head, utilize the modeling tool to indent two oval-shaped small holes to make cavities for his eyes.
Step 4:
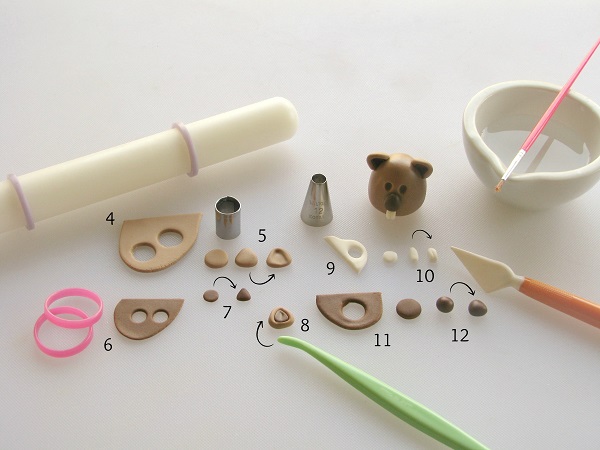
Roll out light brown fondant with the rolling pin and 1/8″ guide rings. Cut out two circles with the miniature round cutter.
Step 5:
Take one of the light brown fondant circles and pinch the top a bit to begin creating the groundhog’s ears in a rounded triangular shape. Then, utilize the modeling tool to indent the center of the ear. Repeat the steps with the second fondant circle.
Step 6:
Roll out dark brown fondant thin with the rolling pin and 1/16″ guide rings.
Step 7:
Punch out two circles with round decorating tip #12 and shape them into rounded triangles.
Step 8:
Glue the dark brown fondant triangles to the larger light brown ears. Utilize the modeling tool to indent the center of the ears and pinch the top together. Fit them over the groundhog’s head by pressing them down a bit and glue them in place.
Step 9:
Roll white fondant with the rolling pin and 1/8″ guide rings. Punch out a circle with round decorating tip #12.
Step 10:
With your fingers, press the sides of the circle together to form a small narrow strip. Utilize the knife tool to make an indentation lengthwise on the white fondant to create the groundhog’s teeth. Press down and flatten the very top of the strip, on which the nose will eventually rest.
Step 11:
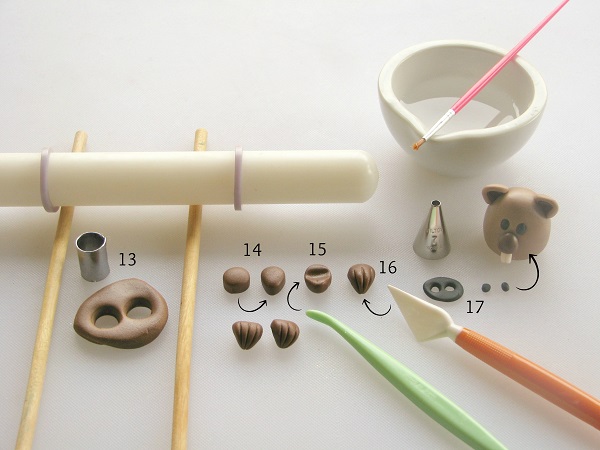
Roll dark brown fondant with the rolling pin and 1/8″ guide rings. Cut out a circle with the miniature round cutter.
Step 12:
Roll the circle into a ball, then shape it into the nose, narrowing the top a bit. Glue the teeth and nose in place on the ground hog’s face, ensuring the nose rests over the flattened section of the teeth.
Step 13:
Roll out dark brown fondant thick with the rolling pin and 1/4″ wooden dowels as guides. Punch out two circles with the miniature circle cutter.
Step 14:
Dip your fingers in vegetable shortening and shape the two circles into teardrop shapes.
Step 15:
Turn the dark brown teardrops upside down and indent the center horizontally with the modeling tool to give them an arch.
Step 16:
Turn the dark brown teardrops right side up and make three long indentations, originating from the pointed end upward to create the nail marks of the paws. If utilizing push pop containers (or any other desired container), make sure to place the paws over the sides and fit them before they begin to dry.
Step 17:
Roll out black fondant with the rolling pin and 1/8″ guide rings. Cut out two circles with round tip #7, then shape them into ovals to create the eyes. Apply a bit of water/glue to the eyes and glue them inside the cavities in the groundhog’s face.
Step 18:
Once the fondant has dried quite a bit (I usually like to wait overnight), dip your toothpick in soft gel paste and add glimmers to the eyes. I did it looking to the side, peeking out of the container. Dip your brush in pink shimmer dust and add a bit on the groundhog’s cheeks.
Step 19:
If making push pops, fill the push pops with the desired treat (i.e. cake and icing, pudding, etc.), top it with the crushed cookies and top them off with the fondant pieces.
Share tips, start a discussion or ask one of our experts or other students a question.
No Responses to “Make These Peek-a-Boo Groundhog Day Treats and Wish for an Early Spring”