
Basil is an herb that brings about quite a bit of frustration, and successfully growing basil is harder than it seems. It’s easy to grow and easy to kill all at once. There is one mistake that almost all first-time herb gardeners make with basil, and it ruins the whole experience for them. We’ll go over that, as well as everything else you ever needed to know to find success with growing basil.
Basil is a perfect container garden crop!
1. Growing basil from seeds
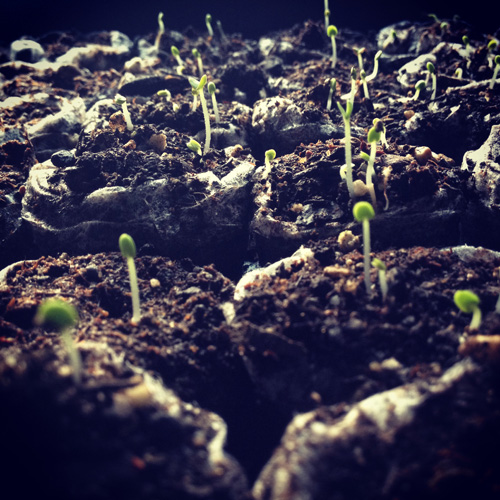
If you plan to start basil from seed, you’ll likely need to start it indoors under grow lights six weeks before the last frost and transplant outdoors. It’s easy to grow from seed and quick to germinate. Make sure your little basil seedlings are getting plenty of light so they don’t get leggy.
Basil prefers a long growing season and plenty of hot, sunny days. It can’t be put outside if there’s any risk of frost, so make sure you wait until nighttime temps are warm enough, or put a cover over the seedlings at night. During transplanting, you can bury most of the stem and roots will grow out of it, like a tomato, to make for a stronger and healthier plant. You can bury the stem up until the first true leaves.
2. Planting basil
If you buy seedlings from the store, there are several things you need to look out for before purchasing. A lot of times the basil in the store looks like it’s thriving, then you get it home and put it in the ground and it dies. Why? There are three possible reasons.
Overgrown basil plants in tiny pots are root-bound, meaning their roots have nowhere to go so they just go round and round in circles. Sometimes even after you get them out of their tiny pot and put them in the ground, they remain root-bound. I know it seems counter-intuitive, but buy small seedlings at the nursery, not the enormous ones that are so tall they’re tipping out of their pot. If you’re stuck with a root-bound seedling, help it out before planting by placing the roots in a container of water until they stop bubbling, then loosen them as much as you can with your fingers. This tip will help any root-bound plant get established in the garden.
Another reason your basil may not thrive at home is because you bought a plant that was already at the end of its cycle. To avoid this, make absolutely sure the basil you’re purchasing isn’t flowering. Basil that has flowered is putting all of its energy into reproduction and very little of its energy into making new leaves. You can try pruning off the flowers, but usually once the plant has reached this point it’s done producing for the year.
Lastly, don’t buy those little fresh basil plants in cellophane sitting in the herb section of your grocery store, put them in soil, and expect them to grow. These plants are grown hydroponically and because they aren’t accustomed to growing in soil, they won’t survive in your garden. Instead, keep them in a cup of water on your countertop and feed them a liquid fertilizer every two weeks. We’ve had them last almost two months this way!
3. Caring for basil
Plant basil in well draining, rich soil, and in full sun. It needs 6-8 hours of daylight to thrive. Water it consistently, especially in hot weather, but be sure your soil is draining properly so the roots don’t sit in water. Use mulch around basil plants to ensure the soil stays moist and to keep weeds at bay.
Fertilize with a well balanced fertilizer or compost tea several times throughout the growing season.
Learn how to make compost tea in our post on making your own fertilizer.
4. Pruning/harvesting
This is it. The one thing that most first time-basil growers do wrong. Pruning/harvesting must be done often and correctly in order for your basil to grow big and bushy. Have you ever had a basil plant that grew tall in one single stem, with a few leaves poking out here and there, then get all woody and shrivel up and die? It’s because it wasn’t pruned properly.
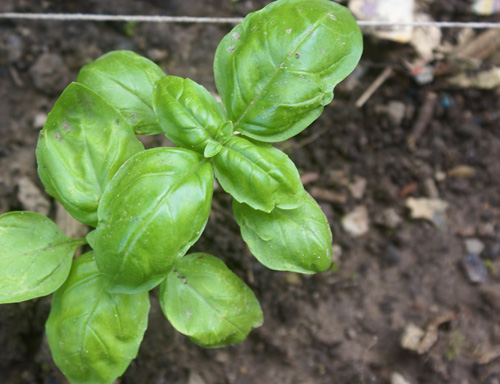
Many first-time herb gardeners think they should be plucking the big basil leaves off the bottom to give the small ones on top room to grow. It’s actually the exact opposite. The big bottom leaves need to stay on the basil, they’re the powerhouse that take care of sun absorption for the plant.
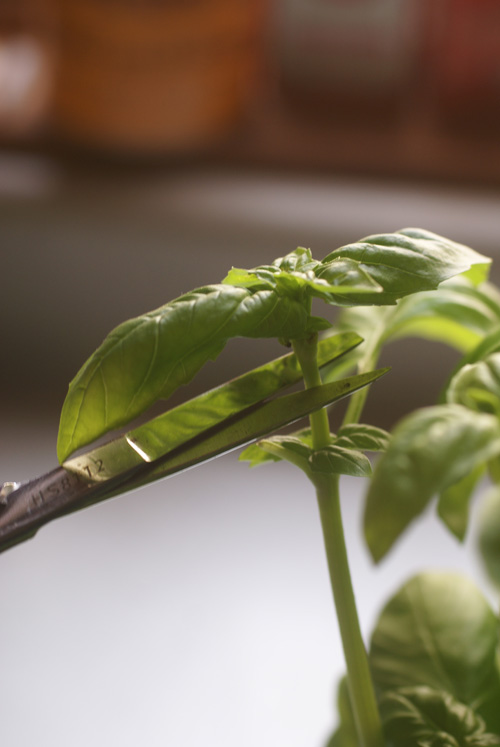
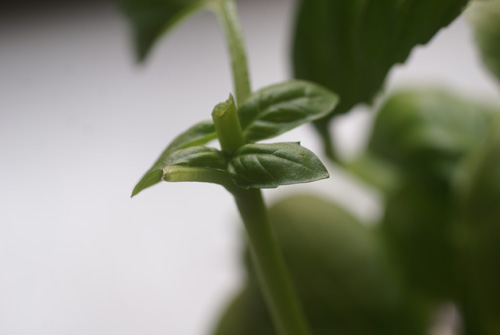
To properly harvest basil leaves, look carefully at the stem, and find the spots where leaves branch out to either side. Cut the top stem right after the two leaves sprout out. Sometimes you can see two more tiny leaves sprouting out from that spot, that’s where two new branches will form, making your basil grow out instead of up. Once those two branches form enough leaves to prune, do so, you’ll get two more branches on each of them, and so on and so forth.
You can start pruning as soon as your seedling reaches 6 inches tall and keep on every week until the end of the season. Be vigilant and consistent, you almost can’t prune too much. When it comes to basil, the more you prune, the more you get!
4. Cook
Basil is a summertime favorite and has many delicious culinary uses. Combine it with a few other herbs, garlic, nuts, olive oil and Parmesan cheese to make a savory pesto to put on pasta or serve as an appetizer. Sandwich basil between slabs of fresh tomato and mozzarella cheese for a delightful Caprese salad. Chop it up and toss it onto fresh pasta for a beautiful garnish and delicious taste.
Basil can be frozen to use at a later date or dried in the oven or dehydrator. Pesto can also be made and frozen in an ice cube tray to use at a later date.
Now that you know how to properly grow basil, get to it so you can enjoy this delicious treat!
Share tips, start a discussion or ask one of our experts or other students a question.
No Responses to “The One Mistake Most First-Time Gardeners Make When Growing Basil”