
Disney’s classic Mary Poppins film, based on the novel by P.L. Travers, was introduced to our hearts nearly 50 years ago and continues to captivate audiences of all ages! Now, with the new movie “Saving Mr. Banks”, we’re finally able to discover the incredible story behind how the original Mary Poppins film came to be, including the way Walt Disney persuades Travers to give him the screen rights to her magical narrative.
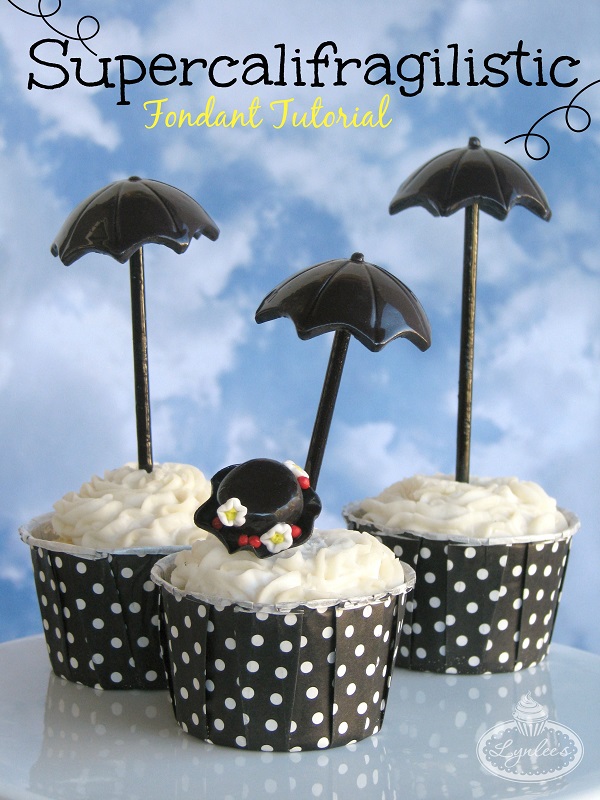
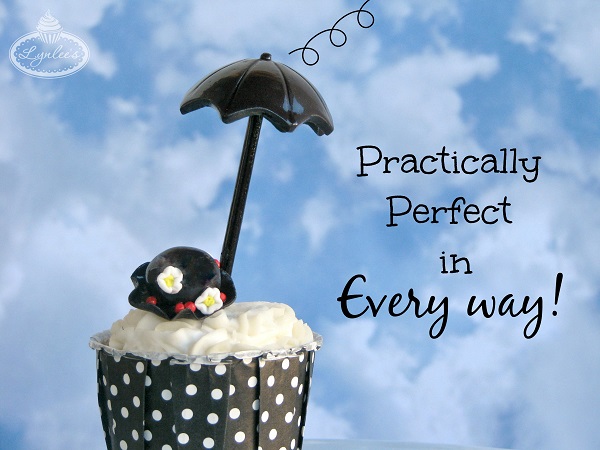
Inspired by the enchanting Mary Poppins, follow this step-by-step tutorial how to make a fondant umbrella and hat for your “supercalifragilistic” cupcakes!
Materials:
- Black, white, red and yellow fondant
- Water/edible glue and brush
- Fondant rolling pin with 1/8″ guide rings
- 1/4″ wooden dowels
- 7/8″, 1 7/8″, 2 1/4″ circle cutters
- Miniature flower cutter
- Round decorating tip #5
- Small veining tool
- Ball tool
- Small spatula
- Flower forming cups
- Thin shaping foam
- Lollipop sticks
- Black soft gel paste/brush
- Vegetable shortening to soften your fondant
- Powdered sugar/dusting pouch for your work surface
How to make a fondant umbrella
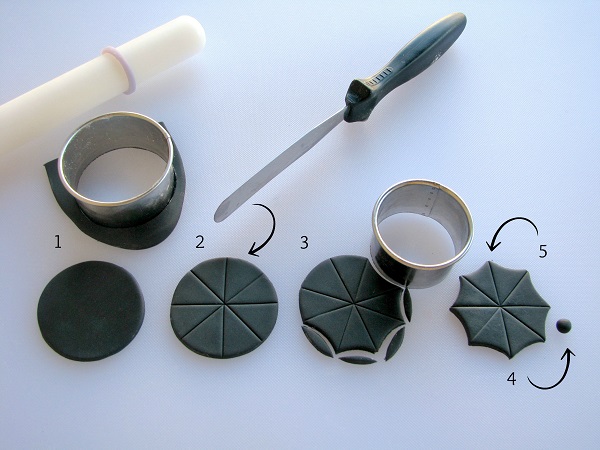
Step 1:
Roll out black fondant with the rolling pin and guide rings and cut out a circle with the 2 1/4″ round cutter.
Step 2:
Using the spatula, make indentations over the black fondant circle to make eight sections. Start out by indenting it in half, then again the opposite way. Then finish it off by making diagonal indentations.
Step 3:
With the 1 7/8″ round cutter, trim the bottom of each of the eight sections around the perimeter of the circle.
Step 4:
Take one of the small cut pieces and roll it into a ball.
Step 5:
Clean up the sides of the fondant with your fingers, slightly pinching each tip of the umbrella into a point.
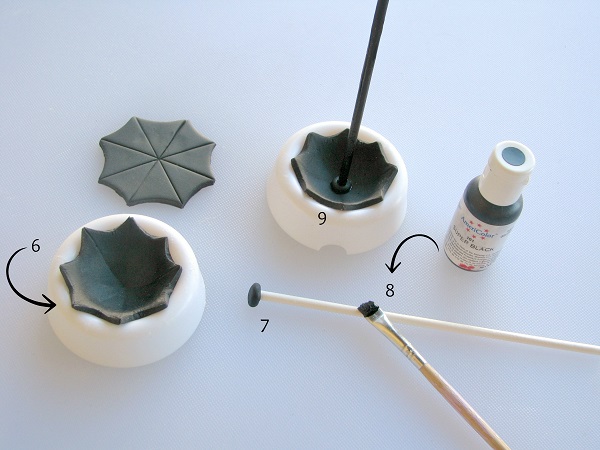
Step 6:
Brush a flower forming cup with powdered sugar to avoid the fondant sticking to the plastic. Turn the umbrella upside down and gently press it into the forming cup.
Step 7:
Insert a lollipop stick into the small black fondant ball.
Step 8:
Paint the lollipop stick using the black soft food gel and a brush, then glue it to the center of the umbrella. If your forming cup has a small hole in the center, you can push the stick in just a bit so that a small amount of fondant pokes through the hole at the top of the umbrella.
Step 9:
Allow the umbrella to dry thoroughly inside the forming cup to keep its shape. Once your cupcake has been iced and your umbrella is dry, insert the lollipop through the center.
How to make a fondant hat
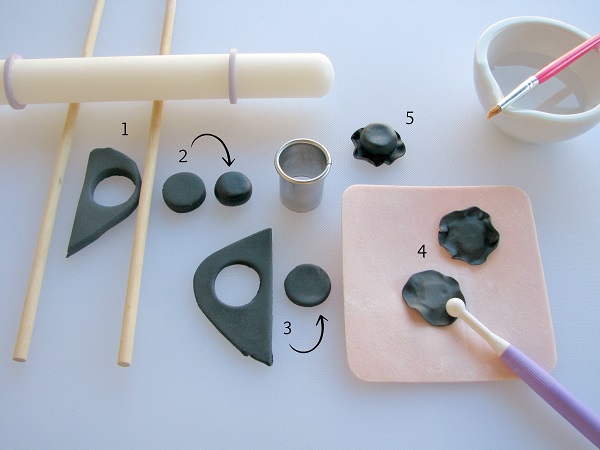
Step 1:
Roll out black fondant thick with the rolling pin and wooden dowels as guides.
Step 2:
Cut out a small circle with the 7/8″ round cutter and smooth it out a bit with your fingers to create the top of the hat.
Step 3:
Roll out additional black fondant with the rolling pin and guide rings and cut out a small circle with the 7/8″ round cutter.
Step 4:
Dust the thin shaping foam with powdered sugar and place your thin black circle on it. Utilize the ball tool to gently impress around the perimeter of the circle, creating a bit of a wave effect to form the the brim of the hat.
Step 5:
Glue the top of the hat to the brim.
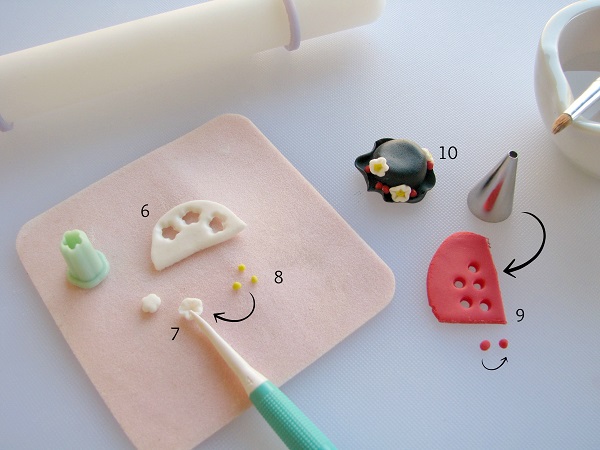
Step 6:
Roll out white fondant with the rolling pin and guide rings. Cut out three miniature flowers with the cutter.
Step 7:
Dust the thin shaping foam with powdered sugar and place the three flowers on it. Using the small veining tool, make small indentations in the center of each petal.
Step 8:
Roll tiny little balls out of yellow fondant and glue them to the center of each white flower. With the tip of the small veining tool, making little dots on the yellow circles.
Step 9:
Roll out red fondant with the rolling pin and guide rings. With round decorating tip #5, cut out about five circles and round them into balls with your fingers.
Step 10:
Glue the flowers and red balls to the hat and allow it to dry thoroughly.
Optional steps:
- Apply a glossy finish to the umbrella and/or hat.
- If making several umbrellas, trim the bottoms of the lollipop sticks in varying sizes to add different dimensions to the cupcakes.
Here are some additional Mary Poppins inspired sweets and treats sure to carry you away:
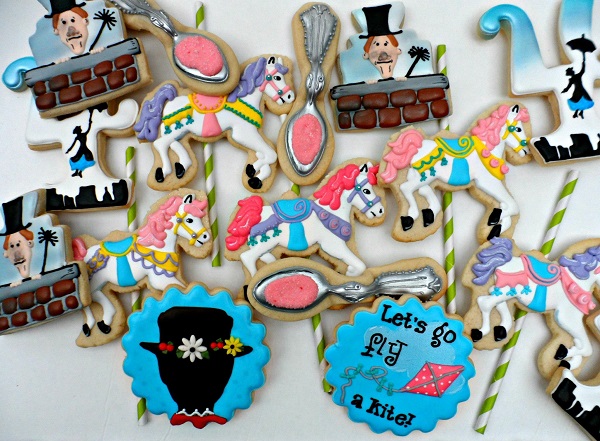
Photo via Sweet Tweets
Poppins favor cookies
This gorgeous set of Mary Poppins inspired cookies was created by Vicki’s Sweet Tweets as party favors. Each design reflects elements of the storyline and also includes personalization with the guest of honor’s age, as well as the creative use of paper straws for the carousel horses!
Learn how to create delightfully detailed decorated cookies like these in the Craftsy class Decorating Essentials: Designing Cookies with Autumn Carpenter.
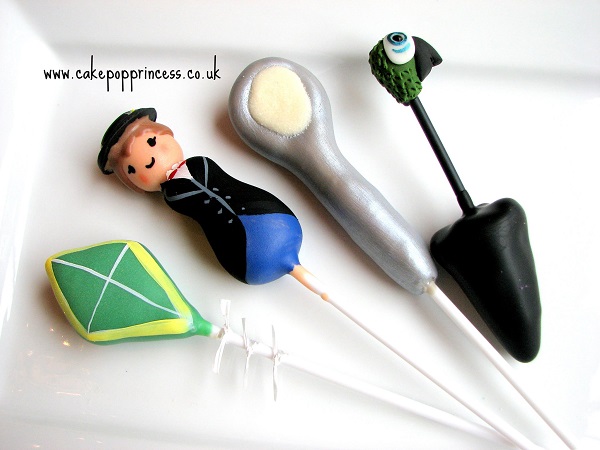
Photo via Cake Pop Princess
Mary Poppins cake pops
These incredibly detailed Mary Poppins cake pops by Cake Pop Princess are absolutely adorable! Mary Poppins is featured, along with her umbrella, a spoon full of sugar and a kite, with smooth candy coating and painted details.
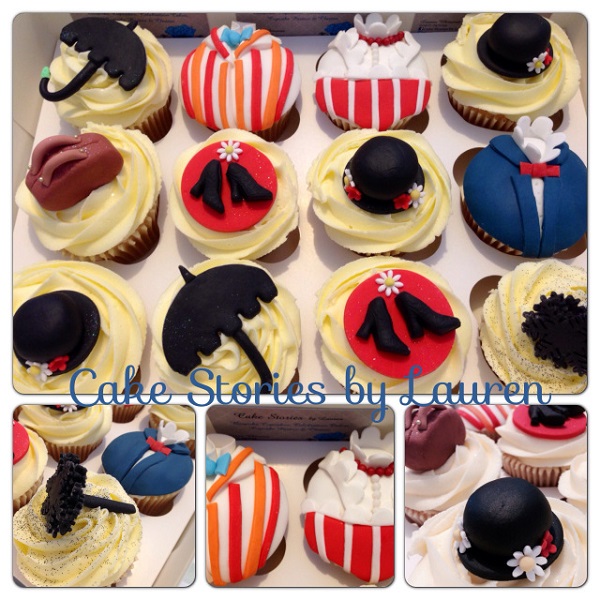
Photo via Cake Stories by Lauren
Mary Poppins cupcakes
These absolutely precious fondant-decorated cupcakes by Cake Stories by Lauren tell the story with detailed designs representing characters and elements of the film. Some fondant toppers are placed over iced cupcakes, while others are covered entirely in fondant decor.
Share tips, start a discussion or ask one of our experts or other students a question.
No Responses to “A Practically Perfect Mary Poppins Cupcake Tutorial”