
Twisted cord is infinitely useful. It’s perfect for bag handles, button loops or anywhere you might use a knitted I-cord. I find twisted cord much faster and easier (and less fiddly) than knitting I-cord, which always seems like a slog to me. The traditional method of making twisted cord involves looping some yarn over a doorknob and a lot of tedious hand twisting. Bah to that, I say. If you’ve got a spinning wheel or a spindle, you can churn out twisted cord in a fraction of the time.
When you get right down to it, twisted cord is really just a two-ply yarn. You spin the singles one way, usually clockwise, and allow them to twist back on themselves, evening out any extra twist. With a yarn, you might add some plying twist as well, but with a twisted cord, that isn’t necessary. The initial twist you put in the yarn is more than enough to balance when it’s twisted on itself or plied.
The first step to making a twisted cord is to measure your yarn.
For a two-strand cord, you’ll want a length of yarn that’s twice as long as you want the finished cord, plus a little bit more to make up for the length that the twist eats up. For a four-strand cord, you’ll want a piece of yarn that’s four times as long as you want the finished cord, plus a little more. Follow the same formula for an eight-, ten-, or twelve- (etc.) strand cord.
For a two-strand cord, tie one of the free ends to your hook.
On a spindle, this will be the cup hook on the top (or you can tie a slipknot if you’re using a bottom-whorl spindle). On a spinning wheel, you’ll have to start by pulling the free end through the orifice and then tie it on one of the hooks like in the photo below.

For a four- or more-strand cord, loop the middle of the yarn around the hook.
If you want more than four strands, you will need to fold your yarn in half (or fourths, etc.) first, and then loop in on the hook. On a spindle, you can just set the cup hook in the loop. On a wheel, draw the middle through the orifice and then loop it around a hook.
Spin.
If you’re using a spindle, you’ll want to spin the spindle as fast as it will go (you’ll probably have to restart it a couple of times). If you’re on a wheel (which is my preference for this particular application), treadle as fast as you can. You could go slower if you really wanted, but the goal is to put enough twist in the yarn that it starts to kink up.
You want to keep a bit of tension on the yarn, especially with a wheel so it doesn’t twist around the flyer. This does mean you’re limited somewhat as to the length of cord you can make (on a spindle it’s roughly half your height, and on a wheel, it’s half of the furthest you can sit back from your wheel and still treadle, plus the length of your arm). It’s not perfect. For a longer cord, you can spin the single much like you would a singles yarn, but with extra twist. You’ll just have to let it wind onto the bobbin and then ply onto another bobbin (or wind onto the spindle shaft and ply as usual). But for a short cord, this method is pretty quick.
Remove the yarn from the spindle or wheel.
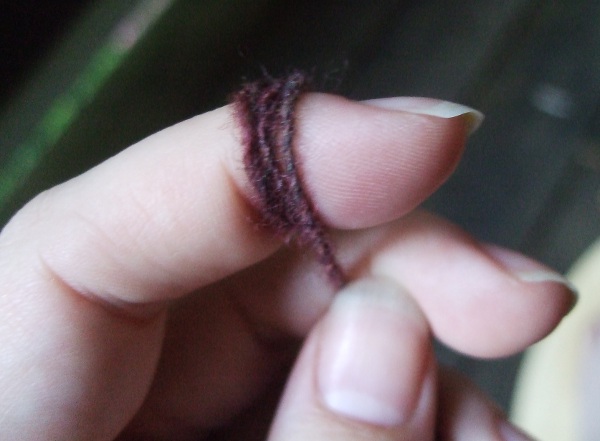
You’ll want to secure the free end somehow so the twist doesn’t unravel. I usually do this by wrapping it around one of my fingers a few times, as seen in the photo below.
To keep the cord from twisting together, you can hook your elbow around the twisted single to hold it out of the way while you retrieve the end that’s attached to the spindle or wheel.
On a spindle, you can just pinch the yarn above the hook and then pull the cup hook out of the end. On a wheel, you have to get the end through the orifice.
Pinch the yarn above the hook and bring it as close to the inner edge of the orifice as possible. Then take your other hand and pinch the yarn as close to the outer edge of the orifice. Then let go with the inner hand. You might loose about an inch of twist, but it will all balance out in the end.
Fold the yarn in half and allow it to twist together
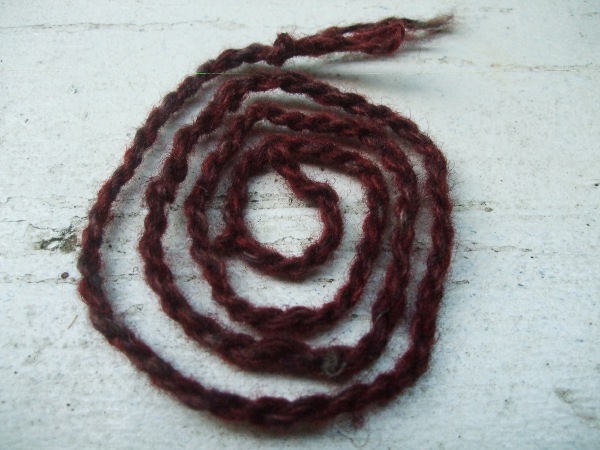
You’ll probably have more twist than necessary in the yarn–that’s okay. Run your fingers over the finished cord to even everything out and remove any extra twist. To finish, tie an overhand knot in the cut ends to prevent everything from untwisting.
And there you have it! An easy, quick method for making twisted cord–add it to bags, sweaters, pillows and more.
Share tips, start a discussion or ask one of our experts or other students a question.
No Responses to “How to Make Twisted Cord”