
So, you’ve been making jewelry for a while. You have perfected your wrapped loops, you’ve got crimping down, and you are developing a discerning eye for which beads and components you really want to work with. Your jewelry is developing its own distinctive voice, but there’s something that’s still not quite right. Perhaps it’s those finishing touches you put to your jewelry, the nuts and bolts that are easy to overlook initially: the findings. Don’t fret if the construction points that hold your jewelry don’t look quite as sophisticated as you’d like. We’re here to help!
Note: When you start out making jewelry, you don’t want to spend more cash than you need to. Bargain packs of lobster clasps and ear wires are extremely useful as you experiment and play with beads and wire, honing your techniques and finding your design voice. You can make, make, make without having to spend too much. Of course, as you develop your skills, you may well want to use higher quality components. Not just beads, but findings too…and this can mean spending a lot more!
There are some fabulous higher end mass-produced findings out there – but if you want to add value to your work and save a few pennies at the same time, then why not learn to make your own jewelry findings?
A few simple tools and a spool or two of wire is all you need to get started.
Whatever metal you want to work with ultimately, I would recommend starting out with something relatively inexpensive and flexible, such as copper. Copper is actually very often my metal of choice for my own designs, but even if you eventually want to create with sterling silver or other expensive metals, I still recommend beginning with copper. Mistakes and experiments are a lot less costly that way!
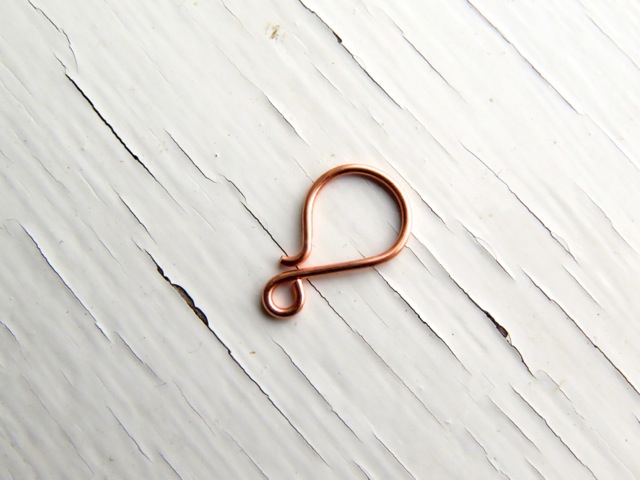
I am going to lead you through making a simple hook clasp. You can use this as a base for making your own unique findings – other clasps, but it will also easily adapt to ear wires.
Here are some tools you will need to make your own jewelry findings
Round-nosed pliers (RNP)
You can get long-nosed and short-nosed versions of these. If you end up making a lot of your own findings/wirework components, then you may wish to purchase both, but either will work for the simple design I am sharing with you today.
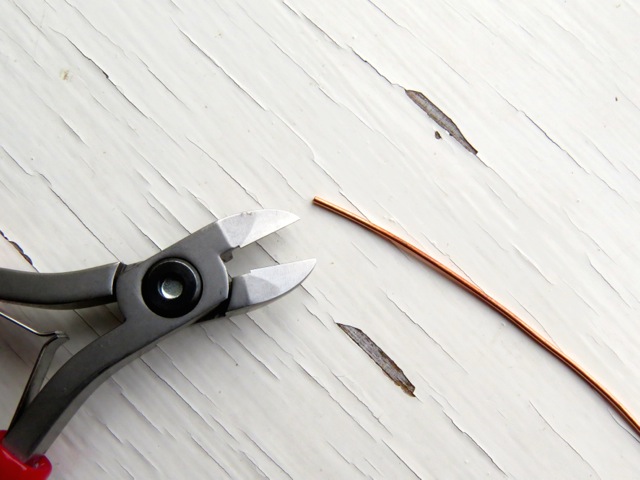
Flush cutters (FC)
Get the best you can afford! Although they can be expensive, the more expensive ones tend to last longer, so you may well be saving money in the long run, and you will certainly notice a difference when working with them.
Flat-nosed pliers (FNP)
These are so useful for steadying, flattening and holding wire when working with it.
Hammer
This can be ball-peen, planishing or chasing, but it needs a nice flattish but slightly domed face for best results in my experience.
Steel bench block (SBB)
This is really important for successful metal hammering and a worthwhile investment. If you’re going to a bricks-and-mortar bead/supplies shop, or a bead fair, you can save on postage by picking one up there (they are heavy!) but you cannot hammer metal/wire well without one of these.
Bail-making pliers (BMP)
7-9 mm are best for these projects. If you don’t want to purchase these straight away, then you can use a cylindrical object of the equivalent size.
(WB) (optional)
You will need this to sand/soften the end of ear wires, but it can also be useful for softening the ends of wire clasps, too.
Step 1:
Cut a 4″ (10 cm) piece of 1 mm (18g) copper wire, making sure to use the flush side of your FC.
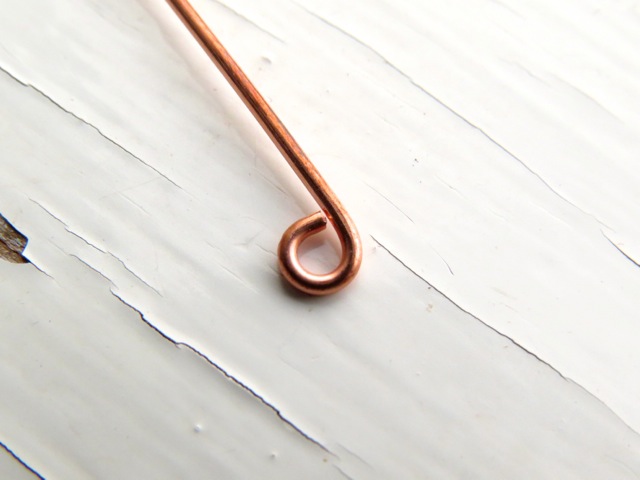
Step 2:
Turn a simple loop at one end with your RNP.
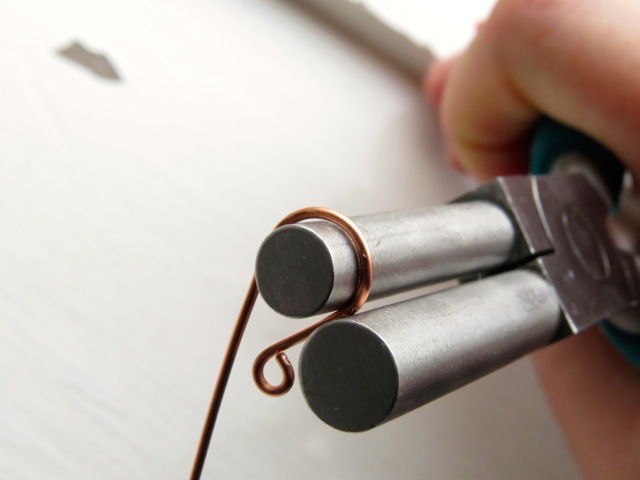
Step 3:
Use your BMP to turn an opposing loop above this, drawing the wire down to form a hook.
Step 4:
Flick out the wire roughly alongside the first loop, and trim with your FC.

Step 5:
Hammer the main curve of the loop to harden and therefore make the clasp more secure. Sand/soften the wire end if desired with the WB.
A few more tips to help you make your own jewelry findings:
- When hammering, you need to be firm but gentle at the same time. You do not want to damage or mar the metal. You do not have to raise the hammer too far above the metal before hitting — this is safer for your fingers, too! It takes practice but thankfully copper is a fairly cheap material to work with.
- If you wish to work-harden the wire without changing the look of it, you can use a rawhide or nylon-headed hammer to hammer it against your steel block. This actually causes a molecular change in your wire — toughening it up without the distinctive “hammered” look.
- Because you are able to harden the wire simply by hammering, where you can, work with “dead soft” wire. This means it is easier for you to work with initially, but it is still easy for you to end up with a nice and secure end project through work-hardening.
Want to learn more?
This is truly just the beginning! In the Craftsy class Make Your Own Wirework Findings, award-winning jewelry artist Lisa Niven Kelly shows you how to finish elegant jewelry, like beaded necklaces, bracelets, earrings and more, with custom findings.
Sign up today to find out how to create unique, exquisite components, from jump rings, head pins and ear wires to clasps, a stunning wrapped toggle and much more.
You might also enjoy our post on how to make a jump ring.
Share tips, start a discussion or ask one of our experts or other students a question.
No Responses to “How to Make Your Own Jewelry Findings: A Tutorial & Tips”