
As an illustrator, there are some fundamental you need to know in order to submit your drawings for publishing. One essential step is properly prepping your layout.
Here’s how to prepare and create your full page illustration layout.
What is a full bleed illustration?
When you are required to create an illustration that fills the dimensions of an entire page, this is called full page or full bleed art. The size of the page is called the trim size.
One of the first and most important details of your illustration assignment is the measurement of the area you will be working in. For any full page art, you will probably need to add 1/4 of an inch to all four sides of this precise measurement. This is your bleed area, allowing you to run artwork to the edge of a printed page.
Why is bleed area so important?
Bleed area is essential to your layout because on the press, the artwork will be printed on a large sheet of paper and then trimmed down to page size (also known as “trim size”). If you do not allow for at least 1/8 of an inch bleed, any misalignment while cutting will result in the artwork not running to the edge of the paper, and thus the possibility of a white strip of paper showing on one or more sides of a page that was to be full color.
Such an error would compromises the end quality of the entire project. Generally, most art directors like the added insurance of a 1/4″ bleed to your full page illustration.
How do you determine the layout size?
Many art directors will automatically provide you with a printed layout with markings for the trim size and bleed amount, so there is no guesswork. If not, you can ask for one, especially if you feel it will help you work better. And at this early stage, it is always a good idea to double check with the art director to make sure that the standard 1/4 inch bleed is enough for the project. There are sometimes when a project will require a little more bleed at one or more of the edges.
What about traditional vs. digital?
Since I am a traditional illustrator, I do my layouts manually, but the mechanics translate the same if you work on a computer. It is good at this stage in the illustration process to be as accurate as possible — your artwork should rest nicely on the page it will be printed on. Also, this can be your template you can use again, should you be doing more illustrations to this same size, let’s say for a book or a greeting card company.
Which comes first: the art or the page size?
To add a little of my own experience here, I am self taught. Though I knew a little of these mechanics by searching out just this kind of information, when I actually got my first assignments, it was a big concern of mine that I did not forget to figure in the extra bleed. It is best to deal with the mechanics first, and then let your artistic ideas flourish within the size you will be working in.
Generally, I do my illustrations the exact size or “same size” as they will be appear on the printed page. Some illustrators like to work bigger or smaller depending on the project. If you are going to work larger or smaller than the actual size given to you, make sure your measurements are proportionate to the size given. And always tell your art director if you are planning to work at a different size before you do so.
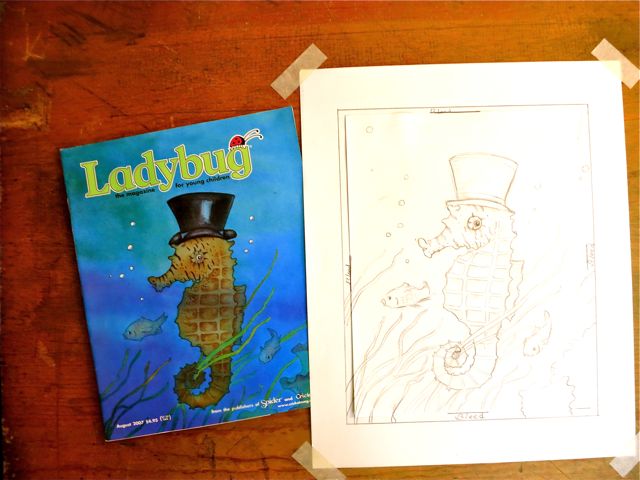
Here’s how I prepared the Ladybug Magazine cover illustration layout:
Step 1:
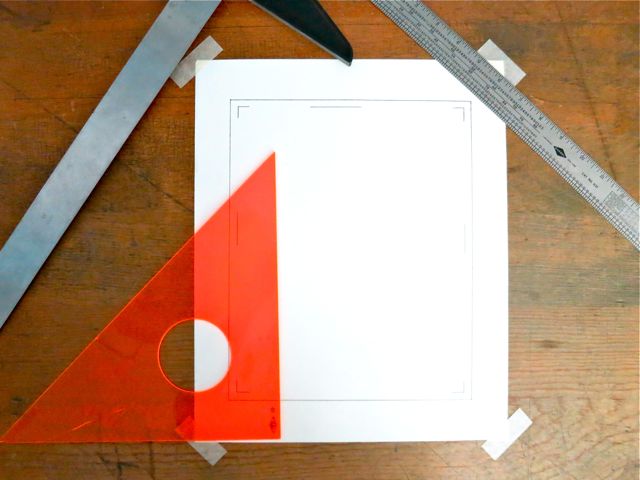
Using a T-square, ruler and triangle, I create my layout size with the additional 1/4″ all around (you can simplify and just use a ruler and the straight edge of your paper as your guide from which to make this same template).
As you can see in the photo above, the inner markings denote the the actual trim size and the unbroken outer line of the template allows for the bleed. So, the total size of your template is 8 1/2″ x 10 1/2″.
Step 2:
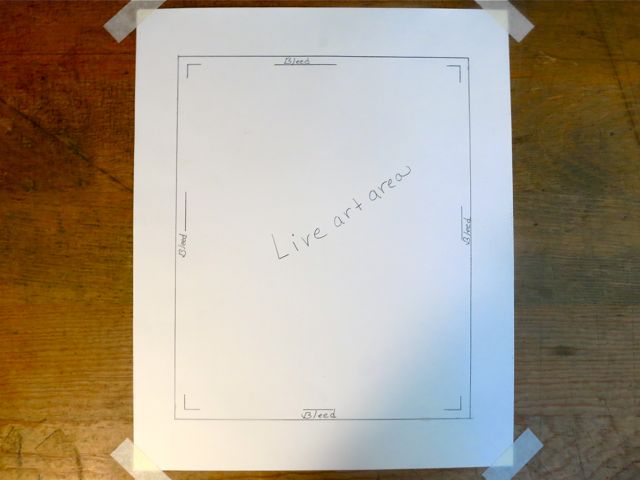
Now you can now leave the technical details for the art director and start the fun part. Remember that this is just the sketching stage and your art director will worry about the size, among other things, before you get the green light to finish.
When you start your sketch, all you have to remember about your markings is to keep any important art details like hands, feet or the edges of anything that might be central to you composition well within the trim size. The rule of thumb here is about 1/2 of an inch inside of the trim size. This area is called your “live art area.”
Step: 3
Since this post is specifically about the technical side of creating the layout for a full bleed illustration, I will jump right to the finished sketch.
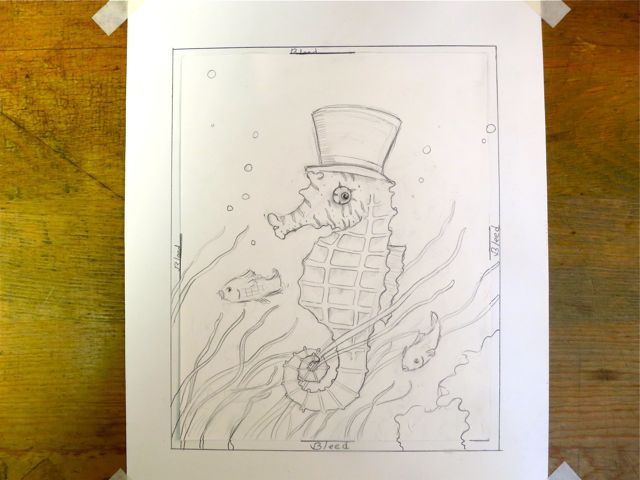
As you can see, I kept any important art details are well within the “live art area” of the trim size while continued background details, like the seaweed and bubbles, extend all the way out to the bleed lines.
Step 4:
Lucky for me, this sketch was approved by the art director without any required adjustments or “changes” on my part. So, I painted in the finished sketch.
Above left is the final result, all printed and published. It is always exciting when I find my printed copy in the mail!
Need helping coloring in your finished sketches? Join New York Times-illustrator Matt Rota in the Craftsy drawing class, Mixed Media: Pen, Ink & Watercolor and and learn how to combine mediums to bring your drawings to life in vivid color.
Share tips, start a discussion or ask one of our experts or other students a question.
No Responses to “Illustration 101: How to Prep a Layout for a Full Bleed Illustration”