
Have you ever built a great project in wood and then ruined it with a lousy sanding job? Do you dread sanding because it can be tedious and boring? I have to answer “yes” to both questions. But sanding doesn’t have to be a drag. Think of it as an opportunity to take your woodworking to the next level. I’ll give you some tips for how to properly sand wood that will help you create a consistent, smooth surface that brings out the beauty of the wood.
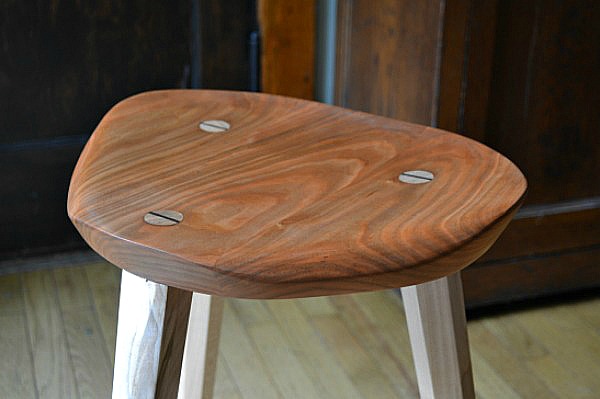
This smoothly-sanded cherry seat is beautiful and inviting.
If you love sanding, more power to you. While I can’t say I enjoy doing it, I have come to appreciate the importance of proper sanding. I spent some time working in a shop that made lots of doors and I would often have to sand, with a pneumatic sander and by hand, for hours on end. Even though it felt like drudgery at the time, I learned a few tips for sanding wood worth passing along. Being deliberate and strategic will give you much better results than if you just grab some sandpaper and sand until you get sick of it.
Tips for sanding wood
1. Scratch management
Sanding is scratch management. Think of sandpaper as a cutting tool, because that’s exactly what it is. Rough grits carve wide, deep scratches in wood. Finer grits make less wide, less deep scratches. Gradually, the scratches become so fine that you can’t see or feel them. That’s what creates a smooth surface. If you don’t go gradually enough – say, if you were to jump from 80 grit to 320 grit – the grit would be too fine to remove the deeper scratches, and you’d have a rough surface or one that appears cloudy.
2. Use a commercially-made sanding block
I recommend investing in a commercially-made sanding block. For years I would just grab a cut-off piece of wood, wrap some sand paper around it, and have at it. The problem with this approach is that it’s difficult to hold the sandpaper in place on the block. Fighting with the paper adds fatigue, which adds to dissatisfaction with the process.
Using wood as a sanding block can also cause problems. Pressing down on the surface can put too much pressure on individual pieces of grit so that they cut deeper than they are supposed to, introducing scratches that are difficult to sand out. A good sanding block will hold the paper in place and provide a soft backing with a little give to it.
Of course, you can make your own, using a layer of cork to serve as the backing. I would rather spend time making furniture than making sanding blocks. Get a commercial block that’s comfortable for your hand and be done with it.
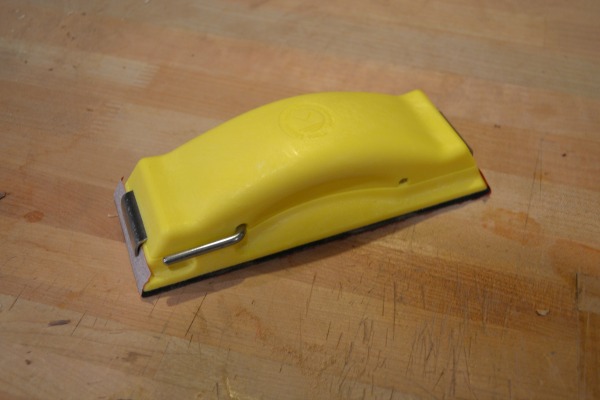
Using a commercially-made sanding block cuts down on fatigue and gives a better result than using a wooden block.
3. Don’t sand more than you have to
Like a chef tasting food to check the seasoning, a woodworker should constantly feel the wood surface and look closely at it. Since dust can collect and make the surface difficult to feel and see, brush it away from the surface periodically with a regular paint brush. I also use the brush to clean dust from between the grit on the paper. Train your fingers to feel different levels of smoothness.
Once you’ve sanded the entire surface with one grit and found that the surface is the same smoothness everywhere, it’s time to move on to the next grit. And once you’ve gone over the entire surface with incrementally finer grits and made sure everything looks and feels the same, you’re done. There is no reason to continue sanding. Doing so adds unnecessary time and aggravation.
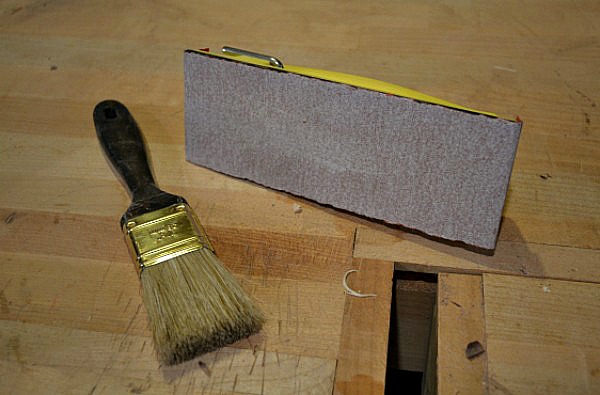
Use a regular paint brush to remove dust and make it easier to see and feel the wood surface.
4. Sanding edges
Attention to detail separates fine work from good work. After too many projects where I’ve unintentionally rounded an edge because of sloppy sanding, I’ve learned to take extra care with edges. Sometimes I clamp boards above and below the surface to act as guides for sanding.
If you are sanding the edge of a round table top, remember that the wood still has grain even though the shape is round. On the portion that has end grain, sand perpendicular to the top. On the portion with long grain, sand horizontally to the top. Between those two portions, gradually shift the angle of your sanding from horizontal to vertical. Otherwise, you’ll have deep scratches across the grain that mar the surface.
5. Sanding bias
Finally, it’s easy to get lulled into sanding what’s right in front of you. Picture yourself sanding a rectangular panel. As much as you intend to sand the entire surface consistently, in reality you tend to concentrate mostly on the area right in front of you. That’s what I call sanding bias. To combat it, I spin the piece around. I’ll work for a time from one perspective, doing my best to cover the whole surface. Then I’ll spin the piece and do the same thing. That way, I have a better chance of sanding consistently over the entire surface.
I once made an end-grain cutting board that a friend gave to her mother as a gift. The board had recessed handles and I sanded the recessed area with the same level of attention as I did the top. When the new owner first picked up the board, she couldn’t stop touching the recessed area. Wood is a tactile material, so paying special attention to the places people are mostly likely to touch always pays off. Think of sanding as an opportunity to enhance your project and your results will improve.
Share tips, start a discussion or ask one of our experts or other students a question.
No Responses to “Strategic Sanding: 5 Top Tips for Sanding Wood”