
Add scallops using this method for sewing a scalloped edge!
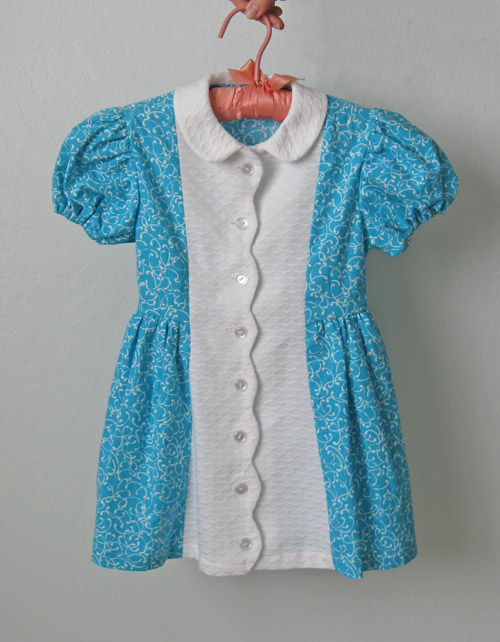
Image via SunnyGal Studio
On this retro-style toddler dress, the scallops are an accent to the button front, showing you are not limited to hemlines for placement. Consider scalloping the edge of sleeves, necklines or even the bodice edge of a fit and flare dress for an intriguing fashion design detail that’s all your own! Follow these easy steps and create your own scallop design with some tools you already have available.Step 1: Assemble your tools.
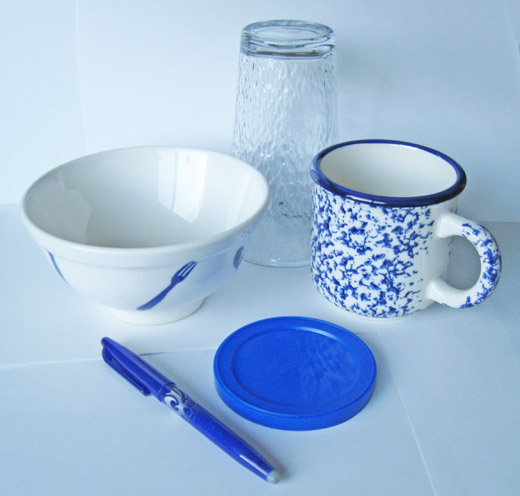 To get an even scallop design across your pattern, I like to use whatever round item is handy. Plates, bowls, jar lids or mugs work really well so grab a few items from your kitchen and start experimenting with the size and shape.
Step 2: Determine scallop size.
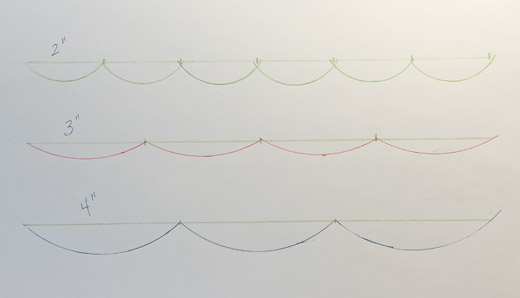 A scallop is a portion of a circle – sometimes a half circle and other times a bit less. Shallower scallops are a bit easier to sew, and also look nice on a hemline. I like to play around with the scallop size and depth on a piece of paper until I decide on my final design.
Start by measuring the length of the finished edge, because you need to decide on a width of scallop that is divisible into your finished edge. For example a dress with a hem circumference of 40 inches would look great with scallops that are 4 inches wide. Be sure to center one scallop in the center front and work your way around to meet in the center back for a more pleasing design.
A scallop is a portion of a circle – sometimes a half circle and other times a bit less. Shallower scallops are a bit easier to sew, and also look nice on a hemline. I like to play around with the scallop size and depth on a piece of paper until I decide on my final design.
Start by measuring the length of the finished edge, because you need to decide on a width of scallop that is divisible into your finished edge. For example a dress with a hem circumference of 40 inches would look great with scallops that are 4 inches wide. Be sure to center one scallop in the center front and work your way around to meet in the center back for a more pleasing design.
Step 3: Mark the baseline and scallops.
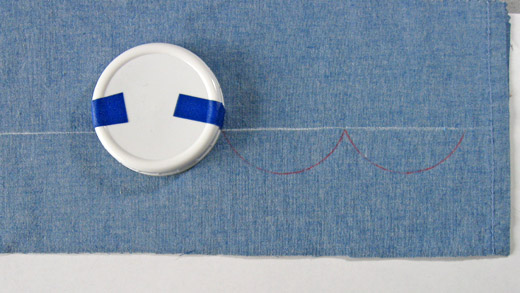 Start by marking on the wrong side of the fabric. Mark a baseline with chalk or other removable marker along the edge you want scalloped. You can mark the actual garment but I find it easier to mark the facing piece and then apply that to the garment. Then take your circle, in this example a jar lid, and put pieces of tape on the end points of the curve you have previously determined. Now you can just trace around the edge of the curve and move over to the next scallop, continuing this way until the whole length is marked.
Step 4: Stitch the scallops.
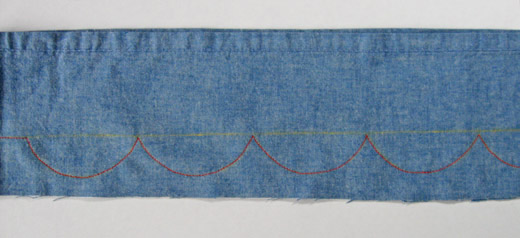 Time to stitch your facing to the garment edge. Sew right sides together, go slow and pivot at the inside corners. A shorter stitch length is helpful for sewing tight curves and narrow pivots such as these. I don’t do any cutting on the facing at this point, just draw on the stitching lines and sew as marked.
Step 5: Trim the scallops.
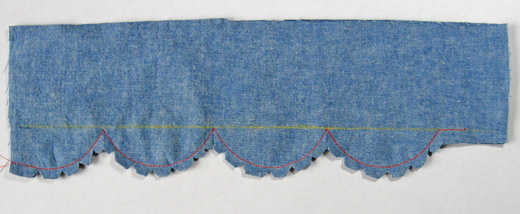 Snip the inside corners of the scallops right up to the stitching. For the curved portion, cut triangular wedges along the edge, as this curve is going to flip to the inside and we need to remove bulk on this seam allowance.
Step 6: Press the scallops.
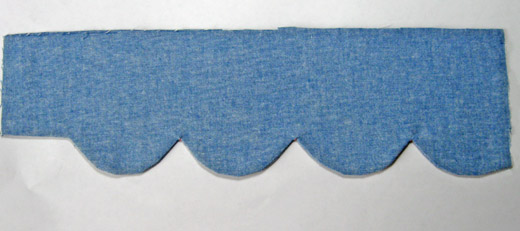 Turn the fabric right side out and press the scalloped edge. If the curves don’t look smooth, check to see if you need to remove a few more wedges on the seam allowance, as that can make the curve uneven if it is not trimmed enough.
Share tips, start a discussion or ask one of our experts or other students a question.
No Responses to “How to Design and Sew a Scalloped Edge”