Stabilized whipped cream may sound sort of like a science experiment. But there’s no need to panic or break out the old chemistry books: really, what it amounts to is whipped cream that is fortified with added ingredients to make it firmer and sturdier in texture.
Why stabilize whipped cream?
- For one, the whipped cream will retain its shape longer. Nobody likes a cake with melted, wilted frosting! This makes it an especially good choice for cakes which may be served outdoors or will be away from refrigeration.
- Visually, it can have some advantages as well. The firmer texture of stabilized whipped cream can make it easier to pipe, and it will hold shapes better and more crisply. For instance, piped rosettes or star tip borders around the edge of a pie will look prettier if they retain their crisp shape!
- Be aware, however, that stabilized whipped cream should be used fairly quickly after making it–the stabilizing agents can make the cream solidify, so like cake frosting, even if you’re not going to consume the dessert right away, you want to apply the whipped cream directly after making it.
There are a few ways to stabilize whipped cream–here are some of them!
Note: Before you get mixing, these basic tricks will help ensure success.
First, make sure that the beaters and the bowl used for whipping the cream are very cold. The easiest way to do this? Pop them in the freezer for about 15 minutes before whipping the cream.
As for the bowl you use, a stainless steel bowl will be a better choice than a glass bowl for this project.
Likewise, make sure the cream is quite cold–make sure it is refrigerated until the moment you’re going to start whipping.
A classic recipe for stabilized whipped cream
- 1 teaspoon unflavored gelatin
- 4 teaspoons cold water
- 1 cup heavy whipping cream
- 1/4 cup sifted confectioners’ sugar
Step 1: In a small pan, combine the gelatin and cold water. Stir gently, and then let the mixture stand until it has turned thick.
Step 2: Place the pan over low heat, stirring constantly, until the gelatin is completely dissolved. Have a small rubber spatula on hand, too, for scraping down the sides of the pan so that no sticky globs form.
Step 3: Once dissolved and incorporated, remove the pan from heat. Let it cool to warm, but do not let it set completely.
Step 4: Whip the cream until soft peaks form. Add the confectioners’ sugar and beat until combined.
Step 5: Reduce the beating speed to low, and add the gelatin to the whipping cream with the beaters going all the while.
Step 6: Return to high speed, and beat until stiff peaks form.
If this method sounds too labor-intensive, there are other options for creating your cake decorating-friendly stabilized whipped cream. There are several homespun (and shortcut!) methods which are also effective in creating stabilized whipped cream. Here are a few of those:
Marshmallow method
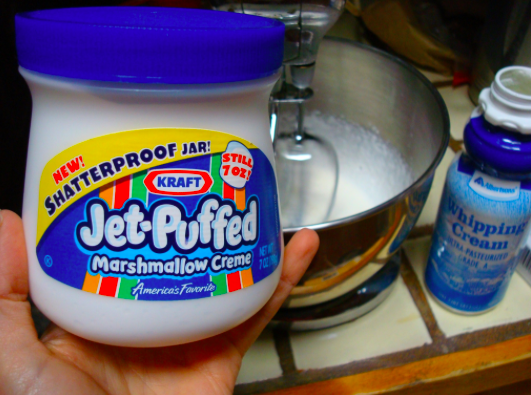
Using either melted marshmallows or marshmallow fluff will add a nice texture to your stabilized whipped cream, but be aware that it will impart a mild marshmallowy flavor to your end result. This is fantastic for many desserts, but it may not be for everyone, especially the marshmallow averse!

Stabilized whipped cream with marshmallows
- 1 cup heavy whipping cream
- 2-3 jumbo marshmallows, or 1 heaping tablespoon marshmallow fluff
Note: Do not use mini marshmallows, as the cornstarch frequently added to them to keep them from sticking in the bag may act as a deterrent in the melting and mixing process.
Step 1: In the bowl of a stand mixer fitted with the whisk attachment, beat the whipping cream until soft peaks form.
Step 2: At this point, stop the beaters and make a decision. Either melt 2-3 jumbo marshmallows or a heaping tablespoon of marshmallow fluff by heating in the microwave in 5 second intervals until melted. Stir gently until you have a gooey, thick mixture.
Step 3: Add the melted marshmallow to the whipped cream, and continue whipping until stiff peaks form.

Pudding mix method
- 1 cup heavy whipping cream
- 2 tablespoons instant dry vanilla pudding mix
Note: While French Vanilla pudding mix will also work, it will impart a slightly off-white color to the whipped cream. If you prefer a more neutral or white color, use plain vanilla pudding mix.
Step 1: In the bowl of a stand mixer fitted with the whisk attachment, beat the whipping cream until soft peaks form.
Step 2: Add 2 tablespoons of vanilla pudding mix (dry) to the soft-peak mixture.
Step 3: Continue whipping until the mixture forms stiff peaks.
Crème fraîche or mascarpone method
This method doesn’t hold up as well in heat as the previous options, but does have a sturdier texture than plain ol’ whipping cream.
- 1 cup heavy whipping cream
- ½ cup mascarpone cheese or creme fraiche
- ⅓ cup confectioners’ sugar
Step 1: In the bowl of a stand mixer fitted with the whisk attachment, beat the whipping cream until soft peaks form. Add the sugar.
Step 2: Add 1/2 cup mascarpone cheese to heavy cream when whipping.
Step 3: Continue whipping until the mixture forms stiff peaks.

Share tips, start a discussion or ask one of our experts or other students a question.
No Responses to “How to Stabilize Whipped Cream”