
Have you seen those really cute graphics that have words fitted inside a shape? I have seen that done in machine embroidery and wanted to see if I could create my own word cloud using my basic embroidery software (like the software featured in Cookie Gaynor’s class, Digitizing Machine Embroidery Designs) and my embroidery machine. It worked!
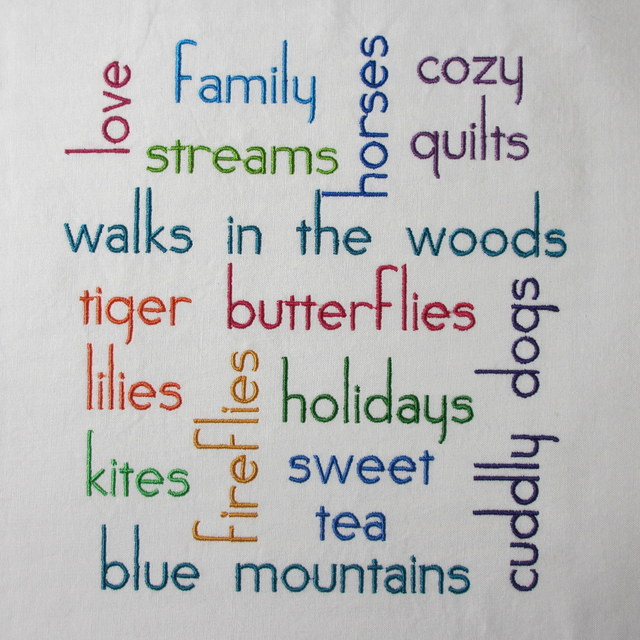
I used a list of some of my favorite things and stitched this with my embroidery machine. What do you think?
There are word cloud generator Web sites that allow you to input any words you choose and the application generates word clouds in the shape of your choice.
These applications will also randomize layouts so that you can select from multiple designs. Some of them allow you to save the graphic, while others won’t let you save it but will let you print the page.
One thing I found was that I had to put a hyphen between words in a phrase if I wanted the words to stay together rather than being split into individual words.
I found Web sites by using the search terms “word cloud” and “tag cloud,” and found quite a options of word cloud generator applications, including Wordle, Tagxedo and ABCya.
As you explore, you will see that the options for fonts, layout shapes and colors give you endless possibilities.
You can create anything you can imagine with just a little bit of time and persistence. Think how much fun it can be to personalize a project with a word cloud and a few small graphics. These would be great on T-shirts, quilt blocks, tote bags and dorm pillows (learn more about machine stitching embellishments onto clothing in Eileen Roche’s Craftsy class, The Machine Embroidered T-Shirt). This would also be a creative way to make a quilt label or stitch a word cloud onto a canvas and frame it for a wedding gift.
How to make a word cloud shown using your embroidery machine and basic embroidery software.
Step 1:
Make a list of the words you want in your cloud and add it to the word cloud generator application. Print a copy on paper and use that as a base for working on the embroidery.
Step 2:
Open your embroidery software and select a font by typing in words with different fonts and previewing them in 3-D view until you find one you like. For this first project, I decided that a sans serif font would be best.
Step 3:
Type words into the embroidery software using the printout from the word cloud generator application as a guide.
I was surprised at how much difference the choice of font makes when trying to fit the words together. Depending on the font you choose, the words may fit like they are on the printout, or the spacing may be completely different.
Be careful to stay within the limits of your embroidery hoop. This is where you get to be creative and move the words around and fit them together like a jigsaw puzzle. Turn some words sideways by rotating 90 degrees and split some phrases by placing them vertically. Or try adding new words and taking away some that are there until they all fit into a pleasing layout.
Another option that would be really nice is to use some of the tiny motifs from your embroidery software or very small embroidery designs you have purchased to fill in some of the spaces and to personalize the word cloud. For my next word cloud, I am going to try adding some small motifs.
What kind of word cloud would you stitch?
Share tips, start a discussion or ask one of our experts or other students a question.
No Responses to “How to Stitch a Word Cloud”