
When I first started knitting sweaters, I ended up with several disappointing results. My sweaters were all super baggy, and they just hung off me. Because the fit wasn’t great, I didn’t wear them.
After a few years of abandoning sweaters completely, I came upon a tip from Craftsy instructor Amy Herzog that completely changed the way I choose sweater sizes.
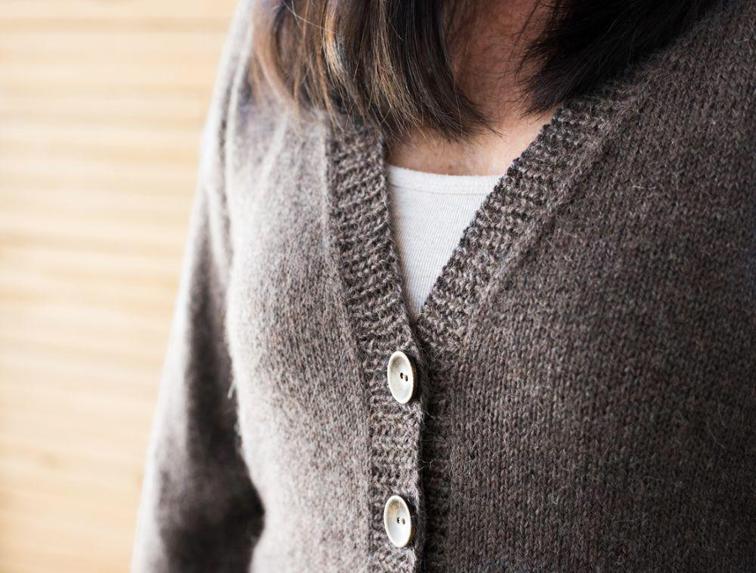
Make a custom-fit cardigan in Amy Herzog’s Simple Techniques for a Super Fit class.
There are lots of different methods for choosing a sweater size.
Some methods have you choose the size based on bust, making adjustments to the shoulders and waist. Others have tips on combining different sizes to get the best fit all over. This method from Amy is just one method, but it’s the one that works best for me.
If you’re struggling to get a good fit for your knit sweaters, give this a try:
Step 1: Measure your upper torso.
Amy’s fit tip starts with your upper bust measurement. Rather than basing your size on your bust measurement, base it on the upper bust measurement. Wrap the tape measure under your arms, pulling it as close as you can to your armpits. Pull the tape measure snugly, then check out the number. Amy calls this an upper torso number.
Step 2: Decide how much (or how little) ease you’d like.
Most sweaters are designed to fit with an inch or two of positive ease. This means that rather than a sweater that clings to you, you’ll have a bit of breathing room. (For more info, read all about positive ease here.)
Usually the sweater pattern notes will suggest how much positive ease to work into your measurement. Take that number and add it to your upper torso measurement. So for example, if your upper torso is 34″ and you want to add 2″ of positive ease, then your number will be 36″.
Step 3: Find your size according to the upper torso.
Now check out your pattern. As you probably know, most sweaters are sized according to bust size (36″, 38″, 40″, etc.). However, let’s say your bust is 40″ and your upper torso measurement is 35″. If you knit the sweater that has a 40″ bust, then the sweater’s shoulders might be drooping off your shoulders. The shoulders might even look baggy, like mine used to!
The reason for this, according to Amy, is that shoulders are one of the most important and hardest parts of the sweater to fit. So if you base your size on the shoulders, you have a great foundation to work from.
Also, basing the size on the bust measurement and then trying to adjust the shoulders is way more difficult than simply adjusting the bust. (More on that later!)
So take your upper torso number plus your positive ease, and find a size that comes close to that:
Upper Torso Measurement + Positive Ease = Sweater Size
Step 4: Plan adjustments.
This is where things get just a little complicated. Because we based the size on the upper torso rather than the bust, you may need to make some adjustments for the bust, waist or hips.
If your measurements already fit within the range of the finished measurements…
Lucky you! You don’t need to make any further calculations. If all your measurements (bust, waist, hips) fit within 1″ to 2″ of the finished measurements and you’re happy with that fit, start knitting!
If any of your measurements fall quite a bit out of the range of the finished measurements…
You’ll have to make some adjustments. Let’s say, for example, that you chose the 40″ bust size to fit your shoulders, but your bust is 44″ and you don’t want the sweater pulling too tightly. Or maybe the 40″ bust size has a waist measurement of 38″, but your waist is 34″ and you want a more fitted look. These are both situations in which you might need to make an adjustment.
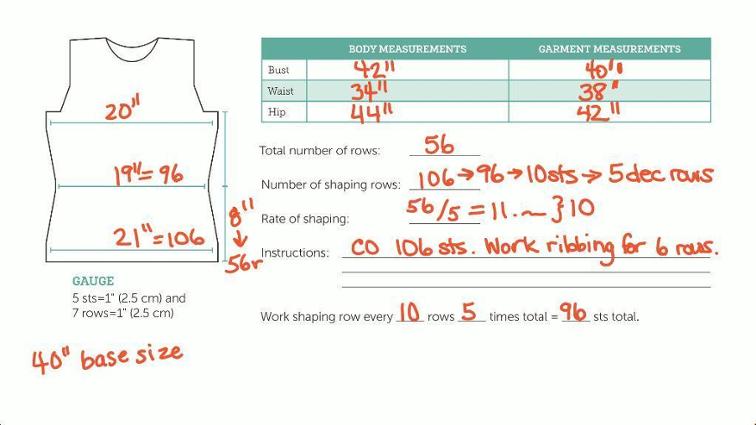
Custom fit worksheet from Amy’s Sweater Modifications for a Custom Fit class.
Amy uses a simple formula that works in conjunction with the sweater gauge to figure out how many stitches you need to add or subtract, as well as how many shaping rows and how often you’ll need to complete a shaping row:
Total number of rows / number of shaping rows you need to work = Shaping Rate
This formula can work for bust, waist, or hip adjustments, and you can see an example pictured above from Amy’s Sweater Modifications for a Custom Fit class.
If you’re giving this a try and the math still seems fuzzy, download Amy’s shaping worksheet from her website to keep track of all the numbers.
If the math is really stressing you out, or if you want to learn even more about fitting, check out one of Amy’s classes: Knit to Flatter, Sweater Modifications for a Custom Fit, or Simple Techniques for a Super Fit. Yay for sweaters that fit!
Shoulders