
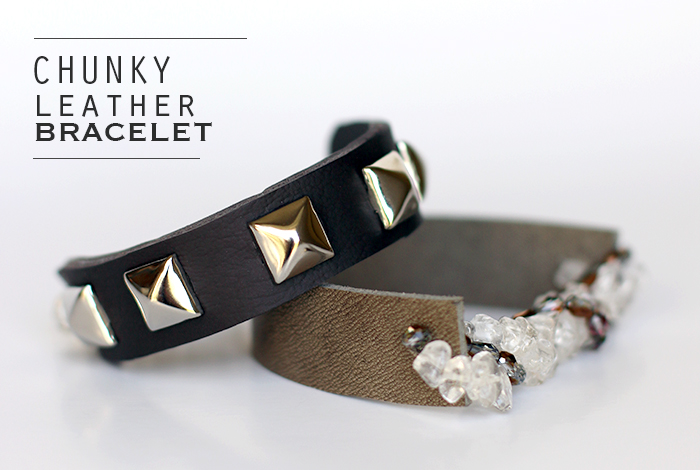
I’ve always wanted to make a leather bracelet, and after working with the leather for this DIY project, I have to say I am hooked!
Follow along for the steps to this leather bracelet tutorial!
What you need:
- Leather — You can buy a sheet of leather and cut it to size or buy the leather strips.
- Gosshammer Floss or Magic Stretch
- Strand of beads
- Strand of crystals
- Leather glue or hot gun glue
- Pyramid spacers
- Scissors
- Pen or marker
Instructions:
Step 1.
Cut your leather to size. You need about 5.5 inches or 14cm.
Step 2.
Score the leather with little slits for your pyramid spacers. There are tools at your local craft store that can be used for this, but I simply used my scissors to make the slits.
Step 3.
Add the pyramid spacers, and bend their legs to the inside.
Step 4.
Apply hot glue or leather glue to the inside of the leather straps. I used a piece of cardboard to distribute the glue, then I glued them together!
Step 5.
Mark the cutting line with a marker or pen, then cut along that line. Using sharp scissors will help you to cut a nice line. To remove any fraying I use a lighter along the cut edge.
Step 6.
Punch a hole on both ends of the leather with a tool or a thick needle.
Step 7.
Start by going through one of the leather piece holes, leaving a tail (picture #7).
Step 8.
Continue by threading the beads on your elastic over a length of about 2 inches or 4,5 -5 cm. Add the big beads first. Then go through the hole on the other side of your leather piece and thread more beads on, creating a circle with your beads.
To create a beautiful design, I used two rows of crystals. Then I closed that loop near a leather piece hole with two overhand knots.
Share tips, start a discussion or ask one of our experts or other students a question.
No Responses to “8-Step Trendy Leather Bracelet Tutorial”