
To help you, here are some foolproof tips for muslin fitting!
Do work before you work
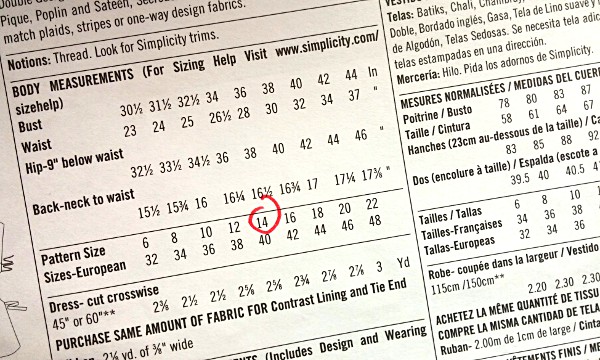
Take your body measurements – there are some great tutorials online if you don’t know how – and pick the pattern size closest to your measurements. If you’re in between sizes err on the side of caution and go for the larger size. It’s far easier taking out excess fabric than visa versa. Once you’ve cut your pattern pieces out, measure them flat and make necessary adjustments. This will help eliminate obvious problems and allow you to spend more time on trickier problems at the muslin stage. Things you can easily adjust at this stage include width for shoulders, necklines and back, as well as length of bodices, sleeves and skirts.Muslins are traditionally made using inexpensive woven cotton — but old bed-sheets are a very affordable alternative. However, if your final garment is going to be made from knit or drapey fabric, then choose a fabric that behaves similarly for your muslin.
Marking and cutting your muslin
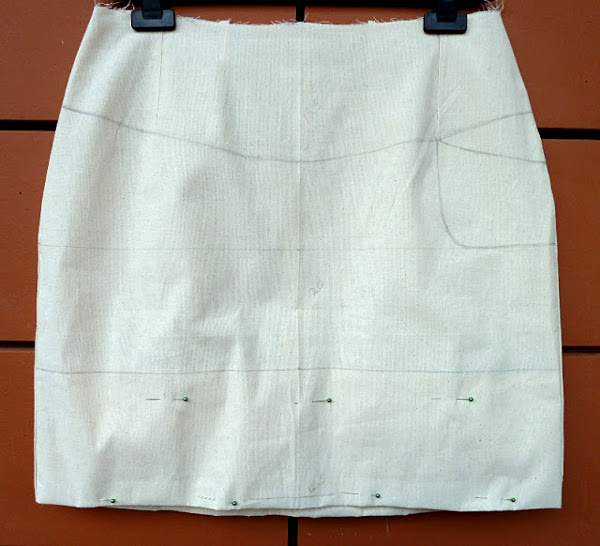
In order to have a true representation in your muslin, it’s important to accurately transfer your pattern’s main markings and cut your fabric. Key things to mark include the centre front and back lines, front and back waist placement, all darts, the bust point, the hip line and grain lines. If the pattern has pockets, unusual design details or pieced elements, those lines can also be marked so you can see where they ‘sit’ on your body.Sewing your muslin
Accurate stitching is crucial, but do so with a longer stitch length in case seams or darts need to be unpicked and adjusted. There’s no need to finish the seams, hems can just be pinned and closures like zips can either be basted or pinned in place. To get a better idea of the neckline and armhole fit, machine-baste along those seam lines, clip the curves and press under your seam allowances. You can also speed up the process by just setting in one sleeve (but sewing in both will ensure the fit across the back is ok) or only making the bodice of a dress (although the final fit can depend on the shape and weight of the skirt).Trying on and adjusting your muslin
Trying on your muslin doesn’t mean just standing in one place. To get a true feel of the fit walk around, sit down, bend and straighten your arms, reach for something up high. Ideally, try it on with the underwear and shoes you intend on wearing with the finished garment.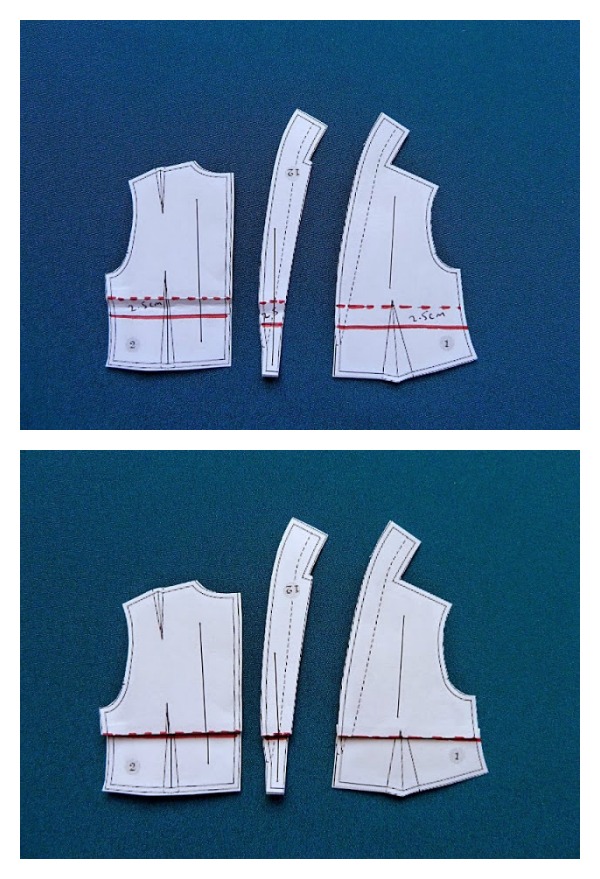
Share tips, start a discussion or ask one of our experts or other students a question.
No Responses to “Expert Tricks & Foolproof Techniques: Tips for Muslin Fitting”