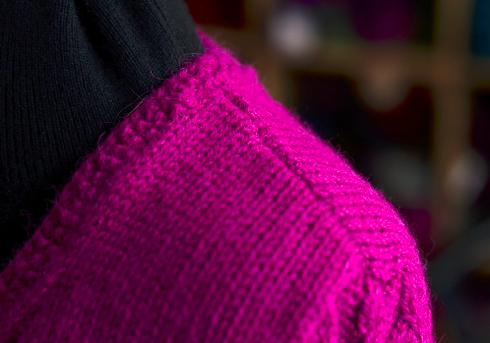
 When we execute the graduated bind-off in this way we also end up creating a shoulder which is taller at the inside, near the neckline or collar, and shorter at the outside edge where the shoulder meets the sleeve. All of this helps to achieve a more fitted look to the final sweater, which is why it is so well matched to the set-in sleeve (a style which easily conforms to the shape of your upper arm).
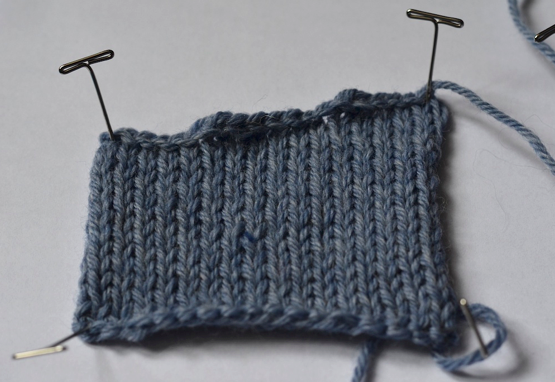
On the other hand, this can also create a more challenging edge to seam together during finishing. As we can see from the swatch example below (worked in Cascade 220 Heathers, for anyone curious!), the series of separate bind-offs can leave a jagged edge behind in their wake. It is no surprise this kind of shoulder is sometimes referred to as “stair steps.” It produces a sloped edge but one that is less neat and tidy. This means that if the two sides of the shoulder are not seamed together just right, the finished seam is less likely to sit flat and even when worn.
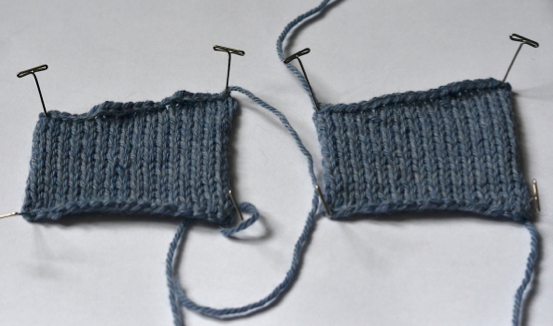
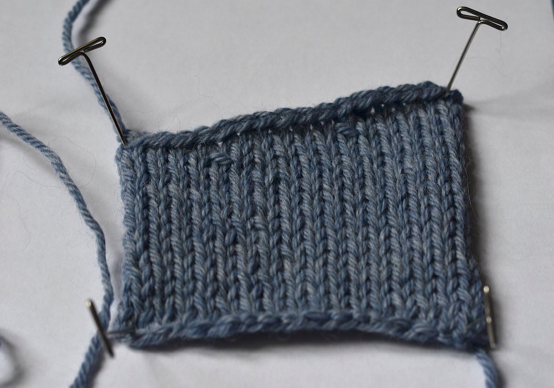
 But, there is rarely one way to accomplish any task in knitting – don’t let anyone tell you differently! And as with most things, an alternative method exists for executing this kind of shaped shoulder. This same kind of sloped shoulder may be accomplished through the use of short-row shaping. Compare the two swatches below: Swatch #1 is the same as we have seen above, which demonstrates the bind-off done in 3 parts. It has a total of 18 sts, and 3 bind-offs of 6 sts each have been executed. Swatch #2 also uses 18 stitches in total but achieves a neatly diagonal shoulder slope with the use of short-row shaping.
 Short-rows are just what they sound like: rows that are knitted shorter than the full length of the row. To achieve this short-row shoulder shaping on the 2nd swatch, I worked across the right side row and stopped at the point where the row would have stopped if the first 6 sts had already been bound off. Then, I worked a wrap-and-turn and purled back across the wrong side of the row all the way to the end. I then turned the work and did this entire step again a 2nd time, this time stopping the short row where the row would have stopped if the first 12 sts had already been bound off. I then worked a second wrap-and-turn and completed the wrong side row. Finally, I bound off all stitches knit-wise. The final bind-off included all 18 sts on the row, but the sloping had already been achieved through the short-row steps. Here is a closer look:
 The final step in the sweater finishing process, of course, is to sew together the seams and complete any collar or button-band that might be necessary. A horizontal seam may be easily completed between two shoulders which use this short-row shaping, but a three-needle bind-off can also be executed if all stitches for both sides of the shoulder are kept “live” on the needles before the final finishing is done. This is another advantage of the short-row shoulder shaping: the door is open for other kinds of final bind-off during the sweater finishing process.
Even if a pattern does not include short-row shoulder shaping in its instructions, it is still possible to modify the pattern instructions accordingly. For example, if your pattern size instructs you to bind off a total of 18 sts over 3 bind-offs, or 6 stitches each time, that means you would work 2 short-row steps. (The number of short-rows you will work is 1 less than the total number of bind-off steps in the graduated bind-off shoulder). In the swatched examples shown here, these would be for the front of a Right Shoulder or the back of a Left Shoulder, where the graduated bind-off steps would occur purl-wise, on a “wrong side” row. To modify this for a short-row shoulder, you would work across the “right side” of the work until there are 6 sts left (the number of the first graduated bind-off), then work a wrap-and-turn. On the second short-row, you would work until there are 12 sts left (the total number of the first and second graduated bind-offs added together), and work the second wrap and turn. Ta-da! You are done, and all that’s left is the final bind-off for the top of the shoulder.
Consider trying short-row shoulder shaping on your next sweater project that calls for sloped shoulders. Practice it on swatches just as we’ve done here. It might just transform your sweater finishing altogether!

Share tips, start a discussion or ask one of our experts or other students a question.
No Responses to “Shoulder Shaping: Short Row Options”