
S’mores are warm and delicious cookie sandwiches made from the assemblage of graham crackers, marshmallow and chocolate. Traditionally made in the outdoors at campfires and other open-aired events, the marshmallows are roasted on a stick, then added to the other ingredients, creating delectable treats.
These s’mores fondant toppers were made to mimic these ooey-gooey delights in honor of National S’mores Day (which is tomorrow, August 10th!). Make them in celebration of this deliciously melty holiday, or create them for any outdoor-themed party. No matter how you use them, they’re sure to be a hit!
Follow this sweet fondant tutorial creating adorable cupcakes.
Materials:
- Fondant (tan, brown and white)
- Fondant rolling pin & 1/8″ guide rings
- 2 wooden dowels
- Water/edible glue and brush
- Vegetable shortening
- Medium square cutter
- Large modeling stick
- Rolling embosser
- 7/8″ circle cutter
- 7/8″ scalloped cutter
- Knife tool
- Round decorating tip #7
- Optional: tylose powder
- Optional: bamboo sticks
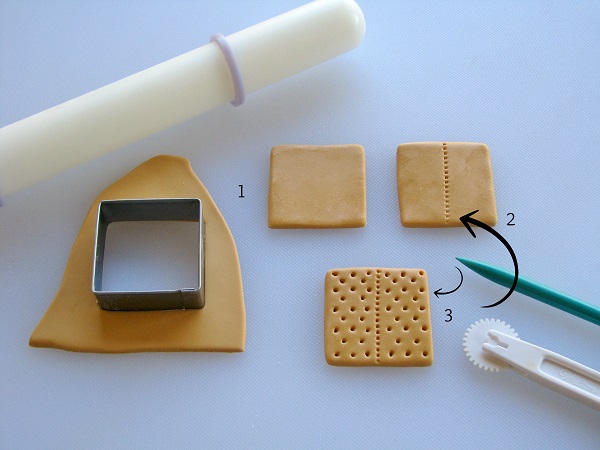
Step 1:
Roll tan fondant with the rolling pin and 1/8″ guide rings. Cut out two medium squares with the cutter to create the graham crackers.
Step 2:
With the rolling embossing tool, make a linear indentation across the center of one of the tan graham crackers.
Step 3:
With the large modeling stick, make dotted indentations on both sides of the graham cracker in a planned pattern.
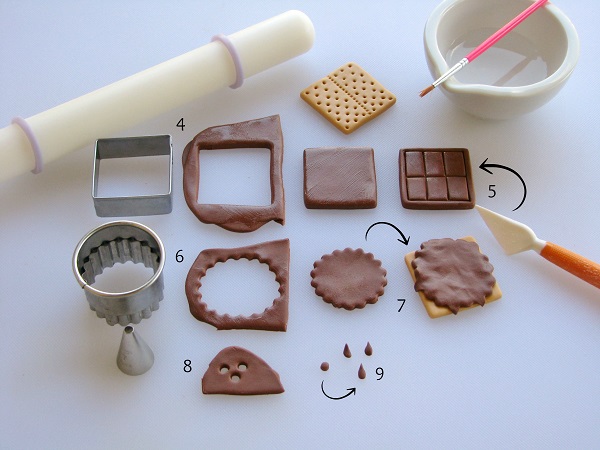
Step 4:
Roll out brown fondant with the rolling pin a bit thicker than you would with the 1/8″ guide rings. Cut out a square with the cutter to begin creating the chocolate.
Step 5:
To make indentations on the brown fondant to create chocolate squares, utilize the knife tool. First, indent about 1/8″ inward on all four sides to make the outer square. The length of the knife tool is very similar to that of your fondant piece. Next, continue to utilize the knife tool to make one indentation lengthwise down the center of the chocolate. Finally, make two small indentations across the width creating little rectangles on the chocolate bar.
Step 6:
Roll brown fondant with the rolling pin and 1/8″ guide rings. Cut out a 7/8″ circle with the scalloped cutter.
Step 7:
Dip your fingers in a bit of vegetable shortening, then spread it across the scalloped circle. Begin to stretch it out a bit in an irregular shape that will ultimately represent the melting chocolate. Pull a few pieces a little longer (approximately three) and pinch the ends with your fingers to mark the sections where chocolate will be dripping.
Step 8:
Roll out additional brown fondant with the rolling pin and 1/8″ guide rings. With round decorating tip #7, cut out three circles (or as many as you planned for the dripping chocolate).
Step 9:
Roll the small brown circles into balls, then form them into teardrop shapes and allow them to dry.
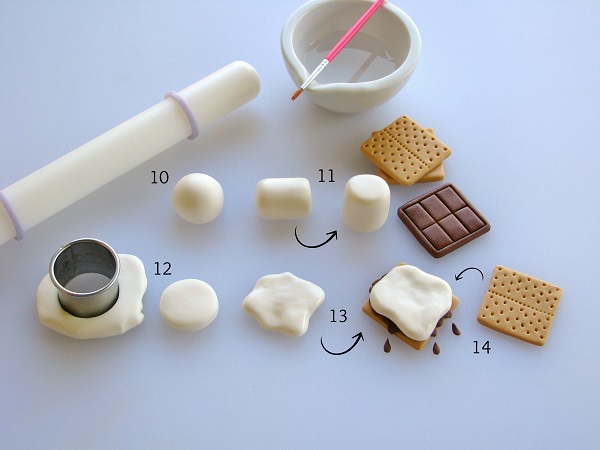
Step 10:
Roll some white fondant into a ball (approximately 1″). If your fondant is not very firm, add some tylose powder to your white fondant prior to rolling into a ball to allow it to dry and stiffen quicker.
Step 11:
Dip your fingers in some vegetable shortening and begin to shape the white fondant ball into a cylindrical shape to form the marshmallow. You can lay it on its side as it dries and once it seems firm enough and if desired, you can sit the marshmallow upright. If you would like your marshmallow to be on a stick, ready to be roasted, simply twist a bamboo stick into its center and allow it to dry. If drying on your work surface, place an object underneath the stick as the fondant marshmallow stiffens.
Step 12:
Roll white fondant thick with the rolling pin and wooden dowels. Cut out a 7/8″ circle with the round cutter.
Step 13:
Dip your fingers in vegetable shortening, spread it across the white fondant circle and begin to round it and spread it out. Continue shaping it in an irregular shape that will ultimately resemble the melted marshmallow.
Step 14:
Assemble the s’more by layering the bottom graham cracker, melting chocolate and melting marshmallow in that order. Glue the pieces of fondant together. Once the top graham cracker is sufficiently dry and stiff, glue it to the top of the layered s’more.
You know have both the ingredients to making a s’more, as well as a melting, assembled one. For the latter, when placing it over a cupcake, be sure to position the little chocolate drips on the icing, underneath the pinched chocolate to make it look like it is melting over your cupcake!
Don’t stop here! Keep celebrating National S’more’s Day treats by creating the ultimate chocolate + marshmallow + chocolate sandwich! Check out this recipe for homemade graham crackers and this recipe for homemade marshmallows to take your s’more to the next level. Then, be sure to check out this roundup of creative s’more recipes, for a gourmet twist on this classic campfire treat!
Share tips, start a discussion or ask one of our experts or other students a question.
No Responses to “A S'mores Fondant Tutorial That Will Leave You Wanting S'more!”