
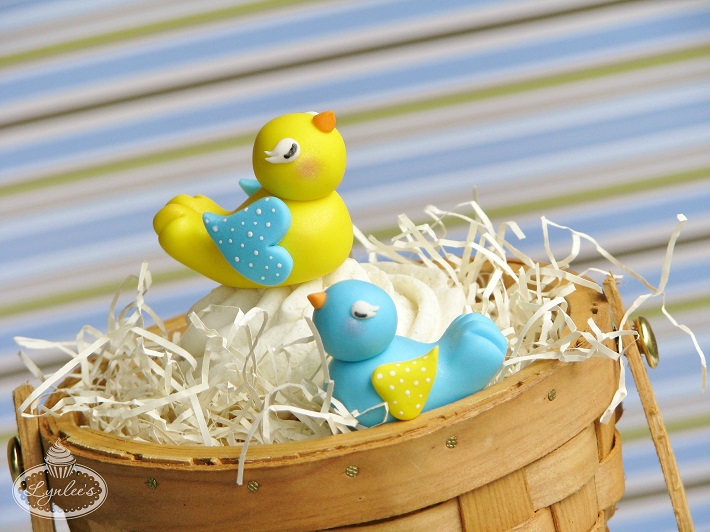
As March rolls around and the little birdies begin to chirp, it can only mean one thing: Spring is on its way! Birds become an exceedingly popular theme, making the perfect motif for seasonal birthdays, as well as love birds for weddings and bridal showers or feathering momma bird’s nest at a baby shower.
Welcome the new season by following this tweet tutorial to create a bird fondant topper for your springtime cupcakes!

Materials:
- Yellow, light blue, orange and white fondant (interchange colors of choice)
- Water/edible glue and brush
- Fondant rolling pin and 1/8″ guide rings
- Knife tool
- Small heart cutter
- Round decorating tips #6 and #7
- Precision knife
- White soft gel paste
- Toothpick
- Black edible marker
- Pink shimmer dust and brush
- Optional: Tylose powder
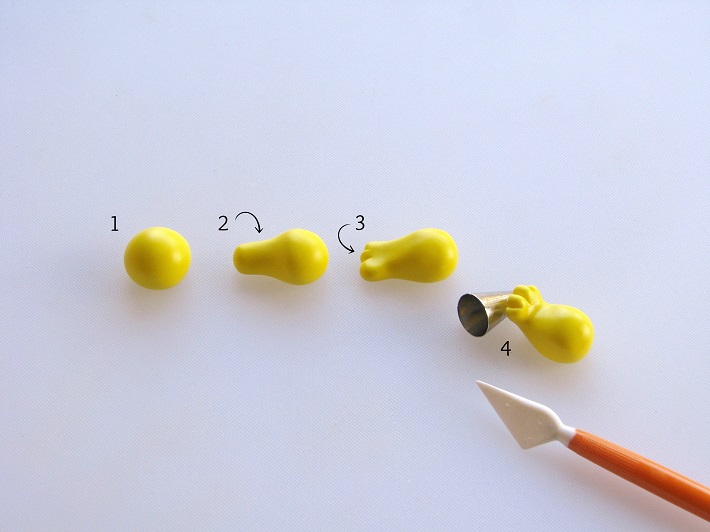
Step 1:
Roll yellow fondant into a ball (approximately 1″). If your fondant is very soft and needs some help to harden enough to hold its shape, add a little bit of Tylose powder to it prior to rolling it into a ball.
Step 2:
Start to pinch a portion of the yellow fondant with your fingers and begin to gently twist and pull it out a bit. Flatten out the end just a bit with your fingers.
Step 3:
With the knife tool, make three indentations to create tail feathers, making the center indentations a little longer, then proceeding to both sides to make smaller indents.
Step 4:
Shape the tail feathers upward and utilize a smooth surface, like a round decorating tip, to rest it against, allowing it to firm up and dry in the desired position. If necessary, utilize some vegetable shortening to soften the surface of the fondant, especially where you are bending it to avoid elephant skin. Set it aside and allow it to dry a bit.
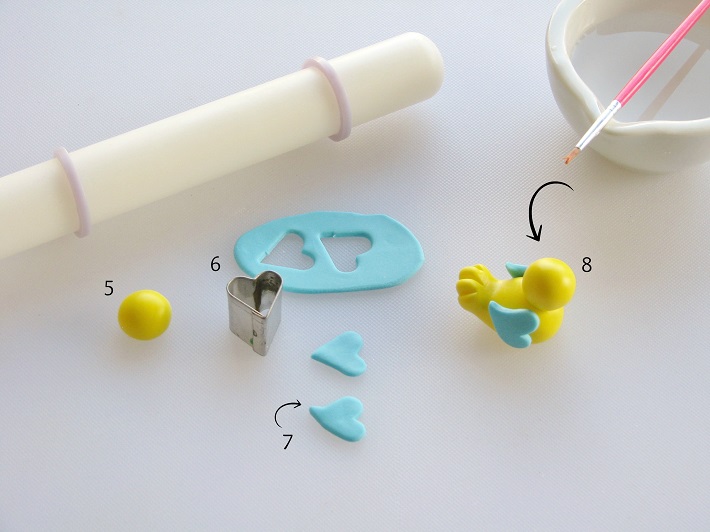
Step 5:
Roll another piece of yellow fondant into a ball (approximately 1/2″) to create the head and set it aside.
Step 6:
Roll out light blue fondant onto your work surface with the fondant rolling pin and 1/8″ guide rings. Cut out two hearts with the small cutter.
Step 7:
Hold the heart-shaped fondant on its side, then take the pointed end and with your fingers, gently pinch it upward to create a wing. Repeat this step with the second fondant heart, making sure to form it in the opposite direction.
Step 8:
Glue the head onto the bird’s body, along with the wings onto both sides of the bird.
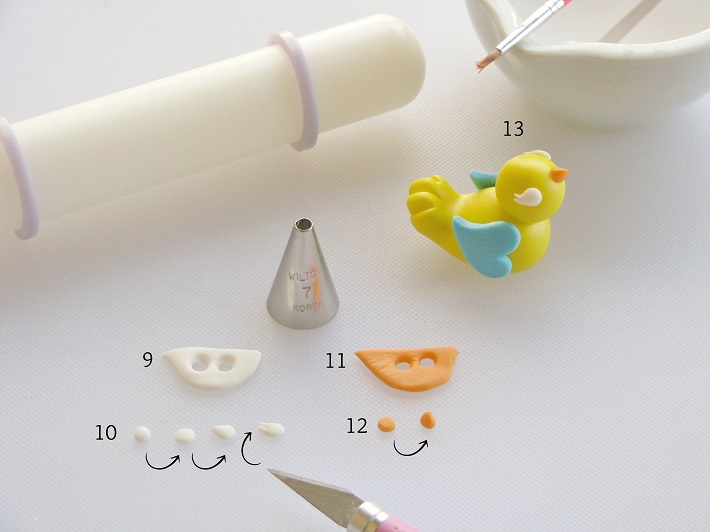
Step 9:
Roll out white fondant with the rolling pin and 1/8″ guide rings. Punch out two circles with round decorating tip #7.
Step 10:
Take one of the white circles and gently press it down with your finger to flatten it out a tiny bit. Then, shape it into a miniature teardrop by pinching one little section.
With the precision knife, make a small slit lengthwise in the center of the pointed tip, then curl them a bit upward to create little eye lashes. Repeat the same steps with the second white circle, making sure you are curling it upward in the opposite direction.
Step 11:
Roll out orange fondant with the rolling pin and 1/8″ guide rings. Cut out two little circles with round decorating tip #6.
Step 12:
Roll the orange circle into a ball, then shape it into a cone shape with your fingers to form the bird’s little beak.
Step 13:
Glue the eyes and the beak to the bird’s head.
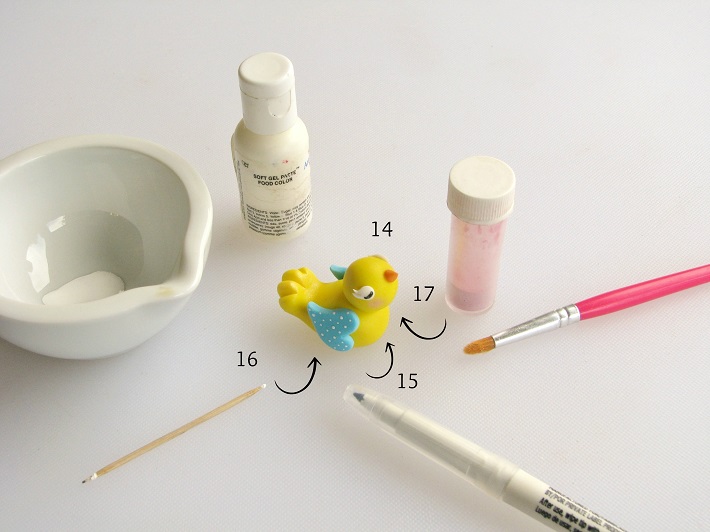
Step 14:
Allow the fondant bird to dry awhile for the next steps. I prefer to wait overnight to allow the fondant to dry enough so that the moisture from painting it doesn’t seep in too quickly and sink into the fondant.
Step 15:
Utilize a black edible marker to draw a curved line on the bird’s eye to create a little closed eyelid. Repeat on the second eye. Be careful not to press too hard so that the pen tip doesn’t sink into the fondant. You can also utilize black gel paste mixed with some clear alcohol (i.e. Vodka) to paint it on with a small, thin brush.
Step 16:
Dip your toothpick in white soft gel paste to make little polka dots on the bird’s wings.
Step 17:
Dip a brush in a little bit of pink shimmer dust and gently brush it on the bird’s cheek in a small circular motion. Repeat with the other cheek. Allow to dry thoroughly.
Share tips, start a discussion or ask one of our experts or other students a question.
No Responses to “A Sweet, Little Cupcake Birdie Told Me Spring Is On Its Way!”