
If you’ve been sewing for yourself for any length of time, you know that sewing a garment from a pattern straight out of the envelope is about as likely to fit as perfectly as grabbing a garment off the rack at the mall. You might get lucky, but more often than not, there will be some fit issues to contend with. Fortunately, there are many resources available on Craftsy to help you resolve any fit issues.
Petite and plus-size
Some body types are more prone to specific fit issues than others. Petite women (like me!), for one, will always struggle with length and proportions when using commercial patterns. One of the most important things to understand in regards to great fit for petites is how to make adjustments without losing the lines of the garment.
Plus sizes are also more likely to have specific fit issues. Correctly measuring the front waist length can be a good start in addressing fit issues. Knowing how to identify a flawed fit for plus sizes is also a step in the right direction for correcting fit issues. Plus size sewists will be interested in Plus-Size Fitting and Design with Barbara Deckert, which covers pattern adjustment, fitting, and construction specifically for plus-size garments.
Know your numbers
Regardless of whether you identify as a specific body type or not, you probably have an area or two that needs special attention when fitting a garment. The first step in this process is to take your measurements. This can go a long way in helping you to account for more difficult fit issues and strategizing a fit plan. Depending on the adjustment needed, you have several options.
Make adjustments
The first is to alter the pattern. This is a good option when you have a situation as I did when sewing my wrap dress. My waist and hip measurements fell into different sizes, but because of the style of the dress, I was able to easily and quickly alter the pattern by creating some small darts. This technique is covered in more detail in Fast Track Fitting with Joi Mahon, which discusses modifying flat pattern pieces.
Another option, which is better for garments with a more tailored fit, is to make a muslin. Once you’ve fit the muslin, you can transfer the adjustments to your pattern before making the final garment (which should then be pretty close to fitting like a glove). For more detailed information on making and fitting a muslin, check out Sew the Perfect Fit with Lynda Maynard.
Finally, minor adjustments (like hems or a sleeve that’s just a hair too long), can usually be addressed after a garment has been constructed.
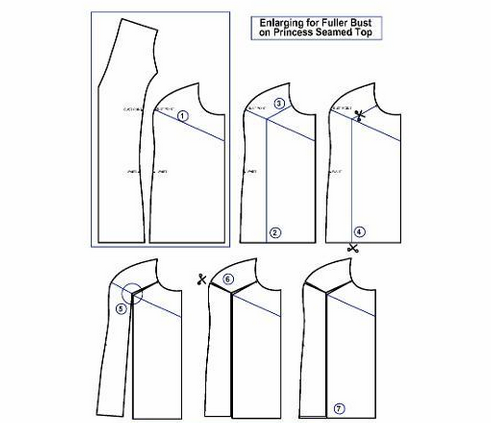
Photo via Kathleen Cheetham
Addressing specific fit issues
Some areas require more attention than others, particularly if a garment is very tailored in that area. If your bust is not proportional to your hips (and it probably isn’t), you will need to make bust adjustments for most patterns. Adjust the Bust with Kathleen Cheetham addresses this issue and shows you how to adjust patterns for any bust size — large or small.
Your torso can also be a tricky area too. Custom Fitting: Back, Neck and Shoulders with Kathleen Cheetham covers tailoring to your torso to achieve proper fit. Darts can definitely be your friend in this instance!
I found bluepringtv and was immediately hooked. Love everything about it. Barbara Garrett