
I like mixing mediums. When it comes to knitting, that can be difficult. Sure, you can mix yarns and gauges, but things can get tricky when you want to mix knitting with other crafts.
Today, we’ll examine two ways to knit directly onto leather.
(Another option for attaching knitting to leather is to knit separately and attach it.) My favorite way to utilize leather fabric in knitting is as a base for bags or cozies.

You will need:
- Something to make small holes in leather, like an awl or screw punch
- A ruler
- A fine point marker or pen
- Small amount of embroidery floss for sewing your side seams
- Yarn
- A yarn needle
- Crochet hook (2.5mm/ US-C, optional)
- Leather [I suggest thin leather, as it is easier to work with. The following methods could be used with other fabric, but I think they are ideal for non-fraying types.]
In both methods, you will end up with chains across the top of your leather to knit into. If you are comfortable with a crochet hook, the first method is one I use for crocheting onto leather, but can easily be used for knitting. If crochet hooks are just not your thing, you can use the second method, which utilizes an easy embroidery stitch, aptly called the chain stitch. I’ve provided some photos for each.
Prepare the leather (both methods)
Your leather piece should be 1/2″ wider than your desired finished size. The height is up to you. There will be a crease across the bottom, opposed to a seam, so the piece of leather you start with should be twice as tall as you want it to be in your finished item plus 1/2″.
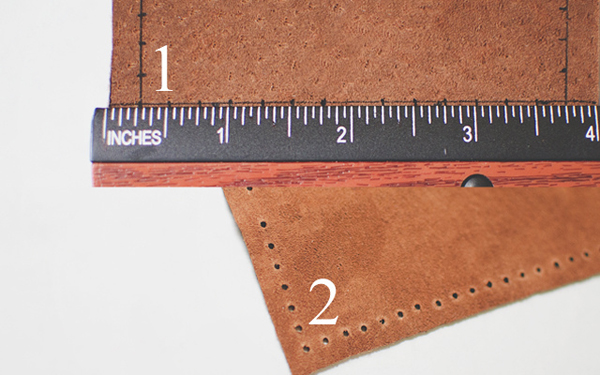
Step 1:
Using a fine-tip marker (or pen, pencil, etc.) and a ruler, mark a stitch line straight across all four sides 1/4″ in from the edge. On these lines, make marks 1/4″ from each other. On the short side, omit the very center mark. (Notice that the two-inch on the ruler is not marked). These marks are where you will be making the holes to stitch the leather together and where you will be placing your stitches to begin knitting.
Step 2:
Make your stitch holes.
My husband said when he worked with leather in the past, they would use a hammer and nail to make the holes. I tried using a thick needle and it made my fingertips raw. I looked up leather punches and almost purchased one online when I remembered a rarely used tool in my crafty arsenal: a screw punch! It’s generally used for making holes in the center of paper, for scrapbooking or book binding.
You could also use an awl, which can be found in a hardware store or even your local craft store.

Step 3:
Fold your leather in half, right sides together. Attach some embroidery floss (or thread of choice) by pulling it through the hole closest to the fold. Leave a 2″ tail and tie a tight knot.
Step 4:
Sew up the small seam, making sure to pull tight. Don’t pull tight enough to warp the fabric, but you also don’t want your stitches to be too visible when you turn it right side out. I stitched up and then back down to the beginning and tied another knot with the beginning tail. Seam up the other short side. Turn right side out.
Add stitches to the edge: the crochet method
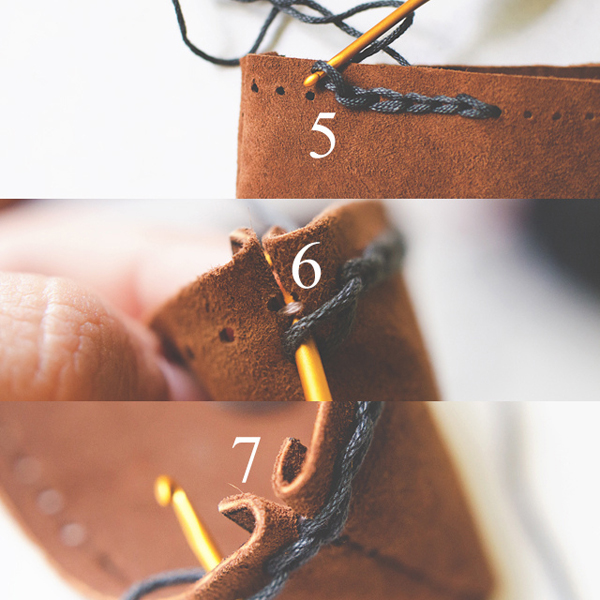
Step 5:
Using a 2.5mm hook and the yarn you plan to make the top out of (I like to use cotton for these, as it’s generally stiffer), pull a loop through a hole along the long edge, leaving a 6″ tail. Slip stitch around. Try to keep your stitches loose, so you don’t warp the fabric.
Step 6:
When you get to the first edge, make a slip stitch into the seam UNDER the first seam-stitch. Fold your seam flat as you work.
Step 7:
Keep going across to the other edge and do the same. When you get back to the very last hole, cut your yarn leaving about 6″ and pull it through. Using a yarn needle, make the last chain stitch through the first, then go back through the last hole again. Tie a knot with beginning tail.
Now your leather base is ready for stitches! Notice how the slip stitches look like the tops of regular crochet stitches? Well, pick up and knit into them. Move on to the “Picking up stitches” section to determine how many stitches you should be knitting up.
Add stitches to the edge: the embroidery method
These are the general steps for the chain stitch. You will need a yarn needle with a head that’s not very much thicker than the rest of the needle. You don’t want to force it through!
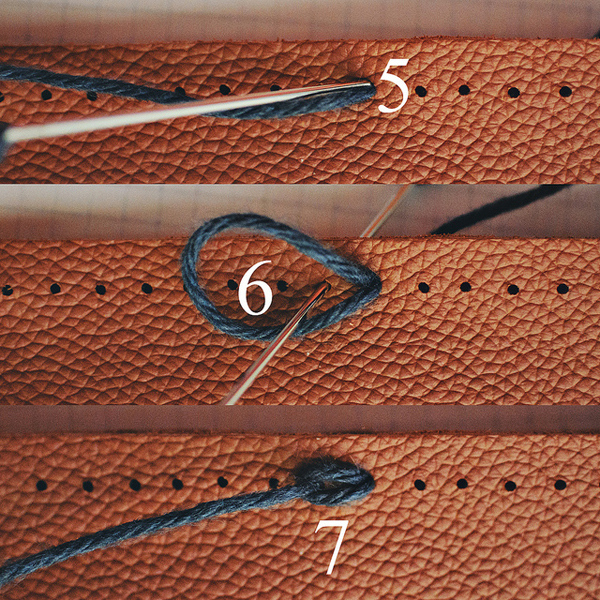
Step 5:
Thread your needle and bring about a yard or so of yarn through the first hole then go back through the SAME hole, but do NOT pull the yarn all the way back through.
Note: The photos show me starting in the center of one of the sides, but I suggest starting at a seam.
Step 6:
Bring the needle back up through the hole to the left and through the little yarn loop left from the first step.
Step 7:
Pull the yarn to tighten the first stitch. Continue making stitches as such until you reach a seam.
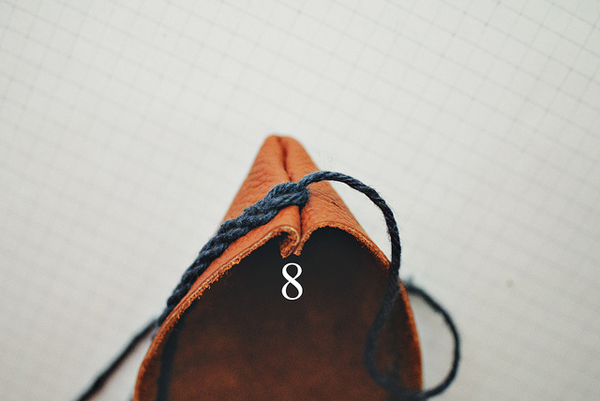
Step 8:
When you get to a seam, come up through the seam, under the top seam stitch. Continue the way you were working until you get back to the first stitch.
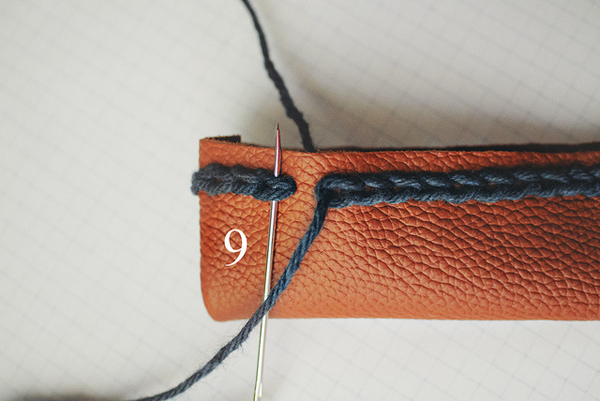
Step 9:
The last chain stitch is made by putting your needle through the first, as shown above. Go through that stitch, then back through the last hole to complete that final chain stitch. Make a knot on the wrong side or leave it loose to weave the yarn in later.
Now you’re ready to pick up your stitches for knitting!
You will need a bit of math for this part, but I will do my best to explain it and hopefully headaches will be kept to a minimum.
When it comes to picking up stitches, you need to pick up enough to go around comfortably.
You will need to know:
- Your gauge in the stitch you want to use (how many stitches per inch or whatever unit you prefer)
- The circumference of your finished product (in the same units you used for gauge)
- How many stitches you need to pick up around the edge (gauge x circumference)
- How many stitches you made around the edge in crochet or embroidery
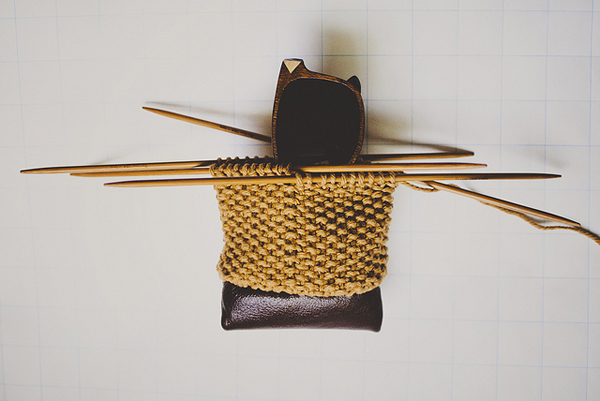
The photo at the top of this tutorial is a case for sunglasses. My seed stitch gauge (in the round, with 4 mm needles and worsted weight cotton) is five stitches per inch. The circumference of my finished object is 8”. This means I will need to work my case on 40 stitches.
I made only 32 stitches around the edge of my leather, so I will need to increase. Fortunately, increasing from 32 to 40 is simple because they are both divisible by eight. 32 / 8 = 4 and 40 / 8 = 5.
This means I am going to have to increase every four stitches to five. I have to pick up and knit four stitches, then yarn over. I repeat this until I get to the end. Then, I work the rest of my project on those 40 stitches and end up with a sweet case for my sunglasses.
Because you made holes every 1/4″, chances are you made four chain stitches per inch on your leather. It should not be too difficult to increase to whatever gauge you knit with. I do suggest working with a tight tension or smaller needles than you are used to, so your knit fabric will not be so stretchy. Have fun with it!
I want to try and utilize this method to knit directly on the hem of a dress or maybe I can finally rework some T-shirts that feel absolutely suffocating in the summer. Can we say lace yoke?
You may also enjoy our post on hand sewing leather techniques.
Did you know Tuesday is Left Handers Day? We’ll be celebrating on the Craftsy Blog with a shout out to Craftsy’s left-handed knitting and crocheting community!
Share tips, start a discussion or ask one of our experts or other students a question.
No Responses to “Two Techniques for Knitting onto Leather”