
When woodworkers talk about the most important tool in their shop, often they will mention a machine, like a table saw, or a hand tool, like a plane. Either way, it’s arguable that the most important tool in any woodworker’s shop is not a hand tool or a machine, but a workbench. If you took away a woodworker’s machine or tool, the woodworker could probably figure out another way to accomplish the task at hand. But without a workbench, it becomes difficult to work on the individual pieces of a project, to assemble the piece, and to apply the finish.
There’s no one perfect workbench for every woodworker. The characteristics of a workbench for someone who uses a lot of machinery is going to be different from a woodworker who uses mainly hand tools. A woodworker who does a lot of detail work, like carving, is going to want a different set up from someone who is building large-scale projects like doors and gates.
In this post, we will look at some of the considerations that go into deciding what type of workbench will be the best fit for the woodworking that you do.
1. Height
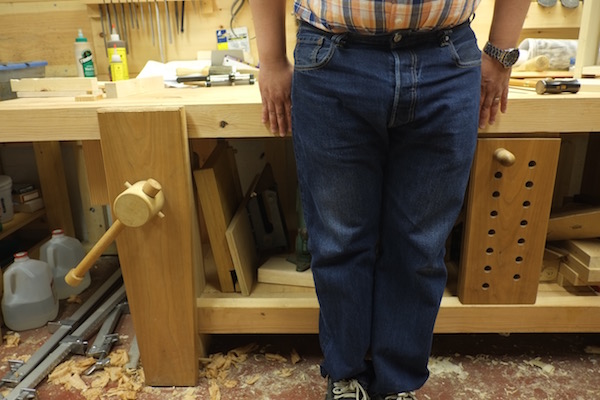
Height is probably the most important characteristic of a workbench. If the other physical properties of a workbench aren’t optimal, that can be worked around. But trying to do work on a bench that is too low or too high is a quick path to being uncomfortable while you work, and it’s not very easy to alter the height of a bench.
If you use a lot of hand tools, your bench should be on the lower side. In fact, if you haven’t worked on a workbench that is set up for hand tool work, seeing such a workbench may strike you as a bench that is too low. The reason this type of workbench is low is that for planing or chopping with chisels, you can get over the top of the workpiece, which makes planing and chopping more efficient. A good rule of thumb is to stand straight, with your arms relaxed and at your sides. The height of the knuckle of your pinky is a good height for this sort of workbench, as seen in the photo above.
Having a low workbench makes detail work like carving more difficult, but you can always make an auxiliary bench to sit on top of your main workbench to raise the workpiece. Or you can get a stool and sit down. If your woodworking primarily requires detail work, such as marquetry or making musical instruments, you may want your workbench to be higher than the pinky knuckle standard mentioned above.
If you use a lot of power tools, you will want a bench that is on the higher side. This will make tasks like using a router, a sander, or a jigsaw more comfortable. You also may want to take the machines and the counters in your workshop into account. If you make your workbench the same height as your tablesaw, you could use the workbench as an outfeed support for longer pieces. Or you may find that having the workbench the same height as your counters to be advantageous.
2. Length

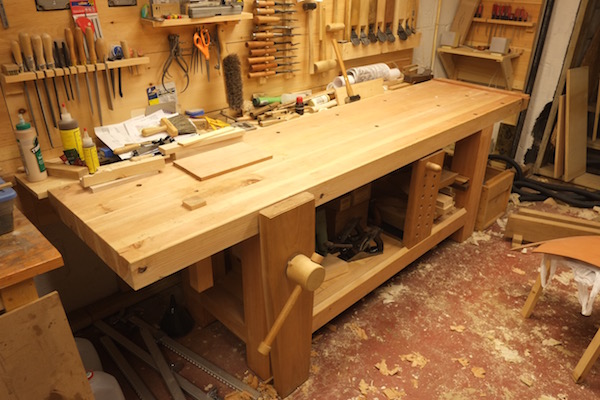
Make your workbench as long as possible, given the space limits of your shop. This is not just so you can work on a post 8 feet long for a four poster bed. This will give you space to put workpieces that you are not immediately working on. My workbench is 8 feet long, and I often wish it was longer.
3. Depth
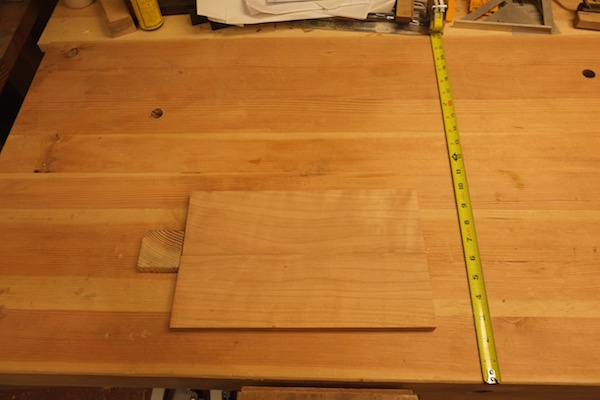
A workbench only needs to be about 24” deep, at most. The vast majority of the work done on a workbench is done in the front 12” or so. The board above is set up for planing, and you can see that the planing can easily be done within 12” of the front of the bench.
In addition, if your workbench is deeper than 24”, you won’t be able to reach across the bench to get something sitting on the opposite side. The only exception to this principle is if you plan on using your workbench as an assembly table, in which case the extra space would have some use. Even so, I would rather keep a large sheet of plywood around that you can place over your bench when assembling a piece. That way you’ll have the extra real estate when you need it, and a more functional workbench when you don’t.
Share tips, start a discussion or ask one of our experts or other students a question.
No Responses to “3 Things You Need to Consider When Designing Your Workbench”