
Carving pumpkins? Tons of fun and certainly time-honored. But there are so many gorgeous ways to doll up the humble gourd, why settle for what you’ve always done? These pumpkin pros broke out the Mod Podge, craft paint, faux pumpkins and even real plants to level up this year’s crop. Get ready for some serious fall feels!
Pretty Painted Pumpkins
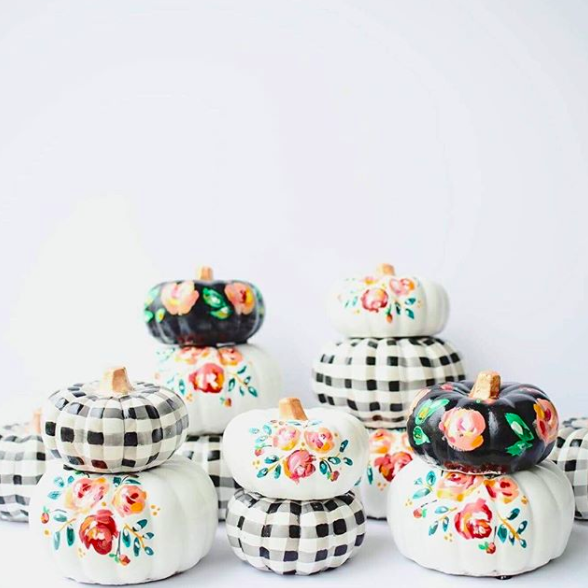
Annie Quigley loves DIYing pumpkins because they make a big splash fall décor. She says, “One decor tip I learned from my mom is to never have anything in your home for the sake of having it. Let everything you decorate with have purpose and meaning,” she says. “These hand-painted pumpkins are most definitely special!”
How to Do It
Even though it looks complicated, Annie says that her gingham and floral pumpkins are a quick DIY project. Start with a base coat on fake or real pumpkins. “Most pumpkins I paint are white, but don’t let that limit you,” she says.
Once the base coat is dry, lightly sketch the artwork onto the pumpkin. Annie used regular craft paint, “the kind you can find in arts and crafts stores.” For the florals, she used a round-tip brush, and for the buffalo-check pattern, she used a flat brush. After painting the designs, she sealed them. She says, “For indoor use, I just use a light layer of matte Mod Podge which is enough to protect it from scratches. For outdoor use, you’ll need an outdoor sealer and layer a few coats for heavier protection.”
Annie’s Tricks
“When painting my florals, I typically use four to five colors per flower and always start with the lightest color first, and then work toward deeper colors,” she says. “At the end, you can go in and add small strokes of white, and this will give you that beautiful contrast you are looking for. When painting a gingham pattern, the trick is to water down your acrylic paint. I would say 60/40 water to paint. This is how you get a more authentic buffalo check feel.”
Ghoulish Gourd
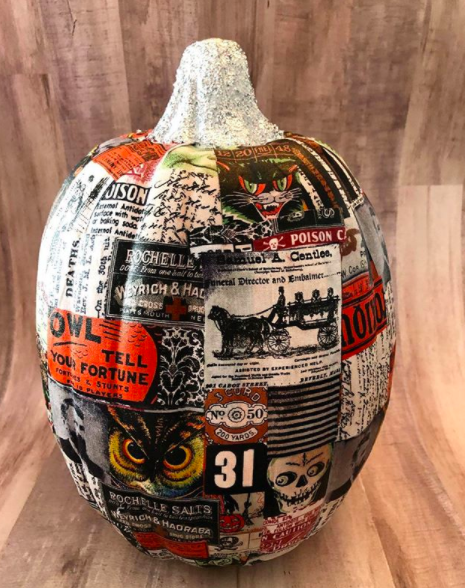
Cathie Filian describes herself as a “maker, mom, and Mod Podger,” and it’s plain to see that’s she’s the queen of decoupage. “I love adding my own twist to store-bought decorations,” she says.
How to Do It
Cathie created this vintage-inspired Halloween pumpkin using printed fabric and Mod Podge — yep, that’s all you need! “First, cut your fabric into square patches. Cover the backs of the fabric pieces with Fabric Mod Podge. Position the pieces onto the pumpkin and press with your fingers to secure. Smooth pieces with your fingers to work the fabric into the grooves of the pumpkin. Continue to add square patches in the same fashion. Overlap the pieces as needed. Once the entire pumpkin is covered, top-coat it with a layer of Fabric Mod Podge. Once it’s dry, glitter the stem by adding a coat of Mod Podge and sprinkling glitter on it.”
Cathie’s Tricks
“Use fabrics that have an all-over printed design,” Cathie recommends. “Striped patterns and images are difficult to line up. And experiment with fabrics. This technique works with cotton, lace, cheesecloth, velvet and even flannel.”
Seasonal Succulents
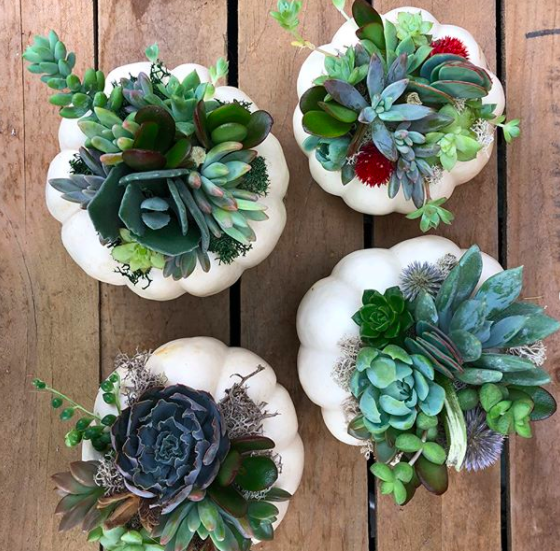
It turns out that pumpkins and succulents go together like fun-size candy bars and trick-or-treating! Leah Gordon discovered the perfect pair while working at her family’s business, Gordon Florist and Greenhouses. Her nickname has become “the succulent and air plant girl.”
How to Do It
First, Leah says to collect an assortment of differently-sized succulents: “a couple larger ones as the main focus, and then lots of little babies to tuck in between.” She looks for a pumpkin that doesn’t have any cracks, holes or yellow spots to ensure it’ll last for a long time. Start with reindeer moss as a base, and attach it with hot glue. Then grab your succulent pieces and arranging them on the pumpkin. “Hold off on gluing until you get a basic design,” she warns. Once you’ve got the design in mind, glue the large succulents first, and then tuck smaller succulent pieces in between, filling in any holes with moss. Once the glue has dried, Leah lightly mists the succulents with a spray bottle and wipes off any excess water.
Leah’s Tricks
“To keep your pumpkins looking fresh, mist the succulents with a spray bottle twice a week and dry off the sides of the pumpkin with a paper towel. To add a personal touch to your pumpkin, you can add small fall decorations like dried flowers, cinnamon sticks, acorns, dried peppers or pinecones,” Leah says.
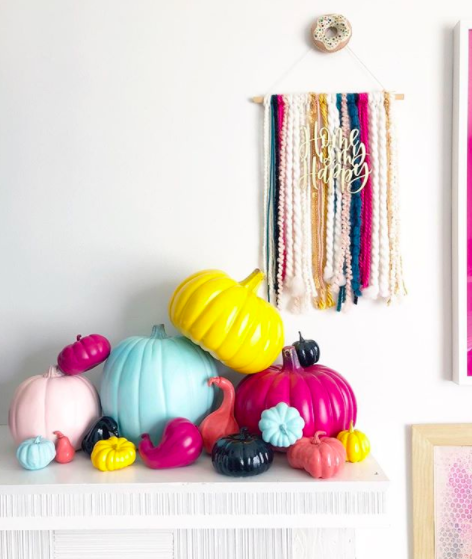
Autumnal Awesomeness
Fall décor doesn’t always have to be orange and black, which Justine Ma proves with her bright, bold pumpkins. A graphic designer and hand letterer, Justine crafted these pumpkins with her four-year-old daughter. “She’s currently loving rainbows, so it was only natural that we create a rainbow pumpkin patch!” she says.
How to Do It
This DIY project couldn’t be easier. Justine says, “We chose our color palette and searched for spray paints at our local craft and hardware stores. We purchased craft pumpkins from Michaels and simply gave them a good coat of spray paint outside on cardboard. Voila! Easy peasy.”
Justine’s Tricks
Go with faux pumpkins, Justine suggests. “Spray paint really adheres well to these without having to use a primer. Allow coats to fully dry before flipping or turning the pumpkins to paint the bottoms or other sides. Allow pumpkins to fully dry before stacking.”
Sparkling Squash
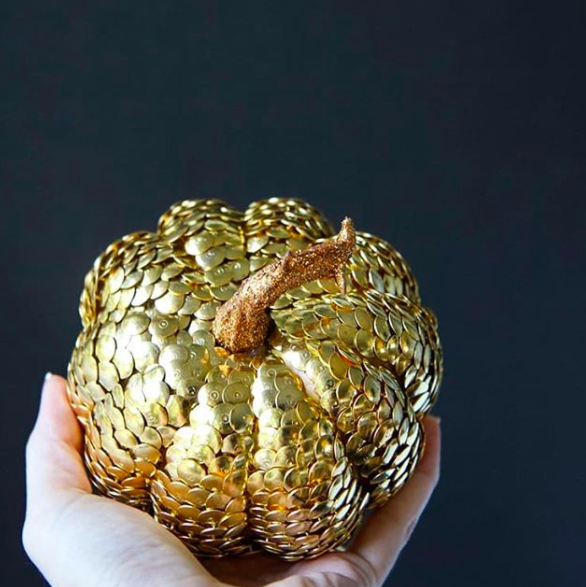
Amy Allen Clark is the founder of MomAdvice.com, and she previously didn’t consider herself to be crafty. She says, “I started doing not-so-crafty projects for our readers over the last ten years. I am finally admitting, I just might have a bit of a crafting gene after designing my own knitted project for a craft line for Joann Fabric. I feel like I have come a long way and half the hurdle was just believing in myself.”
How to Do It
You’ll need a small Styrofoam pumpkin and, oh, about 700 gold or silver thumbtacks. (Don’t worry, you can get them in packs of 300 or so.) “Going along one of the ridges of the pumpkin, begin inserting thumbtacks, starting at the very top and working your way down. You will want to make sure that they overlap just a bit to create a feathered effect on your pumpkin,” Amy says. “Next to that row, begin placing thumbtacks in the same way, repeating this process until you have covered the entire ridge. Once the ridge is filled, fill holes with additional thumbtacks. Begin in the next ridge, just as you did with the first, allowing a little room between those ridges so you can still see pumpkin’s shape.” Repeat until you’ve covered the entire pumpkin.
Amy’s Tricks
Going for a specific color? Spray paint the pumpkins (or the thumb tacks) in your desired colors.
Share tips, start a discussion or ask one of our experts or other students a question.
Already a member? Sign in
No Responses to “Skip the Toothy Grin — Here Are New Ways to Decorate Your Pumpkin”