
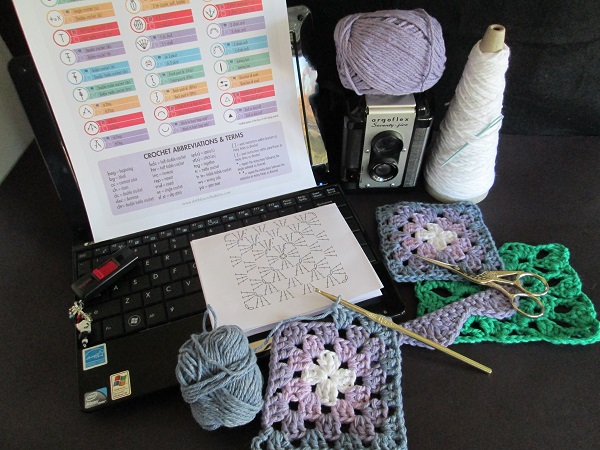
You finally find the perfect crochet pattern. You look at the instructions and there it is, the dreaded diagram — an intimidating jumble of lines and shapes that make no sense at all.
Fear not, my friends. With a few hints and a little practice you’ll be decoding diagrams faster that Tom Hanks in The DaVinci Code!
What are crochet diagrams?
Simply put, a diagram is a chart, a schematic if you will, of a pattern made up of symbols that represent stitches. All you need to break the code is the symbol key — that’s it! And, thankfully, you don’t have to risk life and limb to find it.
In fact, most diagrams (which are also referred to as charts, depending on the designer), include a legend or key to show you what stitches the symbols represent. Once you break the code, you have a tool that opens a whole world of pattern possibilities.
Symbols – the international language of crochet
Diagrams are created using internationally recognized symbols that corresponded to each stitch and instruction. Understanding symbols means that you can crochet in any language!
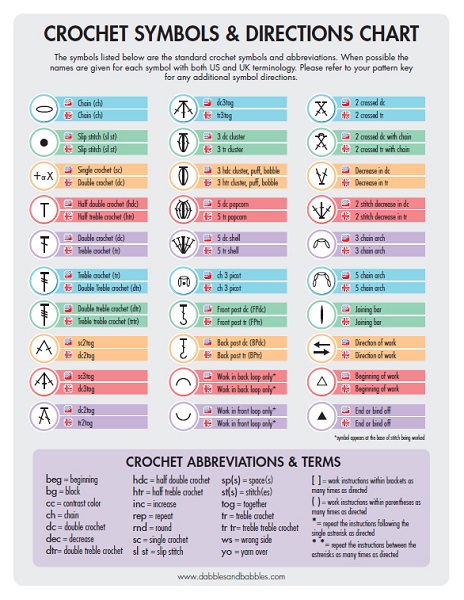
Chart via Dabbles & Babbles
Get the crochet symbols and directions chart here.
This graphic shows some of the most frequently used symbols with both their U.S. and U.K. definitions. If the diagram you’re using doesn’t have a key, a chart like this one will help. This, along with your general knowledge of crochet, should provide all the information you need.
Take a look at the symbols. They kind of look like the stitches, don’t they? The dc symbol has one horizontal bar to show one yarn over, and the tr has two bars for two yarn overs. They give a logical approximation of stitch size, too. The dtr symbol is long and the sc symbol is short, just like the stitches are!
Reading diagrams
Now that the symbols are starting to make sense, let’s take a look at some of the different diagrams you might encounter.
Working in rows
Generally, diagrams are used for edging, borders and for repeating stitch patterns. They are also used to demonstrate what different stitch combinations look like.
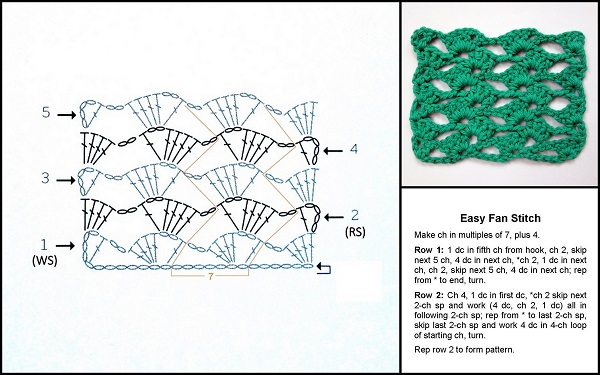
Diagram via Crochet Nirvana
- Diagrams are worked from the bottom up and are designed for right-handed crocheters unless otherwise noted.
- A solid arrow points the beginning direction. After the starting chain, you work in a zigzag motion back and forth up the pattern.
- The right side row (RS) number is placed on the right side of the diagram and you work that line right to left.
- The wrong side row (WS) number is placed on the left side of the diagram and you work that line left to right.
- Stitches should appear in columns so you can see what stitch to work into as you go up the pattern.

Diagram via Crochet Nirvana
- Pattern repeats are shown by either highlighting the stitches or with a bracket under the starting chain indicating the number of stitches. This is important when determining how long to make a starting chain. Don’t forget to add the number of turning (or raising) stitches to your total.
- If written instructions are included, this is shown at the beginning of the pattern as: Multiples of “x” plus “y”. (I thought I’d throw this in because it took me a long time to figure it out!)
• A bracket on the right side of the diagram indicates the number rows in the pattern repeat.
- A chain stitch that “hangs off” the end of the row is not counted. It simply raises the work to the next row.
- You do count a chain stitch that is directly over a stitch at the end of the row.
Working in the round
Motifs of different shapes (circles, octagons, flowers, hearts and even squares) are worked in the round and often shown in diagrams where the symbols represent the stitches.
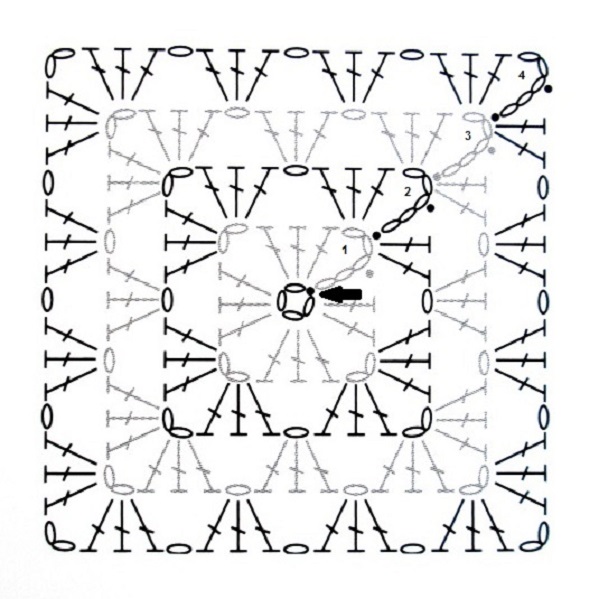
- Identify your starting point (generally the center) and follow the diagram working counterclockwise.
- Do not turn your work, unless the pattern tells you to.
- Rounds may be numbered or designated by alternating colors.
- Diagrams do not tell you if you work into a chain space or into the stitches. Refer to the written pattern if you have one, or on the wealth of knowledge that you have accumulated from previous projects!
Diagram and pattern via Crochet Nirvana
Bringing it all together
Learning to decode crochet diagrams takes practice, but it’s a handy skill to have. Visual learners benefit from the clarity that they bring to patterns. Using a chart in conjunction with the written instructions provides optimal understanding of what the designer wants you to do. Being able to correctly follow the pattern helps ensure that your finished project is going to look fantastic! Remember how long it took you to find the perfect pattern? Now that you’ve broken the code, you’re ready to get started!
first of all, thank you so very much for the crochet symbol and directions chart! it really helped clear up a lot of confusion! I am a first time designer, for a popular Crochet Magazine, and they require that a symbol chart be included with the pattern, and I have never made one before, so you have been a lifesaver in this aspect!
Wondering what the symbol that looks like the number 4 would mean? It is not the number of stitches because it is in multiple places not all with 4 stitches. I got this pattern from the internet and don’t have a book to reference. Any ideas would be greatly appreciated! Thank you