
Have you ever wondered what to do with those small scraps of fabric left over from larger embroidery and sewing projects? One way to use them up is to make bookmarks!
Bookmarks make fantastic gifts for the readers in your life. If you have a birthday celebration looming on the horizon or a graduation gig right around the corner, you can whip up an embroidered bookmark in no time flat and head to the party prepared, with a perfect little gift.
We’ve already talked about how to embroider your own handwriting and we’ve explored pointers on embroidering inspirational or fun quotes.
Now we’ll look at how to make a bookmark that features embroidered handwriting, whether it’s an inspirational quote, a name or just a short message for your favorite reader.
All photos via Needle ‘n Thread
Materials for a hand-embroidered bookmark
For this project, you’ll need a ground fabric for the embroidery; a coordinating backing fabric; light, fusible interfacing; coordinating embroidery threads; parchment paper (the kind used for cooking – it’s sold near aluminum foil and the like); scissors, needles and a hoop or frame.
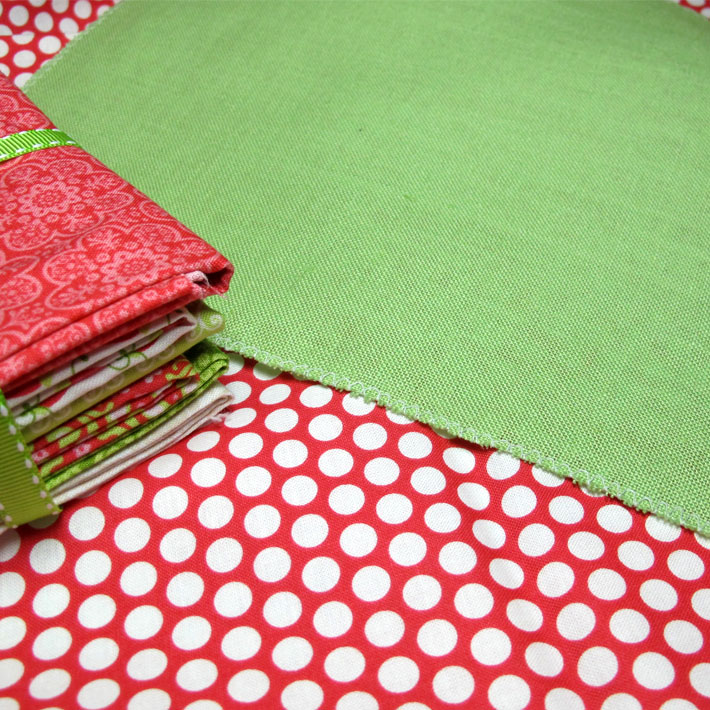
For the sample, I used a medium-weight apple green linen for my ground fabric for the embroidery, and I chose a contrasting fabric for the back of the bookmark.
For interfacing, I used Mistyfuse, which is a paperless, fusible web interfacing. Why Mistyfuse? For three reasons: 1. it provides a good bond and a slight stiffness; 2. there’s no thickness to it; and 3. it’s very easy to stitch through by hand – you hardly know it is there and it doesn’t gum up the needle.
I used regular DMC stranded embroidery floss in two colors, and I opted for a frame rather than a hoop, though both will work just fine.
Setting up the bookmark
Your bookmark can be any size you want it to be — as long as it fits in a standard book.
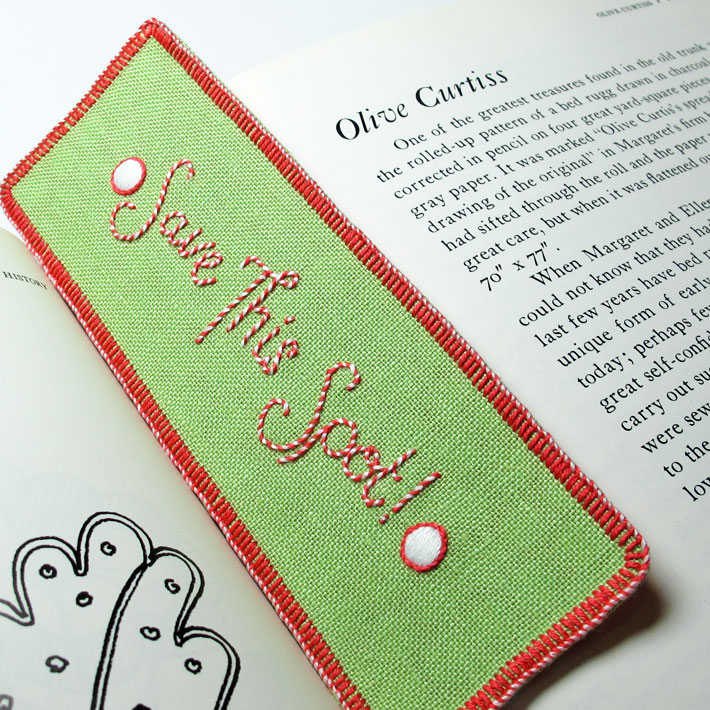
The bookmark in this sample is 2″ x 6″.

Begin by marking the outline of the bookmark on the embroidery ground fabric.
This is one reason why I just love to use linen! Because of its easily visible straight weave, you can mark out straight lines on the fabric by simply holding your pencil at a low angle on the fabric and pulling right along the weave of the fabric. Your pencil will follow the little groove between the fabric threads, and you’ll end up with an outline that is perfectly squared up with the grain of the fabric.
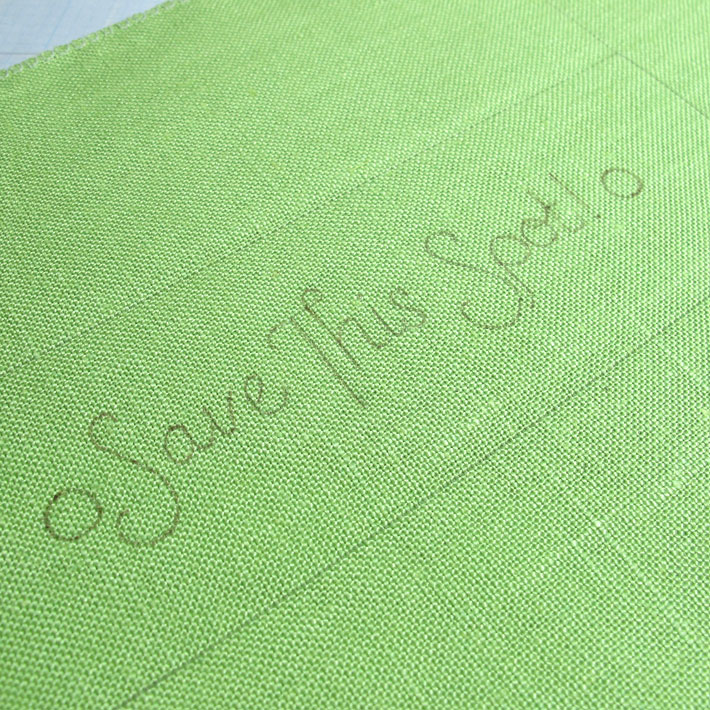
Use your favorite method to transfer your design or words (or both) onto your ground fabric.
A light box or a sunny window will help, if you’re tracing the design. If you’re confident in your drawing or writing skills or you want a design that looks spontaneous, you can draw the design right onto the fabric if you want. In this case, I just wrote my words onto the fabric and drew a couple dots at each end.
Once your design is on the ground fabric, hoop or frame up the fabric so that it’s drum taut, making sure that the fabric is straight and true. If the fabric is warped in the hoop or frame, there’s more of a risk of puckering.
Now you’re ready to stitch!
Embroidering the bookmark
Feel free to refer to my previous article on embroidering your own handwriting, if you’re stitching text. There all kinds of stitch options that work well with lettering, and you can get really creative by mixing up your embroidery stitches on your lettering. Just remember that you want the finished bookmark to be readable, so don’t crowd things too much.
In a small space, I find that embroidery stitches that finish in fine, neat letters work best.
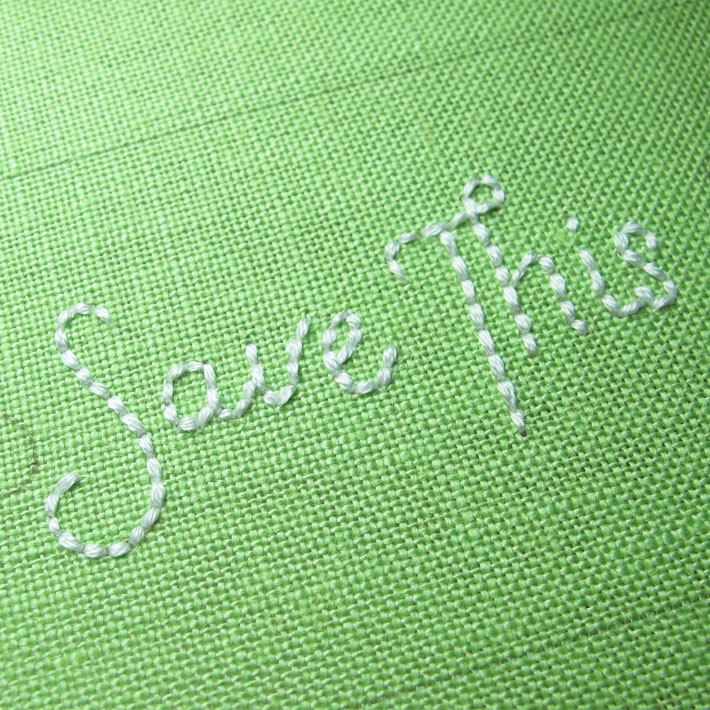
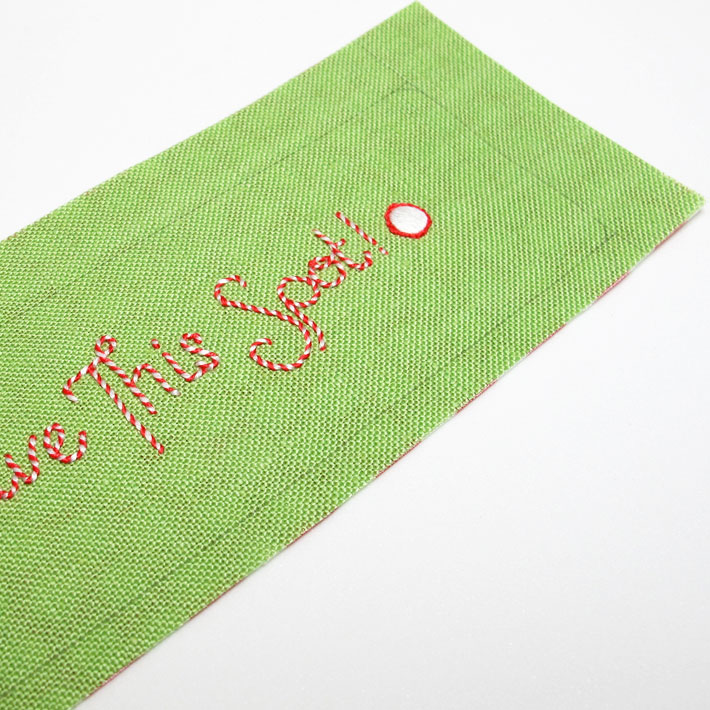
Using three strands of white DMC cotton floss and a #7 crewel needle, I used the backstitch as a foundation for the letters.
When working backstitch, you’ll get a neater result if you’re careful about the stitch length. The more even your backstitches, the better looking the finished result.
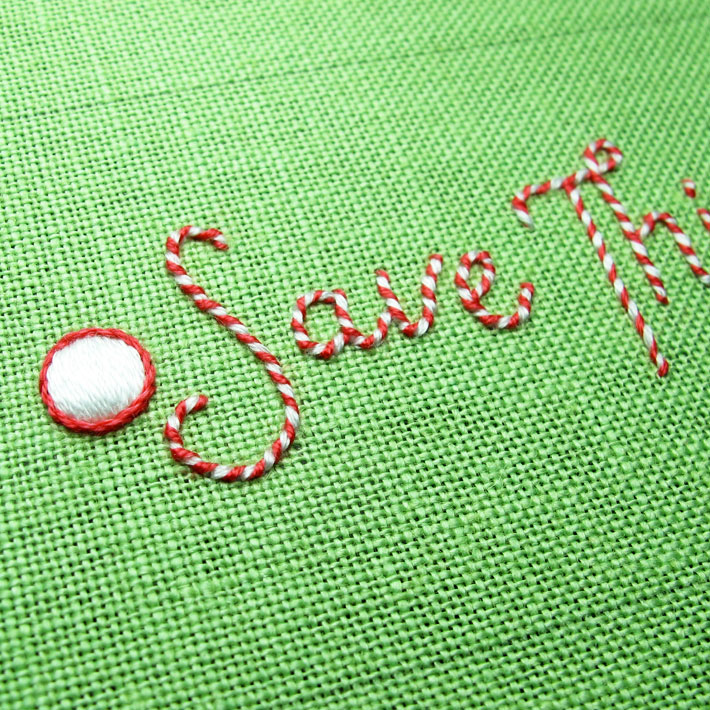
With the white backstitched foundation complete, I switched to a tapestry needle and two strands of DMC floss in a bright watermelon red (to coordinate with the backing fabric), and I whipped the backstitch foundation, which resulted in candy striped letters.
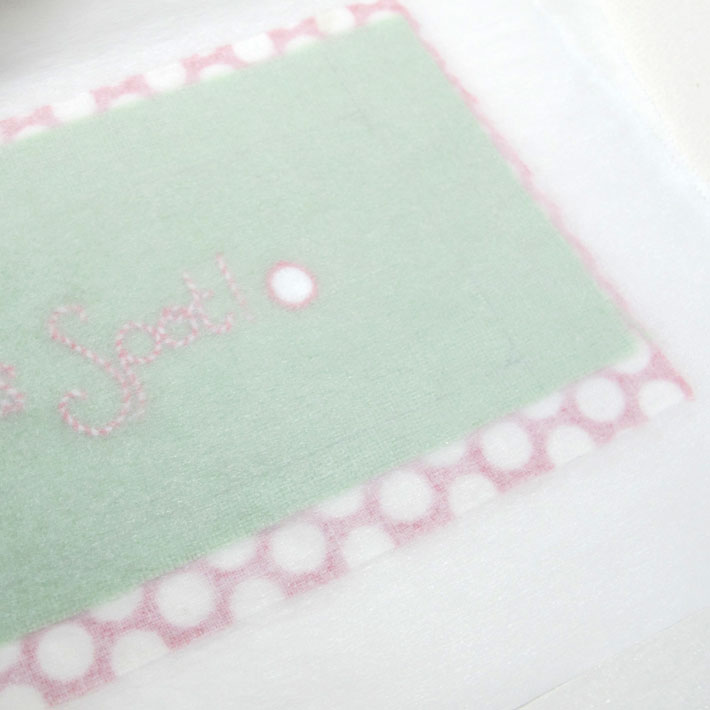
The dots are worked in padded satin stitch in white using one strand of floss, and outlined in watermelon red in stem stitch, using two strands of floss.
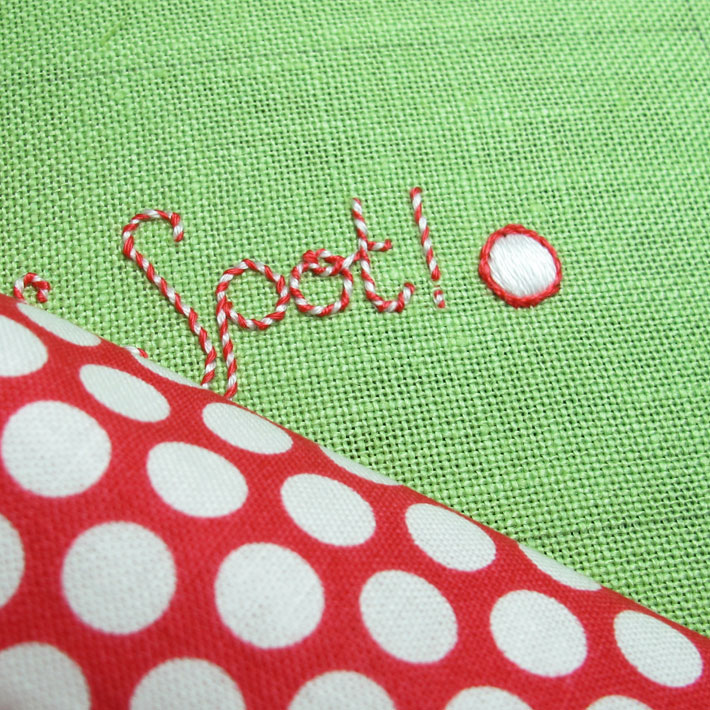
With the embroidery finished, it’s time to take out the backing fabric. In this case, the backing is a cotton spotted fabric, watermelon red with white dots.
Assembling the bookmark
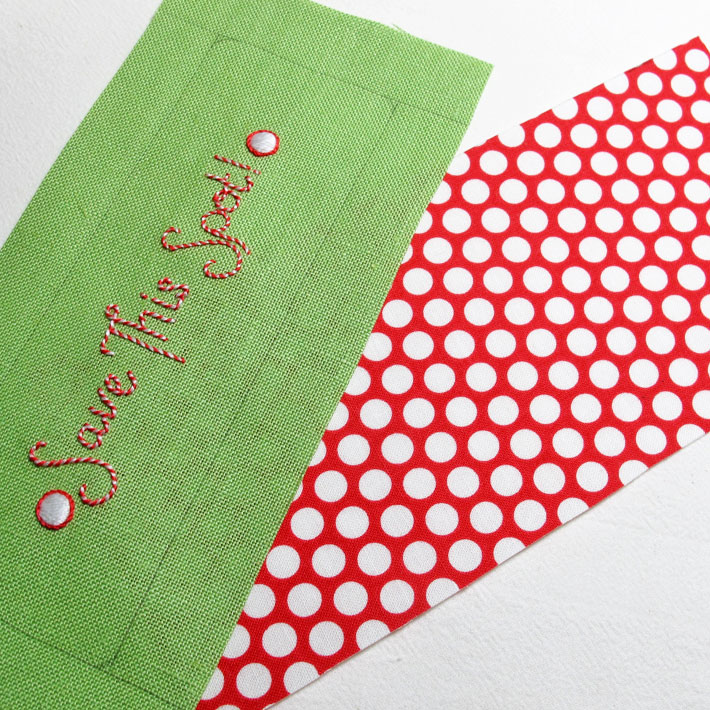
Trim the ground fabric to about half an inch around the outline of the bookmark and cut the backing fabric slightly larger.
Apply the fusible interfacing to the backing fabric
If you’re using a fusible interfacing other than Mistyfuse, it should be the lightest possible fusible interfacing you can find. Follow the manufacturers instructions to bond the two pieces of fabric together.
If you’re using Mistyfuse, cut a piece of the webbing slightly larger than the backing fabric, then lay the backing fabric front-side-down on a piece of parchment paper larger than the backing fabric and the web. Lay the fusible web on top of the back of the backing fabric, and place another piece of parchment paper over the fusible web.
Use a hot, dry iron on top of the parchment paper, pressing until the web is bonded to the fabric.
Allow the paper to cool, turn the parchment sandwich over, and peel the parchment from the front of the backing fabric. The fabric will continue to adhere to the other piece of parchment paper.
Using sharp scissor (for paper), trim the remaining piece of parchment paper right around the backing fabric, and then peel the parchment away. You’ll be left with the backing fabric with a light film of fusible web on the back of it.
Fuse the front and back of the bookmark
Now it’s time to fuse the front and back of the bookmark together.
If you’re using a patterned backing fabric, you’ll want to make sure that the pattern is aligned correctly, so that it is square on the back of the bookmark. With the dotted fabric, I used the dots as my guideline to make sure the front side of the bookmark was lined up.
Place a piece of parchment paper slightly larger than the backing fabric on your ironing board.
Place the backing fabric face down on the parchment paper, with the fusible web side facing upwards.
Place the embroidered front of the bookmark face up, on top of the backing fabric (as shown in the photo above), and top it all with another piece of parchment paper, slightly larger than the backing fabric.
Iron with a hot, dry iron, placing the iron straight down onto the parchment sandwich, holding it for a second or two, lifting up and placing down again in another spot. Once the pieces have been initially adhered, iron the whole parchment sandwich for about ten seconds or so. It’s ok to move the iron back and forth at this point, as long as you do it gently.
Let the paper cool, and then carefully peel away one piece of the parchment.
Trim the parchment and backing fabric to the edge of the front fabric – not to the design line, but just to the edge of the embroidery fabric, so that both pieces of fabric are the same size all around.
Finish the edge
With the ground fabric and the backing fabric bonded together, it’s time to finish the edge of the bookmark.
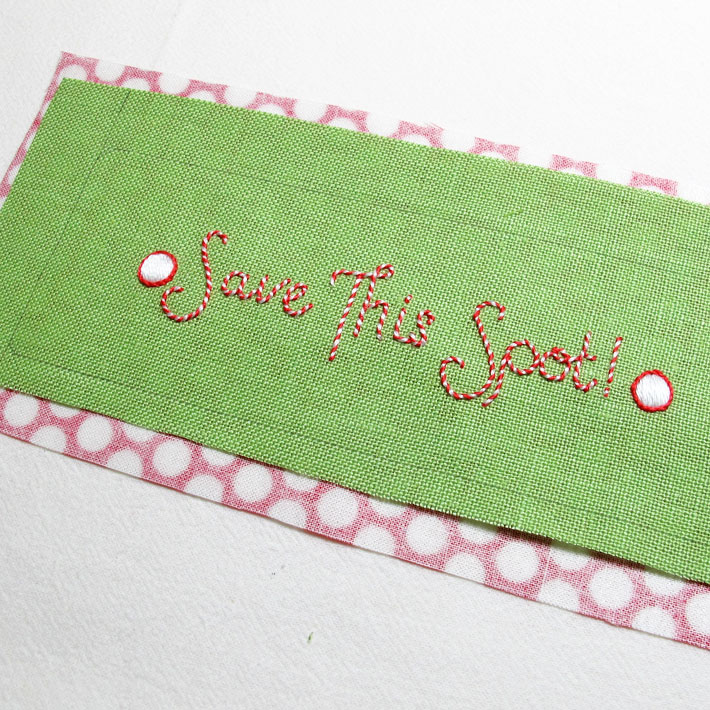
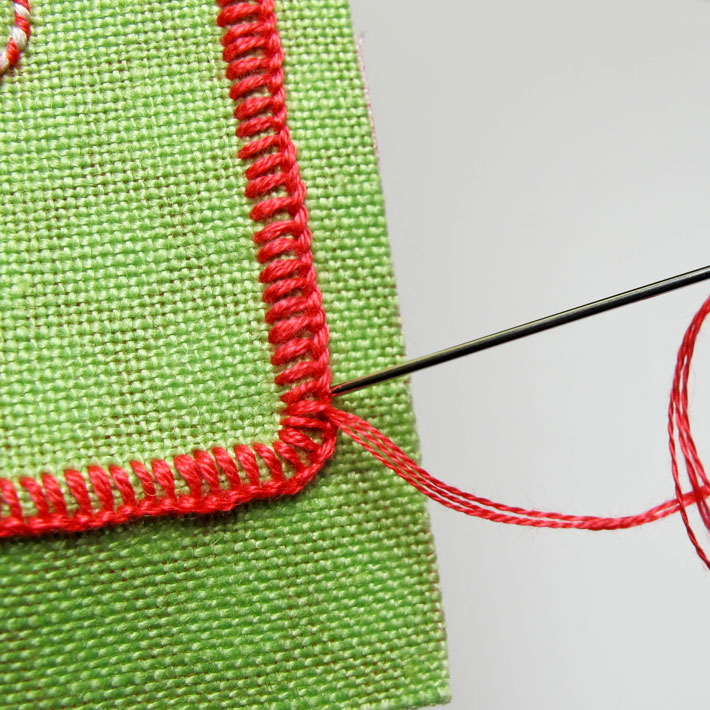
For the edge treatment, I worked a buttonhole stitch all around the outside of the bookmark, using three strands of watermelon red floss. Then I whipped the buttonhole stitch with two strands of white floss.
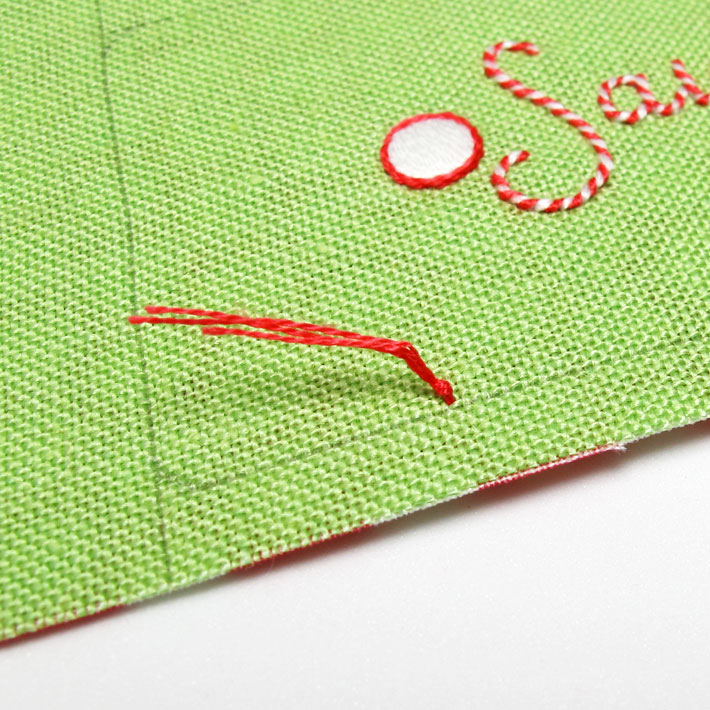
To start the edge treatment — and to avoid using knots — I used a waste knot on top of the design, knotting the end of the thread and taking the needle and thread to the back of the fabric about an inch or so away from where I started the embroidery, and just inside the design line.
You can read more about starting embroidery threads without knots here.
Then I moved down to my starting point and began the buttonhole stitch, working towards the knot.
The twist of the buttonhole stitch is right on the design line, and the stitches are about 1/8″ long.
This is another nice thing about working on linen. If your design is perfectly squared up – if you were careful in the set-up and drew your design line along the fabric grain – you can use the weave of the fabric to help place your stitches. Just follow the line formed by the weave of the fabric to judge the length of each stitch.
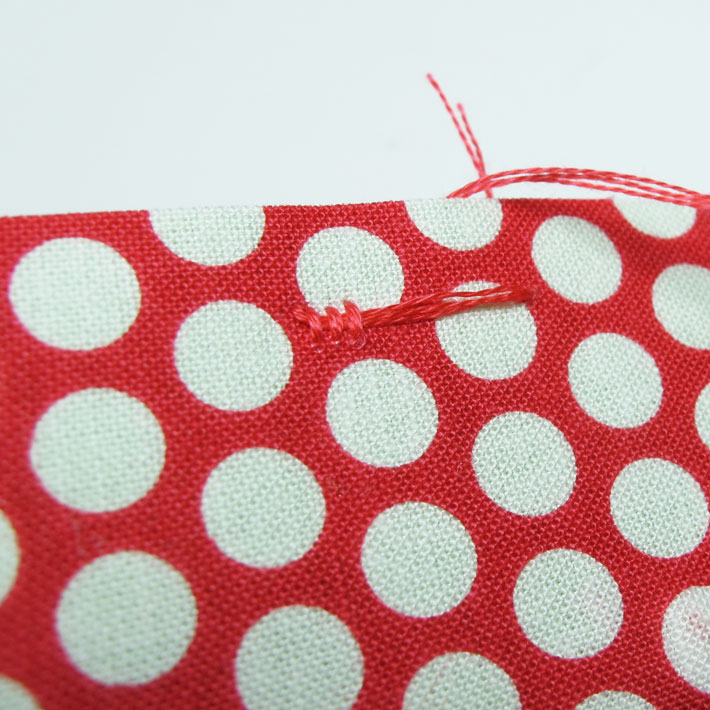
As you work toward the knot, the stitches will cover the thread on the back of the fabric and secure it.
When you get to the knot, just clip it off close to the fabric surface and keep right on stitching!
Changing threads
If you run out of embroidery floss while you’re making your way around the bookmark, never fear! Changing to a new thread is easy!
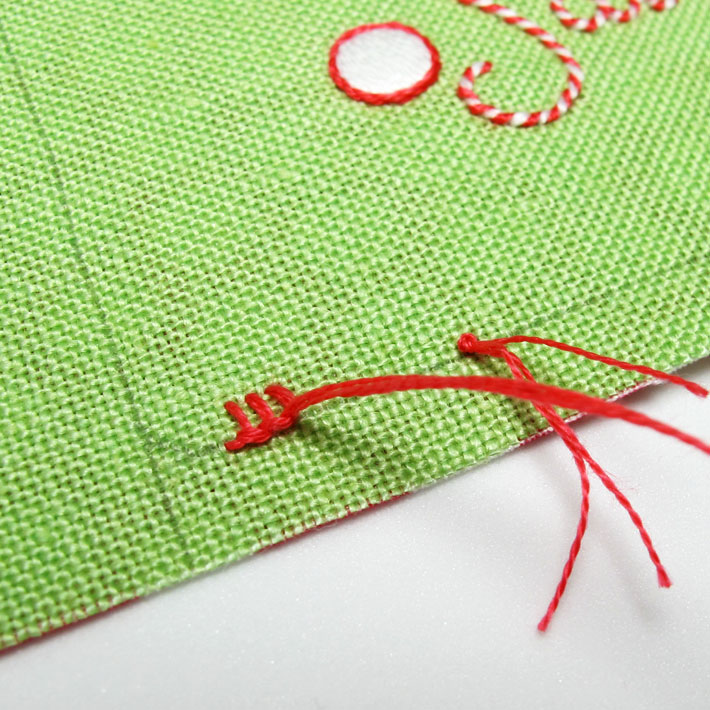
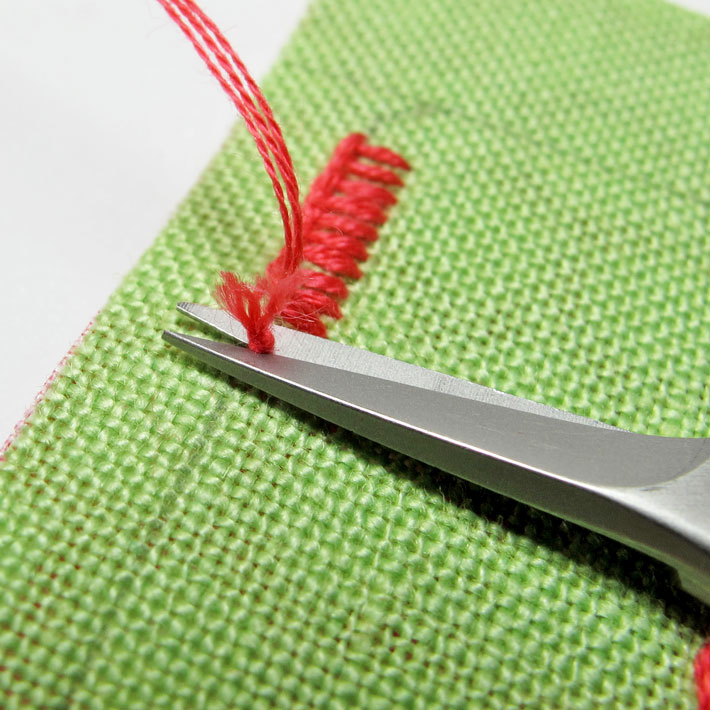
First, you need to end the old thread. To do this, just take a tiny stitch right over the last buttonhole stitch, to anchor it.
On the back of the bookmark, run the needle and thread underneath the backs of the stitches for an inch or so, and trim the floss.
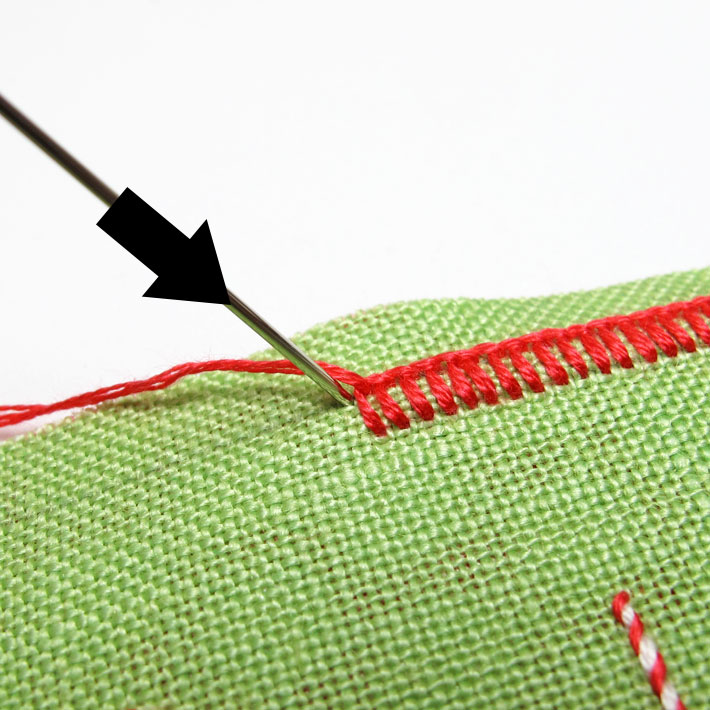
Thread your needle with new floss, and begin with a waste knot as before.
Bring the needle with the new thread up inside the last buttonhole stitch, and continue buttonholing, working the first stitch over that tiny anchor stitch. You’ll cover it right up and the join will be invisible.
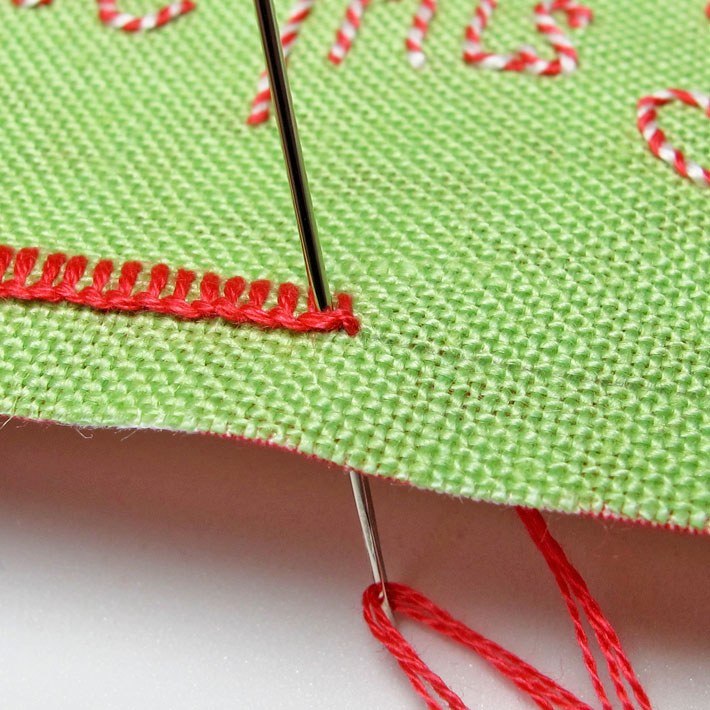
When you make it around the whole perimeter of the bookmark and arrive back where you started, end your thread by taking a small stitch right over your very last buttonhole stitch, and taking that small stitch down into the fabric underneath the very first buttonhole stitch on the edge, as shown in the photo above.

If you want to whip the edge of the buttonhole stitch with a contrasting color, thread up two or three strands of floss (in this case, I used two strands of white floss) into a tapestry needle, and whip the outside twisted edge of the buttonhole stitching, by passing underneath each buttonhole stitch from the same direction, all the way around the bookmark.
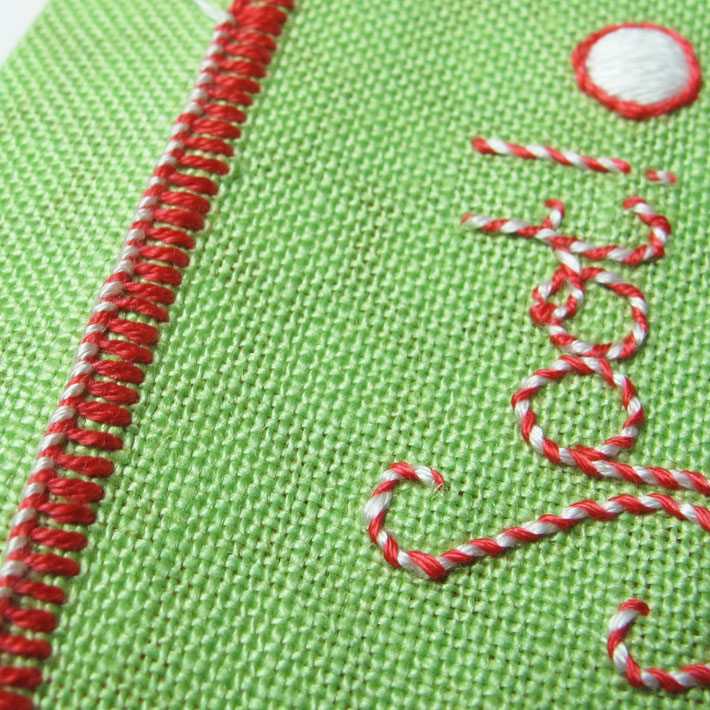
Here’s the whipped edge of the buttonhole stitch, which mimics the striped effect on the lettering.
Trim the edge
The final step in making your own hand-embroidered bookmark is to trim away the excess fabric right around the whole bookmark.
Using small, sharp scissors, trim right under the edge of the buttonhole stitch.
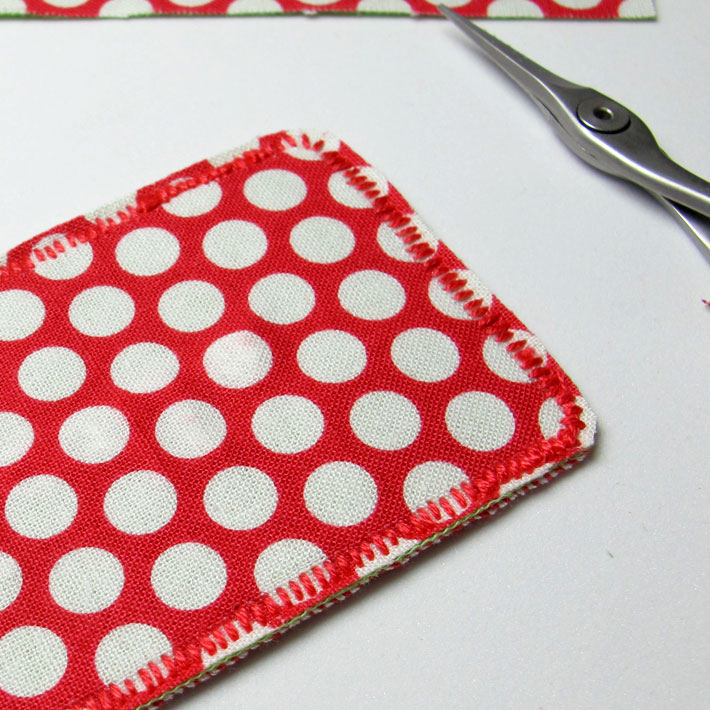
Be aware of the stitches on the back of the fabric as you trim the fabric close. You don’t want to accidentally cut those!
And there’s your finished bookmark!
Thanks to the fusible web, the bookmark is stiff enough — like a bookmark printed on heavy card — but not super thick, so it doesn’t distort the spine of the book. The backing fabric covers up the back of the embroidery and adds a touch of color and a nice finish to the bookmark.
If you have any questions about making this bookmark, add them to the comments below and I’ll be happy to answer them. If you have any of your own tips to share about making hand-embroidered bookmarks, feel free to chime in below, too!
Share tips, start a discussion or ask one of our experts or other students a question.
Already a member? Sign in
No Responses to “Free Tutorial: Quick and Easy Embroidered Bookmarks”