
Have you ever put on a hat or sleeve with ribbing that seemed stretchy enough to fit — but then suddenly you felt an edge as rigid as wire cutting into you? That tight constriction is because the knitter used a cast-on that was not elastic enough to stretch with the ribbing.
The solution? The tubular cast-on.
This tutorial provides step-by-step instructions for a tubular cast-on method using waste yarn for 1×1 rib and 2×2 rib, tips for adapting for knitting in the round and free patterns so you can try out your new technique.
What is the tubular cast-on?
The tubular cast-on gets its name because the first few rows are created with double knitting (two layers of fabric knit simultaneously). This forms a small, unnoticeable “tube” at the edge, which gives the hem elasticity and stability.
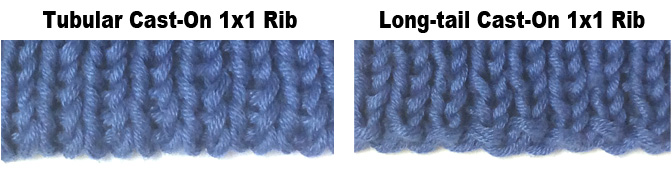
As you can see in the image above, the tubular cast-on has an edge that looks like it is part of the rib. The rib flows right to the edge while the long-tail cast-on binds the rib. This makes the tubular cast-on edge more elastic than the long-tail cast-on.
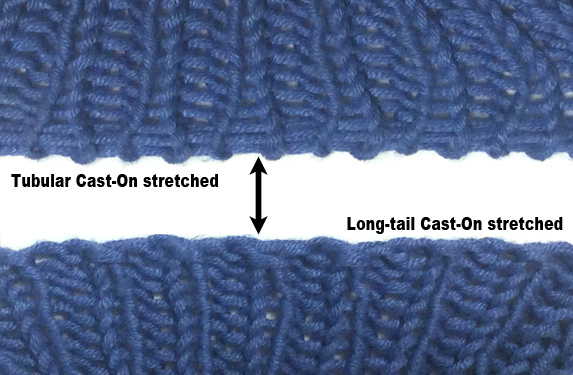
Notice in the comparison above how the tubular cast-on edge stretches out when the rib is pulled, but the long-tail cast-on doesn’t stretch with the rib. The lack of elasticity in regular cast-ons can cause binding in fitted ribbing, such as hat brims, collars, sleeves, and hems.
The waste yarn method
I’ve sampled many of the different methods to create a tubular cast-on, and I prefer the waste yarn tubular cast-on. This technique uses yarn that will be scrapped later. The foundation rows of double knitting are knit on the cast-on in the project yarn. Then the waste yarn cast-on is removed to reveal the tubular elastic edge.
The advantages of the waste yarn method
- You can use your favorite technique for the initial cast-on. Unlike other tubular cast-ons that use special techniques, the cast-on method here doesn’t matter because you’ll remove it after knitting the foundation rows. That means you don’t have to learn a new cast-on technique.
- All you have to know for this method are the basics such as knitting, slipping stitches and yarn over for the foundation rows. No fancy new techniques are required.
- You can cast on to circular needles for knitting in the round with this method. Other tubular methods require that the cast-on and foundation rows be knit on straight needles and then transferred to circular needles.
- You can use up your stash yarn for the waste yarn cast-on.
The biggest challenge is removing the waste yarn, which takes patience and care.
Tubular cast-on tutorial: 1×1 rib
Step 1: Cast on with waste yarn
Select a waste yarn in a contrasting color to your project yarn (so it will be easy to see). The yarn should have a similar gauge to your project yarn and a smooth texture to avoid stray fuzzies when you remove it.
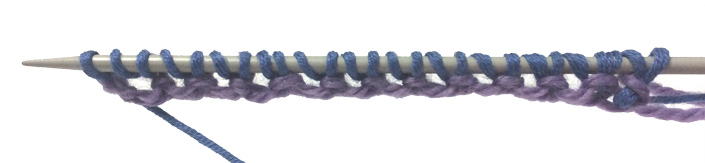
Using the waste yarn, cast on half the number of stitches you need, plus one. Use any cast-on method you prefer. Since it will be removed, the method isn’t important.
In my example below, I want 24 stitches in my final ribbing, so I cast on 13 stitches (12 + 1) using a long-tail cast-on.

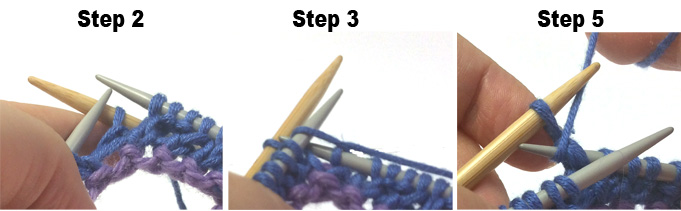
Step 2: Foundation rows
These are the rows that will create the double-knit tube that gives your edge the elasticity.
Switch to your project yarn.
Row 1: *Knit 1, yarn over. Repeat from * to the last stitch, then knit the last stitch.
This row will increase the stitches to the number you need for your pattern. In my example, I increased 13 stitches to 25, so I now have 24 + 1.
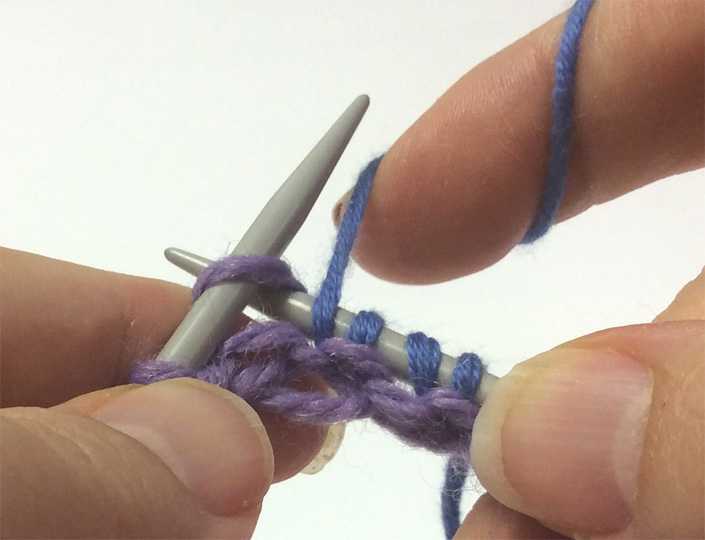
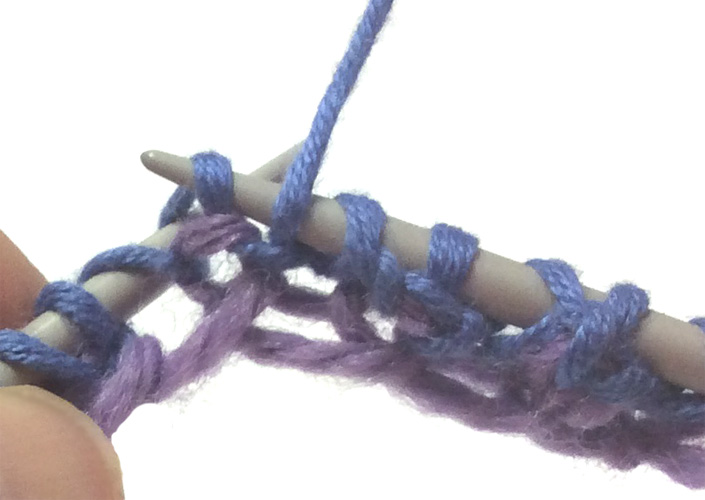
Row 2: *Slip first stitch purlwise with yarn in front. Move yarn to back and knit the yarn over. Repeat from * to last stitch. Slip last stitch.
The photo below shows a stitch being slipped with yarn in front. Note the previous stitch is a knitted yarnover.
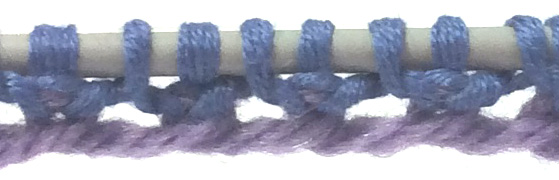
Here is a close-up of the completed Row 2. Note the knitted yarn overs alternating with the slipped purlwise stitches.
Row 3: *Knit with yarn in back, slip 1 purlwise with yarn in front. Repeat from * to last stitch. Knit last stitch.
You may notice that Row 3 is the opposite of Row 2. You are knitting the stitches you slipped in Row 2 and slipping the stitches you knit that appear as purl stitches on this side of the fabric.
Here is what Row 3 looks like when complete. You can begin to see how the edge will form after you remove the waste yarn.

Row 4: *Slip first stitch purlwise with yarn in front. Move yarn to back and knit the next stitch. Repeat from * to last stitch. Slip last stitch.
Note that this is the same as Row 2 except that you aren’t knitting into a yarn over.
Row 5: Repeat Row 3.
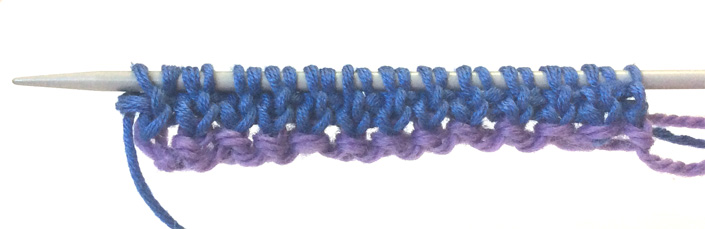
That completes the double knitting! Your work will look something like the picture below.
Step 3: Ribbing
In Row 6, start your 1×1 rib. Remember you are on the reverse side of the fabric. So in my example, my 1×1 rib for Row 6 will be p1, k1 to the final stitch, purl.
What do you do with the extra stitch? You can keep it as selvage or for joining if you are knitting in the round. If you really don’t want it, you can do a decrease of your choice.
Continue with your 1×1 rib until you have completed the ribbing required by your project.
Step 4: Removing the waste yarn
You can remove the waste yarn at any time after you start the ribbing, but I usually wait until I have at least a few rows.
There are two methods I recommend for removing waste yarn: cutting or unraveling the yarn. They both take time, so be patient! Getting impatient at this stage could ruin your hard work.
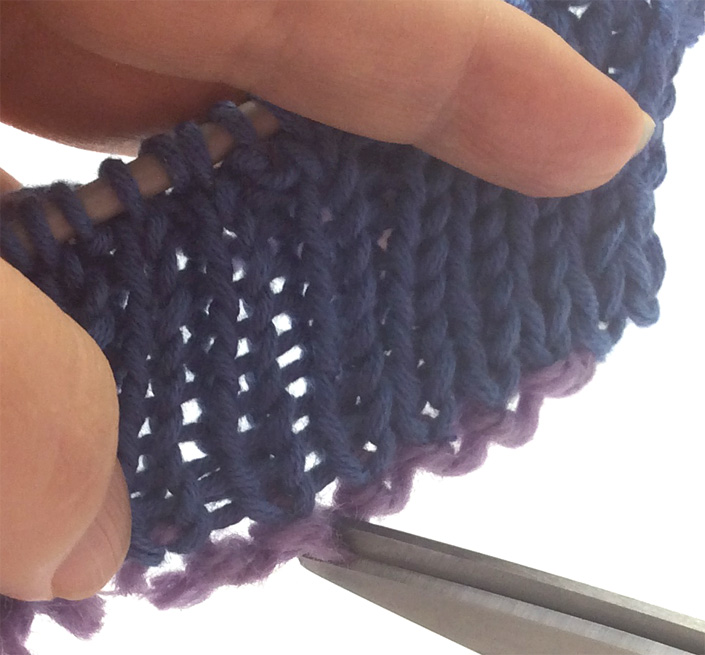
Cutting the waste yarn
First, pull very gently on the cast-on edge so the loops below the yarn overs are safely away from the project rows.
Very carefully snip each cast-on loop below the yarn overs and remove the pieces of waste yarn.
Unraveling the waste yarn
Tease the waste yarn from the cast-on edge by picking at the yarn and pulling the end through the project loops. Note that the yarn will not just unravel like in a provisional cast-on, so don’t pull on it! This type of removal might deform the stitches if you yank too hard.

Tubular cast-on tutorial: 2×2 rib
Casting on for 2×2 is very similar to casting on for 1×1 rib. In fact, you will create the foundation rows in exactly the same way. However, you don’t have to worry about ending up with the wrong ribbing. We are going to work some knitting magic on the last foundation row, making the 1×1 rib into 2×2.
These instructions assume you are starting out with a knit rib and ending with a purl rib. If you are starting out with purl, you will need to adapt the instructions accordingly.
Step 1: Cast on with waste yarn
Follow Step 1 as in the 1×1 tutorial.
Step 2: Foundation Rows
Complete Rows 1 through 4 exactly as in the 1×1 tutorial.
Don’t try to change anything for the 2×2 rib yet or you will wind up with a mess of unraveled stitches (I speak from experience!).
After Row 1, you should have the number of stitches you need in multiples of 4 (for the 2×2 rib) plus 1 stitch. We will address the extra stitch in Row 5.
Row 5: In this row, we’ll be repositioning the stitches for 2×2.
1. Knit the first stitch.
2. Slip the next stitch, a purl stitch, onto a cable or dp needle and hold to back of work.
3. Knit the next stitch from the left needle.
4. Purl the stitch from the cable needle.
5. Purl the next stitch from your left needle.
Continue with these five steps to the last two stitches. Purl the last two stitches together (unless you want the last stitch for the selvage).
You now have your stitches in the correct order for 2×2 rib and have absorbed the extra stitch.
Step 3: Ribbing
Row 6: Start your 2×2 rib and continue according to your pattern. Remember that you are now on the reverse side of the fabric.
Step 4: Removing the waste yarn
Follow the instructions for 1×1 tutorial.
Tubular cast-on in the round
1. Using your waste yarn, cast on to your circular needles. (This will not work with tubular cast-on techniques that require straight needles.)
2. Work your foundation rows with your project yarn, but do NOT join. Knit the foundation rows back and forth on the circular needles as if you were knitting a flat project.
3. Start your ribbing. Slip the first stitch so you can use it for the join and then follow the ribbing pattern by knitting the knit stitches and purling the purl stitches. At the end of the round, join in the first round by purling (or knitting) the last stitch together with the first slipped stitch.
4. When the project is complete, seam the foundation rows before the join.
Thank you for providing these instructions. They are easier to understand and refer to than a 15-minute YouTube video!
I love this as it's the easiest method of tubular cast on to understand that I have come across. I'd almost given up!
This is not the tubular cast-on. It's missing the step where you fold the work over onto itself and stitch the edges together, forming the tube.
I am looking for a stretchy cast off and a stretchy cast on in a middle of a row. Can you recommend a method?
This is my reference for tubular cast on. Of all the ones I looked at including YouTube it was the easiest for me to understand and do successfully.
this is extremely helpful, thank you!