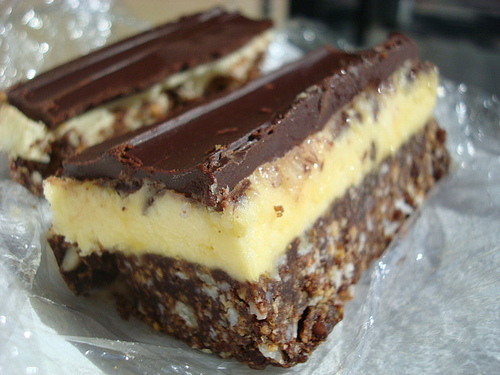
Once you make ’em, they’ll be a part of your go-to Christmas dessert spread. Yeah, these nanaimo bars are that good. These no-bake bars have three layers: the bottom is made from a mixture of graham cracker crust, cocoa and nuts and coconut; the center is buttercream fortified with custard powder; and firm chocolate covers the top. Are you drooling yet?
Good to Know: This dessert is pronounced “nuh-nye-moe,” after a town by the same name in British Columbia from which the bar hails.
Nanaimo Bars
Adapted from the official City of Nanaimo recipe.
Yield: 24 bars
Ingredients
For the Bottom Layer
- ½ cup (1 stick) butter
- ¼ cup sugar
- 5 tablespoons cocoa
- 1 large egg, beaten
- 1 cup shredded sweetened coconut
- 1½ cups (about 20 crackers) finely crumbled graham crackers
- ½ cup finely chopped nuts (almonds are traditional; pecans or walnuts work well, too)
For the Middle Layer
- ½ cup (1 stick) butter
- 2 tablespoons heavy cream
- 2 tablespoons Bird’s Custard Powder
- 2 cups confectioners’ sugar, sifted
For the Top Layer
- 4 ounces chocolate, coarsely chopped
- 1½ tablespoons butter
Good to Know: If you can’t find Bird’s Custard Powder for the middle layer, you can use instant vanilla pudding powder instead.
Instructions
1. Prepare the Bottom Layer
Melt the butter, sugar and cocoa in a double boiler until fully incorporated, but do not let the mixture come to a boil. Add the beaten egg and stir constantly until the mixture begins to thicken, less than 5 minutes.
Remove from heat and stir in the graham cracker crumbs, coconut and nuts. Press down firmly into a greased 8″ x 8″ pan, making the mixture as flat as possible. Let cool for about 20 minutes in the refrigerator.
2. Prepare the Middle Layer
In a stand mixer fitted with the paddle attachment, cream the butter, cream, custard powder and confectioners’ sugar together until very light and fluffy, 3 to 5 minutes. Spread over the bottom layer, taking care to spread it as flat and evenly as possible — it helps if you flatten with an offset spatula.
Return the pan to the refrigerator while you prepare the topping.
Pro Tip: If you like, you can add a flavored extract to this layer for a pop of extra-festive flavor. We recommend adding peppermint extract, or stirring in a tablespoon of peanut butter.
3. Prepare the Top Layer
In a medium saucepan or double boiler, melt the chocolate and butter over medium heat, stirring often to ensure that the mixture doesn’t scorch.
Remove from heat. Let sit until the mixture is still liquid but very thick, then pour it over the second (middle) layer and gently spread it with a spatula to ensure even coverage.
Pro Tip: Work carefully, as the still-warm chocolate will get messy and tear up the middle layer if you press too hard while spreading.
4. Let It Set
Score the tops of the bars before the chocolate totally sets on top. This will make slicing them much easier later.
Good to Know: Typically, Nanaimo bars are sliced in fingers rather than squares. You can slice them any way you like, but for an authentic look, split into eight rows in one direction and six rows the other way, so they’re slightly elongated when sliced.
Let the chocolate set, then place in the refrigerator for at least 20 minutes before serving.
Pro Tip: For easy slicing and serving, run a knife under hot water and dry it off before cutting. This will help it cut through all layers easily.

Share tips, start a discussion or ask one of our experts or other students a question.
Already a member? Sign in
No Responses to “You'll Want to Eat No-Bake Nanaimo Bars All Season Long”