
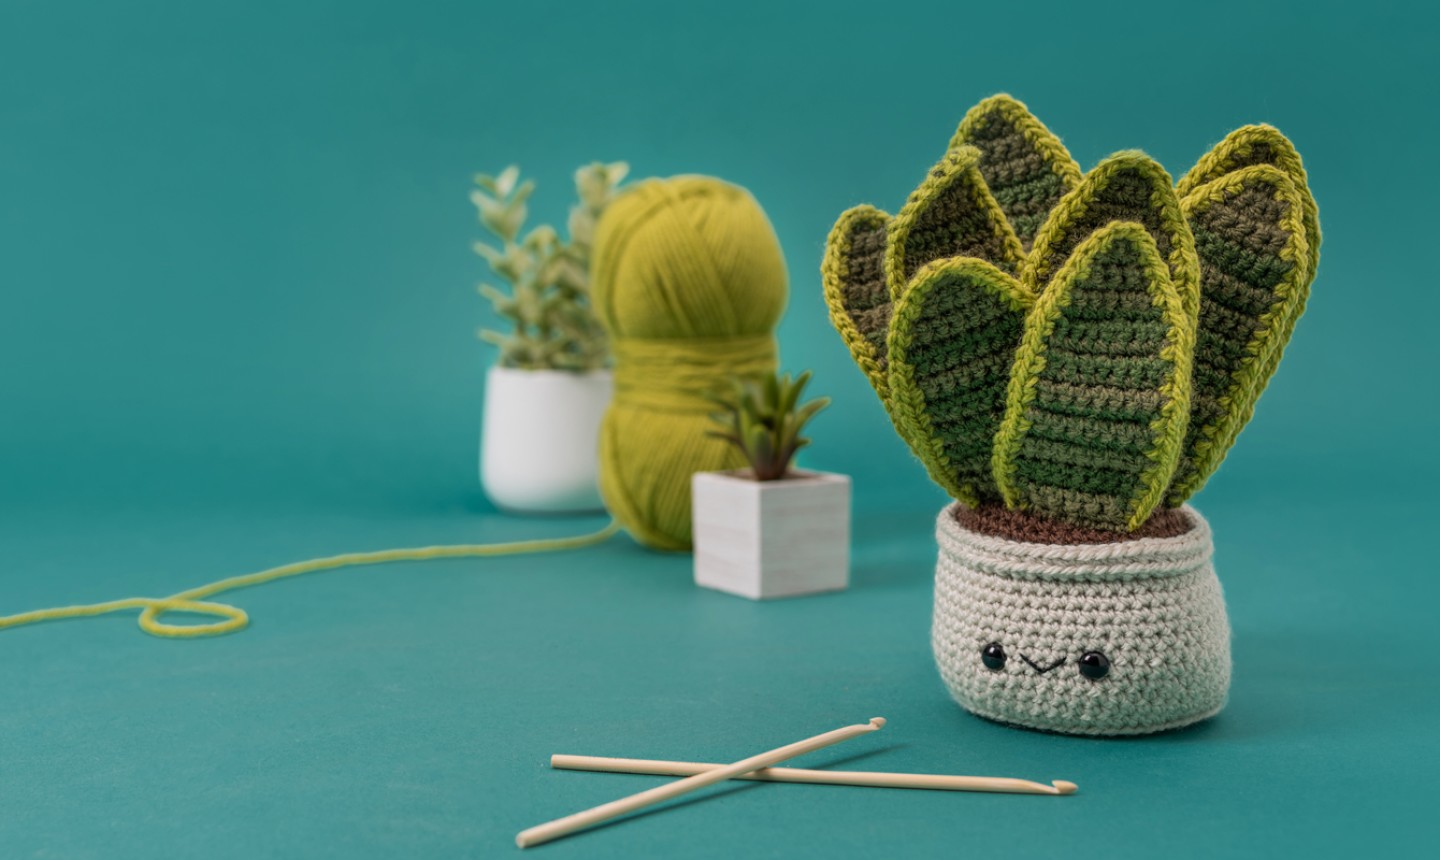
If you dream of being a plant lady but weren’t blessed with a green thumb, say hello to your new BFF: the crochet amigurumi snake plant. This friendly little fella doesn’t care what color your thumbs are, as long as they can hold a crochet hook.
Amigurumi Snake Plant
Pattern by Lauren Espy
Level: Intermediate
Finished Size: About 8″ tall
What You Need
- Worsted weight yarn (we used Sprightly Acrylic Worsted in Olive, Forest Green, Grass, Chocolate and Suede)
- Size F (3.75mm) crochet hook
- Pair of 9mm black safety eyes
- Small amount of embroidery floss and needle (for smile)
- Polyester fiberfill stuffing
- Tapestry needle
- Stitch markers
- Straight pins (optional, but super helpful when attaching the pieces)
- Scissors
- Cardboard (keeps your pot base flat)
Gauge
Gauge is not critical to this project. Just make sure the fabric you’re making is on the tighter side with no holes, so your stuffing doesn’t peek through.
Notes
- The pot and dirt are crocheted in spirals; use a stitch marker to help keep track of where your rounds begin and end.
- The leaves are worked flat in rows.
- The chain 1 at the end of the leaf rows does not count as a stitch.
Abbreviations
- BLO – Back loop only
- Ch – Chain
- Dec – Decrease
- FLO – Front loop only
- Inv dec – Invisible decrease
- Inc – Increase (work 2 sc into the same st)
- Rnd – Round
- Sc – Single crochet
- Sl st – Slip stitch
- St(s) – Stitch(es)
- * – Repeat the directions in between * and * as many times as stated.
- ( ) – The number inside will indicate how many stitches you should have at the end of each round.
Good to Know: To spiff up on crochet abbreviations, here’s a handy guide to all the ones you might see.
Instructions
Make the Pot
With Suade,
Rnd 1: 6 sc in magic ring. (6 sts)
Rnd 2: Inc in each st around. (12 sts)
Rnd 3: *Sc 1, inc* 6 times. (18 sts)
Rnd 4: *Inc, sc 2* 6 times. (24 sts)
Pro Tip: Pay attention to your increases in Rnd 4 and the remaining even rounds: they happen at the beginning of the round to create a more perfect circle.
Rnd 5: *Sc 3, inc* 6 times. (30 sts)
Rnd 6: *Inc, sc 4* 6 times. (36 sts)
Rnd 7: *Sc 5, inc* 6 times. (42 sts)
Rnd 8: *Inc, sc 6* 6 times. (48 sts)
Rnd 9: *Sc 7, inc* 6 times. (54 sts)
Rnd 10: In BLO, sc 54.
Rnds 11 – 20: Sc 54.
Rnd 21: In FLO, sc 54.
Rnd 22: In BLO, sc 54.
Fasten off and weave in the tail.
Add safety eyes between Rounds 14 and 15, leaving 5 sts between the eyes. Embroider a smile in between the eyes.
Cut a circle out of cardboard and place it in the bottom of the pot.
Make the Dirt
With Chocolate,
Rnd 1: 6 sc in magic ring. (6 sts)
Rnd 2: Inc in each st around. (12 sts)
Rnd 3: *Sc 1, inc* 6 times. (18 sts)
Rnd 4: *Inc, sc 2* 6 times. (24 sts)
Rnd 5: *Sc 3, inc* 6 times. (30 sts)
Rnd 6: *Inc, sc 4* 6 times. (36 sts)
Rnd 7: *Sc 5, inc* 6 times. (42 sts)
Rnd 8: *Inc, sc 6* 6 times. (48 sts)
Rnd 9: *Sc 7, inc* 6 times. (54 sts)
Fasten off and leave a long tail for sewing. Set aside.
Make 3 Small Leaves
With Olive ch 2,
Row 1: In 2nd ch from hook, inc. (2 sts) Ch 1 and turn.
Row 2: Inc in each across. (4 sts) Ch 1 and turn.
Row 3: Sc 4. Ch 1 and turn.
Row 4: Inc in 1st st, sc 2, inc in last st. (6 sts) Ch 1 and turn.
Row 5: Sc 6. Ch 1 and turn.
Row 6: Inc in 1st st, sc 4, inc in last st. (8 sts)
Change to Forest Green, ch 1 and turn.
Row 7: Sc 8.
Change to Olive, ch 1 and turn.
Row 8: Sc 8. Ch 1 and turn.
Row 9: Sc 8.
Change to Forest Green, ch 1 and turn.
Row 10: Sc 8. Ch 1 and turn.
Row 11: Sc 8.
Change to Olive, ch 1 and turn.
Row 12: Sc 8.
Change to Forest Green, ch 1 and turn.
Row 13: Sc 8.
Change to Olive, ch 1 and turn.
Row 14: Sc 8.
Change to Forest Green, ch 1 and turn.
Row 15: Sc 8. Ch 1 and turn.
Row 16: Sc 8.
Change to Olive, ch 1 and turn.
Rows 17 – 18: Sc 8. Ch 1 and turn.
Row 19: Dec in the 1st st, sc 4, dec in the last st. (6 sts) Ch 1 and turn.
Row 20: Sc 6.
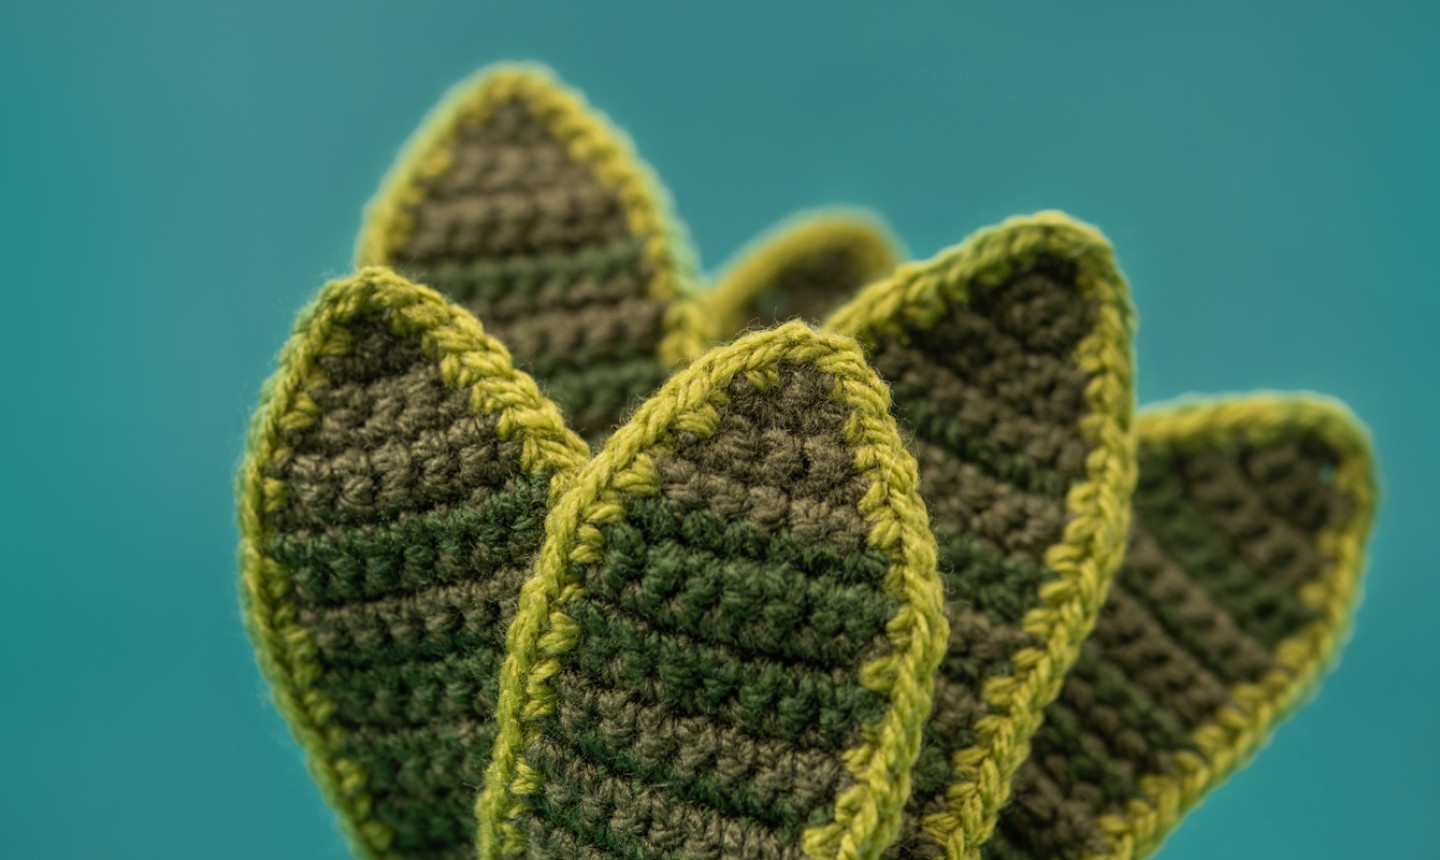
Change to Grass and sc around the edges of the leaf, placing 2 sc in the tip. Do not sc around the bottom. Fasten off the Grass color and weave in tails. Leave a tail for sewing with the Olive yarn.
Make 4 Medium Leaves
Use the pattern for the small leaf through Row 18 and continue with the directions below:
With Olive,
Row 19: Sc 8.
Change to Forest Green, ch 1 and turn.
Row 20: Sc 8.
Change to Olive, ch 1 and turn.
Row 21: Sc 8, ch 1 and turn.
Row 22: Dec in the 1st st, sc 4, dec in the last st. (6 sts) Ch 1 and turn.
Row 23: Sc 6.
Change to Grass and sc around the edges of the leaf, placing 2 sc in the tip. Do not sc around the bottom. Fasten off the Grass color and weave in tails. Leave a tail for sewing with the olive yarn.
Make 3 Large Leaves
Follow the pattern for the medium leaf through Row 21 and continue with the directions below:
With Olive,
Row 22: Sc 8.
Change to Forest Green, ch 1 and turn.
Row 23: Sc 8.
Change to Olive, ch 1 and turn.
Row 24: Sc 8. Ch 1 and turn.
Row 25: Dec in the 1st st, sc 4, dec in the last st. (6 sts) Ch 1 and turn.
Row 26: Sc 6.
Change to Grass and sc around the edges of the leaf, placing 2 sc in the tip. Do not sc around the bottom. Fasten off the Grass color and weave in tails. Leave a tail for sewing with the Olive yarn.

Attach the Leaves
Arrange the leaves on the dirt piece, placing 2 small ones in the front and staggering medium and large ones in different places behind. Leave one of each size for the back, placing the small one last. Remember to stagger them to help make it feel more natural. When you’re happy with your placement, pin the leaves in place, then use the tails you left attached to each leaf to whipstitch them to your dirt.
Put It All Together
To create a clean edge, seam the pot through the unworked back loops from Round 21 to the last round of stitches of the dirt. Add fiberfill before closing the piece fully. Secure your tail inside the pot.
I don't understand, straight pins? I understand that they are necessary. Can we use floral wire instead?
I don't understand how the leaves are supposed to stand straight up??? All mine just flop down onto the dirt.
Thank you for sharing this pattern. I have made one of these for my daughter and god daughter. I crocheted florist wire around the edge of the leaves when doing the lime borders
bonjour comment les feuilles tiennent droite ? Elles se courbent car pas assez rigide.Merci